Bu sürüm, hatalı düzenlemeler içerebilir. En son doğrulanmış bellek kopyası dönün.
Neye ihtiyacın var
-
Bu adım çevrilmemiş. Çevrilmesine yardım edin
-
Using a Phillips #0 screwdriver, remove the two 12.25 mm screws holding the battery cover in place.
-
-
Bu adım çevrilmemiş. Çevrilmesine yardım edin
-
Using the two white straps on the sides of the battery, gently remove the battery.
-
-
Bu adım çevrilmemiş. Çevrilmesine yardım edin
-
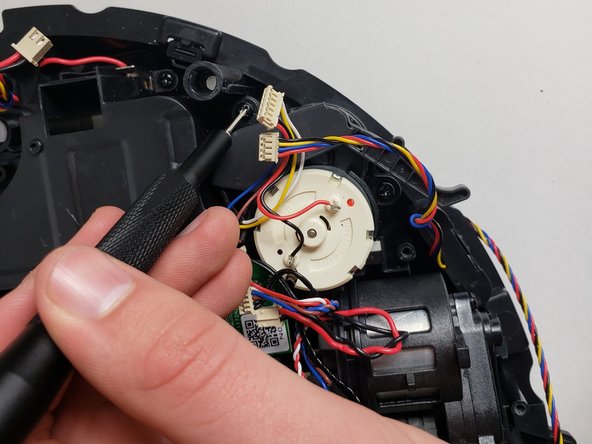
Carefully disconnect the battery cable by pulling near the connector at the bottom of the battery compartment.
-
-
Bu adım çevrilmemiş. Çevrilmesine yardım edin
-
Using a Phillips #00 screwdriver, remove the eight screws on the bottom edge of the bumper.
-
-
-
Bu adım çevrilmemiş. Çevrilmesine yardım edin
-
Carefully lift up the bumper untill it pops out of place.
-
-
Bu adım çevrilmemiş. Çevrilmesine yardım edin
-
Disconnect the two cables connecting the bumper to the body of the Deebot.
-
Remove the front bumper from the device.
-
-
Bu adım çevrilmemiş. Çevrilmesine yardım edin
-
Using a Phillips #00 screwdriver, take out the six screws around the perimeter of the bottom case.
-
-
Bu adım çevrilmemiş. Çevrilmesine yardım edin
-
Insert a Jimmy into the seam and work all the way around the robot.
-
Disconnect the two cables and remove the bottom case from the device.
-
-
Bu adım çevrilmemiş. Çevrilmesine yardım edin
-
Using a Phillips #00 screwdriver, remove the two black screws holding the motherboard in place.
-
-
Bu adım çevrilmemiş. Çevrilmesine yardım edin
-
Carefully remove the ribbon cables connected to the top of motherboard.
-
-
Bu adım çevrilmemiş. Çevrilmesine yardım edin
-
Remove the last three ribbon cables on the underside of the motherboard.
-
-
Bu adım çevrilmemiş. Çevrilmesine yardım edin
-
Lift the motherboard out of the Deebot and remove it from the device.
-
-
Bu adım çevrilmemiş. Çevrilmesine yardım edin
-
Using a screwdriver or tweezers, remove the spring by lifting the spring and pulling it off one side.
-
-
Bu adım çevrilmemiş. Çevrilmesine yardım edin
-
Using a Phillips #00 screwdriver, remove the four screws holding the wheel assembly in place.
-
-
Bu adım çevrilmemiş. Çevrilmesine yardım edin
-
Using the Phillips #00 screwdriver, remove the three screws holding the side brush motor in place and lift the brush motor up.
-
-
Bu adım çevrilmemiş. Çevrilmesine yardım edin
-
Lift up and remove the wheel assembly and the attached sensor (black cable).
-


İptal et: Bu kılavuzu tamamlamadım.
6 farklı kişi bu kılavuzu tamamladı.

Ekip

Embry-Riddle Aeronautical University, Team S6-G1, Rauch Spring 2020 Embry-Riddle Aeronautical University, Team S6-G1, Rauch Spring 2020 üyesi
ERAU-RAUCH-S20S6G1
3 Üyeler
17 adet Kılavuz yazıldı
6 Yorum
Thanks, it helps a lot
I have an OZMO 930 that the left driver wheel is stuck. I tried to follow the above instruction, but I can’t go beyond step 10, I can’t take out the cover. Any help will be greatly appreciated,
do you have place to buy ecovac_deebot_900_54_gear ?? I thinking on printing it but after my printed gear to papper shreder I have no hopes it will last.