Ana içeriğe geç

Epson Powerlite S4 Front Adjustable Foot Replacement

Neye ihtiyacın var

  1. Epson Powerlite S4 Front Adjustable Foot Replacement, Motherboard: adım 1, 1 resimden 1.
    • Press the power button located on top of the projector.

    • Remember to let the projector cool off completely after turning off the power before beginning the repair.

  2. Epson Powerlite S4 Front Adjustable Foot Replacement: adım 2, 2 resimden 1. Epson Powerlite S4 Front Adjustable Foot Replacement: adım 2, 2 resimden 2.
    • Using the Phillips #1 screwdriver, loosen the single captive screw on the right side of the projector.

    • The captive screw will loosen, but it cannot be fully removed.

    • Slide the panel off and remove it from the device.

  3. Epson Powerlite S4 Front Adjustable Foot Replacement: adım 3, 2 resimden 1. Epson Powerlite S4 Front Adjustable Foot Replacement: adım 3, 2 resimden 2.
    • Remove seven black 10 mm screws from the bottom of the device using a Phillips #1 screwdriver.

    • You may need to use a screwdriver extender to reach the seven screws.

    • Remove three smaller silver screws using a Phillips #1 screwdriver.

  4. Epson Powerlite S4 Front Adjustable Foot Replacement: adım 4, 3 resimden 1. Epson Powerlite S4 Front Adjustable Foot Replacement: adım 4, 3 resimden 2. Epson Powerlite S4 Front Adjustable Foot Replacement: adım 4, 3 resimden 3.
    • Turn the projector so the power button is on top.

    • Gently pull up the cover until it pops off.

    • Do not pull too far; a ribbon cable still connects the top cover to the motherboard.

    • Disconnect the ribbon cable that attaches the cover to the motherboard.

    • Remove the cover and place to the side.

  5. Epson Powerlite S4 Front Adjustable Foot Replacement: adım 5, 1 resimden 1.
    • Remove the three screws holding down the motherboard using a Phillips #1 screwdriver.

  6. Epson Powerlite S4 Front Adjustable Foot Replacement: adım 6, 1 resimden 1.
    • Ensure that the two large cable cords located in the center are disconnected.

  7. Epson Powerlite S4 Front Adjustable Foot Replacement: adım 7, 1 resimden 1.
    • Remove the nine cables that are running to the motherboard by pulling them up out of their sockets.

    • You may need a spudger or a plastic opening tool to disconnect all of the wires connected to the motherboard.

  8. Epson Powerlite S4 Front Adjustable Foot Replacement: adım 8, 1 resimden 1.
    • Carefully lift the motherboard from the edges.

    • Remove from base and set aside.

  9. Epson Powerlite S4 Front Adjustable Foot Replacement, Front Adjustable Foot: adım 9, 2 resimden 1. Epson Powerlite S4 Front Adjustable Foot Replacement, Front Adjustable Foot: adım 9, 2 resimden 2.
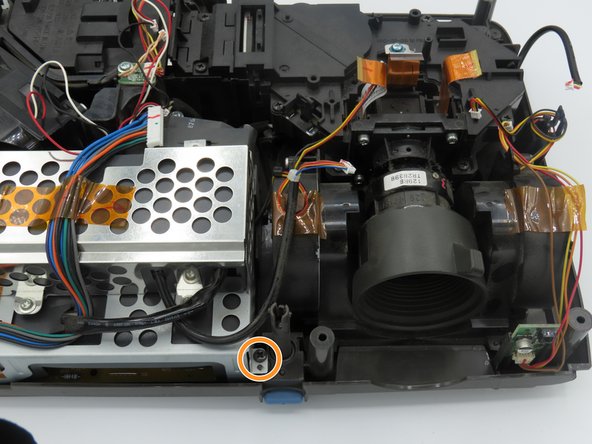
    • To the left of the lens, you'll find the adjustable foot.

    • Remove the screw to the left of the adjustable foot using a Phillips #0 screwdriver.

    • Lift up the adjustable foot to remove it from the projector.

Sonuç

To reassemble your device, follow these instructions in reverse order.

Claire Garland

Üyelik tarihi: 02/21/23

229 İtibar

2 adet Kılavuz yazıldı

0 Yorum

Yorum Ekle

İstatistikleri Görüntüle:

Son 24 Saat: 0

Son 7 gün: 1

Son 30 gün: 6

Her zaman: 92