Giriş
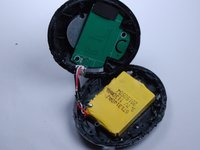
The camera stand battery is an important piece of this product. If your stand will not charge this guide will help.
Neye ihtiyacın var
-
-
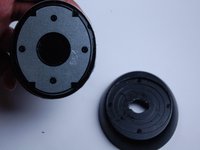
Unscrew the four screws on the bottom of the stand with a J00 screwdriver.
-
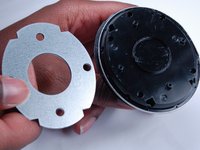
Use a plastic opening tool to pry open the bottom of the stand.
-
If having a hard time separating the two pieces use the iOpener tool to soften the adhesive under the panel.
-
Heat up for 30 seconds. Once it is hot place around the stand to loosen the glue.
-
-


To reassemble your device, follow these instructions in reverse order.
To reassemble your device, follow these instructions in reverse order.
Ekip

Texas Tech, Team S13-G2, Bennett Spring 2017 Texas Tech, Team S13-G2, Bennett Spring 2017 üyesi
TTU-BENNETT-S17S13G2
3 Üyeler
6 adet Kılavuz yazıldı
2Kılavuz Yorumları
A couple of suggestions which are;
1) You do not and should not pry off the bottom (the piece with decal with the QR code and the product info such as the model #). Just use a quarter in the slot and turn counter clockwise and the bottom cover will fall of.
2) After removing the bottom cover and removing the 4 screws, prying off the bottom base (the part below the silver ring about 0.5” above the bottom of the base) should NOT be done by prying from the hole in the bottom center. Doing it this way will just damage the plastic base and is difficult. The way to remove the bottom part of the base is to use a utility knife (razor blade inside the handle), drag it through the seam immediately below the silver trim piece all of the way around a couple of times twisting the utility knife a little to pry off and then use a flat screw drive to finish prying the bottom base piece off of the main unit. Doing it this way takes about 30 seconds, does not damage the base and permits you to reassemble when finished.
Suggestions continued - opening up the battery compartment.
3) Now repeat step 2 (previous comment) on the top side of the silver trim piece to open up the battery compartment. Note that the razor blade really only needs to be used to pry open the the pieces enough to insert a small flat screwdriver to pop open the platics pieces.
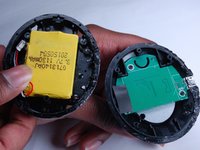
4) The battery is attached to the inside of the case with double sided tape. Just pry the battery gently using a plastic tool (metal tool could damage) working your way around the battery rather than just trying to pry the battery off with 1 large prying motion from 1 place on the battery.