Ana içeriğe geç

Fellowes Laminator Jupiter CRC 57018 heating

Neye ihtiyacın var

  1. Fellowes Laminator Jupiter CRC 57018 heating, Opening the cover.: adım 1, 2 resimden 1. Fellowes Laminator Jupiter CRC 57018 heating, Opening the cover.: adım 1, 2 resimden 2.
    • Opening the cover : push buttons on the left and right side. The right side has a coil to prevent opening under power and can get stuck.

  2. Fellowes Laminator Jupiter CRC 57018 heating, Cover removal: adım 2, 1 resimden 1.
    • remove the 4 flat and 2 screws.

  3. Fellowes Laminator Jupiter CRC 57018 heating, Remove key panel: adım 3, 2 resimden 1. Fellowes Laminator Jupiter CRC 57018 heating, Remove key panel: adım 3, 2 resimden 2.
    • Gently remove glued key panel

    • Remove 4 little screws behind the bottom of the panel

  4. Fellowes Laminator Jupiter CRC 57018 heating, Remove inside cover (upside): adım 4, 3 resimden 1. Fellowes Laminator Jupiter CRC 57018 heating, Remove inside cover (upside): adım 4, 3 resimden 2. Fellowes Laminator Jupiter CRC 57018 heating, Remove inside cover (upside): adım 4, 3 resimden 3.
    • Remove screws upper side (some markers may be missing)

  5. Fellowes Laminator Jupiter CRC 57018 heating, Remove inside cover(bottom side): adım 5, 3 resimden 1. Fellowes Laminator Jupiter CRC 57018 heating, Remove inside cover(bottom side): adım 5, 3 resimden 2. Fellowes Laminator Jupiter CRC 57018 heating, Remove inside cover(bottom side): adım 5, 3 resimden 3.
    • Turn laminator upside down and remove 6 bottom screws

    • When all screws are removed the inside cover can be lifted up

    • Remove the panels with led in front of the orange roll (sorry no picture).

  6. Fellowes Laminator Jupiter CRC 57018 heating, Test Heating resistors: adım 6, 3 resimden 1. Fellowes Laminator Jupiter CRC 57018 heating, Test Heating resistors: adım 6, 3 resimden 2. Fellowes Laminator Jupiter CRC 57018 heating, Test Heating resistors: adım 6, 3 resimden 3.
    • You now have access to the inside

    • To measure the heating resistors detach the brown an blue wires leading to the roller assembly. Not the ones coming from the power cable and microswitches.

    • Ohmmeter result:

    • 80 ohm : everything OK

    • 340-350 ohm : main heating circuit (above and under black rollers) broken

    • 100 Ohm : preheating (horizontally between orange and black rollers) broken

  7. Fellowes Laminator Jupiter CRC 57018 heating, Motor and heating assemby removal: adım 7, 3 resimden 1. Fellowes Laminator Jupiter CRC 57018 heating, Motor and heating assemby removal: adım 7, 3 resimden 2. Fellowes Laminator Jupiter CRC 57018 heating, Motor and heating assemby removal: adım 7, 3 resimden 3.
    • There are six screws fixing the motor and heating assembly to the bottom. (only two show in picture). Remove them and lift the assembly free

  8. Fellowes Laminator Jupiter CRC 57018 heating, Heating elements: adım 8, 3 resimden 1. Fellowes Laminator Jupiter CRC 57018 heating, Heating elements: adım 8, 3 resimden 2. Fellowes Laminator Jupiter CRC 57018 heating, Heating elements: adım 8, 3 resimden 3.
    • Heating elements are fixed on the left and right with two screws

    • And the resistor can be slided out.

    • This diagram helps detecting the faulty resistor.

  9. Fellowes Laminator Jupiter CRC 57018 heating, Missing Spare Parts: adım 9, 2 resimden 1. Fellowes Laminator Jupiter CRC 57018 heating, Missing Spare Parts: adım 9, 2 resimden 2.
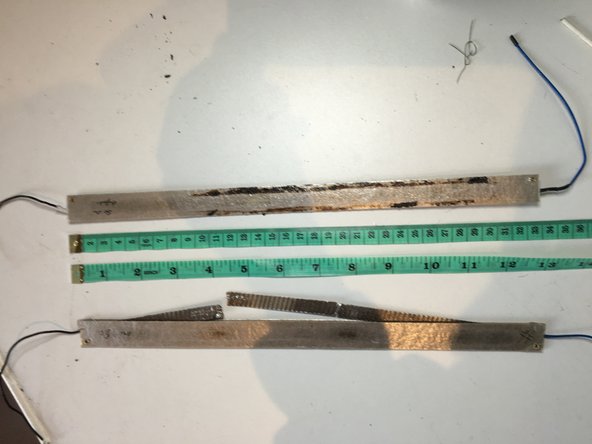
    • I was unable to find spare resistors. But since I had two identical laminators, both with a broken resistor above the upper black roll, repair was possible.

    • Many thanks if somebody can point to a provider for these spare parts

Sonuç

To reassemble your device, follow these instructions in reverse order.

Bir başkası bu kılavuzu tamamladı.

jean huens

Üyelik tarihi: 12/06/14

31 İtibar

1 Kılavuz yazıldı

0 Yorum

Yorum Ekle

İstatistikleri Görüntüle:

Son 24 Saat: 0

Son 7 gün: 1

Son 30 gün: 8

Her zaman: 898