Ana içeriğe geç

Fluorescent Light Ballast Replacement

Neye ihtiyacın var

  1. Fluorescent Light Ballast Replacement, Ballast: adım 1, 2 resimden 1. Fluorescent Light Ballast Replacement, Ballast: adım 1, 2 resimden 2.
    • Shock Hazard. Before starting this procedure, make sure the room's circuit breaker is in the OFF position.

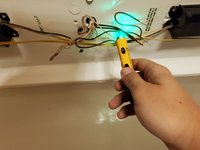
    • Turn off the light switch.

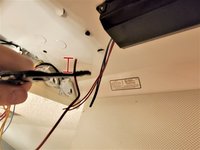
    • Remove light fixture cover according to the manufacturer's instruction guide.

  2. Fluorescent Light Ballast Replacement: adım 2, 1 resimden 1.
    • Burn Hazard. Light bulbs may be hot. If light bulbs were turned on, wait at least 10 minutes before proceeding.

    • Remove the light bulbs by gently twisting each bulb counterclockwise.

    • Remove the light bulb from the light bulb socket.

  3. Fluorescent Light Ballast Replacement: adım 3, 3 resimden 1. Fluorescent Light Ballast Replacement: adım 3, 3 resimden 2. Fluorescent Light Ballast Replacement: adım 3, 3 resimden 3.
    • Remove center cover to expose the wiring and ballast components.

  4. Fluorescent Light Ballast Replacement: adım 4, 3 resimden 1. Fluorescent Light Ballast Replacement: adım 4, 3 resimden 2. Fluorescent Light Ballast Replacement: adım 4, 3 resimden 3.
    • Shock Hazard. Check the fixture for voltage using the non-contact voltage reader according to the device’s instructions.

    • Shock Hazard. After removing wire nuts, do not touch the bare wires.

    • Remove wire nut by twisting it counterclockwise from the hot side (black or red wire) and the neutral side (white wire). Do not untwist wires.

  5. Fluorescent Light Ballast Replacement: adım 5, 2 resimden 1. Fluorescent Light Ballast Replacement: adım 5, 2 resimden 2.
    • Make sure both measure wires are not touching anything else at bare portion.

    • Multimeter should measure at 0 volts.

    • Place the red lead on the bare metal of the black or red wire.

    • Place the black lead on the bare metal of the white wire.

  6. Fluorescent Light Ballast Replacement: adım 6, 1 resimden 1.
    • Switch room's circuit breaker to ON position.

    • Turn light switch on and repeat step 5.

    • Shock Hazard. Electricity should now running through wires. Only touch wires with multimeter leads.

    • Make sure multimeter reads between 110-125 volts.

    • If the measured voltage is not between 110-125 volts, do not continue. Contact a qualified electrician for further service.

    • Turn off light switch.

    • Change room's circuit breaker to OFF position.

  7. Fluorescent Light Ballast Replacement: adım 7, 1 resimden 1.
    • Take note of wire placement or take a picture of the entire fixture to later reference when reconnecting wiring.

  8. Fluorescent Light Ballast Replacement: adım 8, 1 resimden 1.
    • Shock Hazard. Check the fixture for voltage using the non-contact voltage reader according to the device’s instructions.

  9. Fluorescent Light Ballast Replacement: adım 9, 1 resimden 1.
    • Take a picture of the ballast's data plate or take note of the information on the data plate to make sure you have the correct replacement part.

  10. Fluorescent Light Ballast Replacement: adım 10, 2 resimden 1. Fluorescent Light Ballast Replacement: adım 10, 2 resimden 2.
    • Disconnect all wires from the ballast.

    • Use a screwdriver to remove the ballast from the light fixture.

    • If necessary, cut the wires close to the ballast. The cut wires can be re-used later.

  11. Fluorescent Light Ballast Replacement: adım 11, 3 resimden 1. Fluorescent Light Ballast Replacement: adım 11, 3 resimden 2. Fluorescent Light Ballast Replacement: adım 11, 3 resimden 3.
    • Use a screwdriver to install the new ballast to the light fixture.

    • Ballast packaging may have a wiring diagram or may be on the ballast itself.

    • Make sure you strip all wire ends with a wire stripper and use ANSI approved wire nuts on all wired connections.

    • Reconnect all wires according to your notes or picture, add wire nuts to bare wire ends and twisting clockwise.

    • Attach center cover over the wiring and ballast components.

    • Screw in light bulb by placing a light bulb in light bulb socket.

    • Gently twist light bulb clockwise until light bulb is firmly in place.

    • Repeat until all light bulbs are firmly in place.

    • Attach light fixture cover over light bulbs according to manufacturer's instruction guide.

    • Move the room's circuit breaker back to ON position.

    • Turn light switch on to make sure the light works.

Sonuç

Put the fixture back together by reversing the steps 1-3. Test the light to make sure it works. If it still does not function, contact a qualified electrician.

Forrest Jones

Üyelik tarihi: 02/18/21

193 İtibar

1 Kılavuz yazıldı

0 Yorum

Yorum Ekle

İstatistikleri Görüntüle:

Son 24 Saat: 10

Son 7 gün: 46

Son 30 gün: 231

Her zaman: 4,101