Neye ihtiyacın var
-
-
Frong ring with lens naming need to be removed first. I’m using thick doublesided adhesive tape pieces attached to the ring surface.
-
-
-
Then pressing on top of tape with empty metal frame of filter of smaller diameter (55mm in this case). It provides excellent grip power to easily unscrew lettering ring CCW.
-
-
-
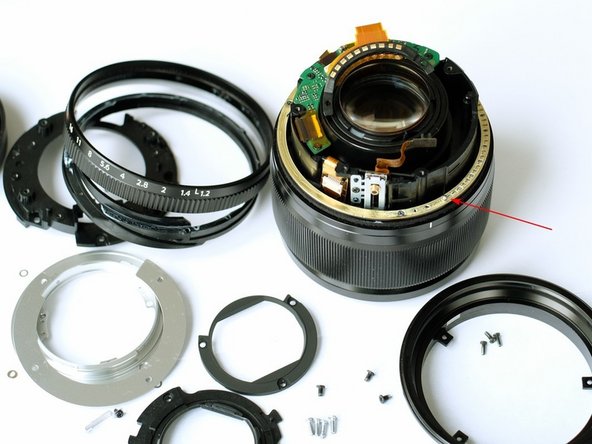
Put lens on table facing front glass down. Unscrew three black bolts from inner mount ring. Unscrew four silver bolts from mount ring. Gently lift up mount ring watching contacts ribbon cable. Pull out plastic inner ring to release contacts.
-
-
-
Accurately discover and write down tiny metal shims location, they should be put to exact screw place when assembling lens back. Then remove large metal shim plate. Unscrew three black bolts from metal ring with “56”, remove it.
-
-
-
Unscrew three black bolts from plastic frame of rear glass element. Pull out that part. Unscrew single bolt and remove small metal plate securing lens focus location sensor. Here you will need very accurate moves to pull out sensor from position without damaging it. Take your time.
-
-
-
-
Unscrew three black bolts from next plastic plate covering electronics below. Remove plate. Remove aperture ring. There is small metal ball loaded with spring inside aperture ring, don’t miss it. I’d also recommend not to touch any greased surface, so you keep every part properly greased.
-
-
-
After that unscrew three tiny black bolts holding brass inner aperture-click ring, then remove it and put somewhere so grease is not touching table surface and remains there.
-
-
-
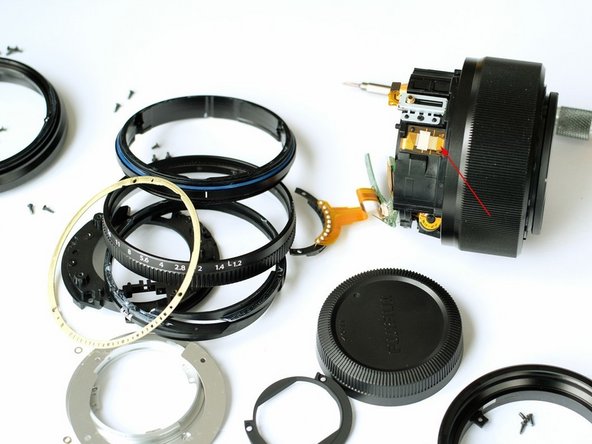
This step was most challenging for me. There are two black bolts holding autofocus motor (see next picture). One is easy to unscrew, another one is partially blocked by focus ring. I used angled screwdriver to remove it. You can allow autofocus motor to stay in that area, since it’s hard to take it out.
-
-
-
Unscrew three silver bolts that are located at the bottom of tunnel, thay are holding whole lens core connected to focus frame. Then flip lens to opposite side (watch electronic board cables are not bending), unscrew four dark-grey bolts around front glass element, then pull out front metal ring with hood connectors.
-
-
-
Then disconnect aperture ribbon cable near the aperture sliding sensor. Unscrew another four dark-grey longer bolts around front glass. Double cjeck that you disconnected aperture ribbon cable ot it will be damaged. Gently and slowly pull out whole lens core from the focusing frame.
-
-
-
There are three calibration bolts of front lens sub-frame. It is loaded with inner spring, then perfectly positioned on Fuji factory, and lastly glued on place to firmly hold that position.
-
-
-
Once front frame is taken out of place – make sure you keep glue pieces on place, they guarantee proper position of that frame, otherwise front frame will be optically misaligned delivering border sharpness degradation. Record calibrating bolts location before removing them. There is metal spring disc inside, remove it.
-
-
-
Unscrew three black bolts to get access to aperture chamber. Then accurately split lens frames. I used Rocket Blower to remove dust and then assembled everything back in opposite order.
-


Fujinon XF 56mm F1.2 is excellently engineered and constructed lens. The build quality is impressive. It has full metal frame with durable plastic inner frame. Fuji are using eccentric calibration of the sliding focusing cylinders and also for front lens sub-frame position. Large amount of cemented spots guarantee stable optical calibration.
I have to say that this lens is extremely hard to disassemble comparing to relatively more simple disassembly of Fujinon XF 35mm F1.4 R or Fujinon XF 27mm F2.8 lens. However it’s possible to access aperture ring area and one side of focus ring for maintenance with not so big effort. And accessing inner aperture chamber is very hard. I’d highly recommend to service this lens in professional places if you need to deal with optical issues. Fortunately it’s very high quality constructed build, and most likely you just don’t have to think about repairs and just enjoy excellent shots from this Fuji gem lens.
İptal et: Bu kılavuzu tamamlamadım.
4 farklı kişi bu kılavuzu tamamladı.
6 Yorum
Can you show me where you placed the friction ball when you reassembled it?
The ball goes into the spring loaded socket of aperture ring.
I want remove fungus inside front lens, is it possible to open the front lens without opening the back?
I would first accurately investigate the location of the fungus - by looking at small light source reflections from coating surface (like LED flashlight) you can count and tell which surface has fungus.
If fungus is under 1st or 2nd element, then you can try to make a special spanning wrench to unscrew the front securing ring located around front lens element, then accurately extract 1st and 2nd elements for cleaning. Make sure you mark their radial orientaiton to put exactly at same angle during assembly. I never did it with XF 56mm, but removed front fastening ring on XF 100-400mm lens, and perhaps there is a securing glue in XF 56mm.
However if fungus is under 3rd element or further - then it is only possible to access by complete disassembly of rear area.
Also, if fungus is between 4th and 5th elements - then it is a very difficult problem, because that elements are glued together, and that type of cleaning requires extremely complex process of separating glass, cleaning and optically cementing them back.
My lens has a terrible squealing noise when auto focusing. Any idea where in the lens this could be coming from and what to do to fix it?