Ana içeriğe geç

Gateway W350I Display Replacement

Neye ihtiyacın var

  1. Gateway W350I Display Replacement, Battery Access: adım 1, 1 resimden 1.
    • Turn the laptop upside down and position it as shown in the image.

  2. Gateway W350I Display Replacement, Unlocking the Battery: adım 2, 3 resimden 1. Gateway W350I Display Replacement, Unlocking the Battery: adım 2, 3 resimden 2. Gateway W350I Display Replacement, Unlocking the Battery: adım 2, 3 resimden 3.
    • Slide the locking switch towards the open lock picture.

    • Hold the release switch in the unlocked position while simultaneously pushing the battery away from the laptop.

    • Once the laptop is disengaged, completely remove the battery from the laptop.

  3. Gateway W350I Display Replacement, Remove Rubber Protectors & Screws: adım 3, 2 resimden 1. Gateway W350I Display Replacement, Remove Rubber Protectors & Screws: adım 3, 2 resimden 2.
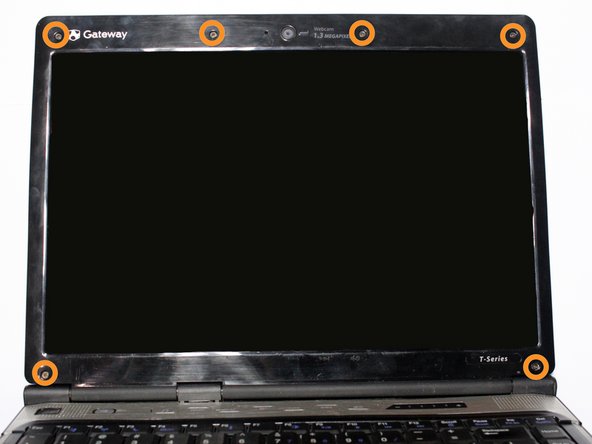
    • Pry the six black rubber protectors out of the screw holes.

    • Remove all six of the 4mm Phillips #0 screws that were covered by the rubber protectors.

    These pictures look like they might be out of order. The second picture looks like the screw has been removed.

    Proofread the text in the first bullet point of this step.

    I don't see the rubber protectors that you mention.

    Dan Brown - Yanıt

  4. Gateway W350I Display Replacement, Separate Plastic Casing: adım 4, 2 resimden 1. Gateway W350I Display Replacement, Separate Plastic Casing: adım 4, 2 resimden 2.
    • Separate the plastic screen casing from the laptop lid by inserting a plastic opening tool. Complete this step around the top and along both sides of the screen.

    I'm not quite sure what I'm supposed to be seeing in the second picture. Where/what are the clip connectors that you mention?

    Dan Brown - Yanıt

  5. Gateway W350I Display Replacement, Remove Bracket from Laptop Lid: adım 5, 2 resimden 1. Gateway W350I Display Replacement, Remove Bracket from Laptop Lid: adım 5, 2 resimden 2.
    • Remove the two 4mm Phillips #0 screws located at the top that fasten the screen bracket to the laptop.

  6. Gateway W350I Display Replacement, Remove LCD Screen from Bracket: adım 6, 1 resimden 1.
    • Separate the bracket and the screen from its original position within the lid of the laptop.

    • Remove the four 4mm Phillips #0 screws on the sides of the bracket that hold the LCD screen.

  7. Gateway W350I Display Replacement, Remove Video Cable: adım 7, 2 resimden 1. Gateway W350I Display Replacement, Remove Video Cable: adım 7, 2 resimden 2.
    • Detach the video cable that is attached to the laptop from the back of the screen.

    • Be careful while removing the video cable as it is very delicate.

    I could use clarification as to why steps 7 and 8 are here. The introduction suggests that this guide shows how to replace the screen, so why would I need to do these as well?

    Dan Brown - Yanıt

  8. Gateway W350I Display Replacement: adım 8, 2 resimden 1. Gateway W350I Display Replacement: adım 8, 2 resimden 2.
    • Disconnect the camera connector from the circuit board to completely free the screen.

Sonuç

To reassemble your device, follow these instructions in reverse order.

3 farklı kişi bu kılavuzu tamamladı.

Samuel Newton

Üyelik tarihi: 09/22/14

296 İtibar

1 Kılavuz yazıldı

Ekip

USF Tampa, Team 4-1, Brown Fall 2014 USF Tampa, Team 4-1, Brown Fall 2014 üyesi

USFT-BROWN-F14S4G1

3 Üyeler

10 adet Kılavuz yazıldı

Bir Yorum

It was very easy to follow.

Very friendly guide.

Stephan Williams - Yanıt

Yorum Ekle

İstatistikleri Görüntüle:

Son 24 Saat: 0

Son 7 gün: 1

Son 30 gün: 3

Her zaman: 1,244