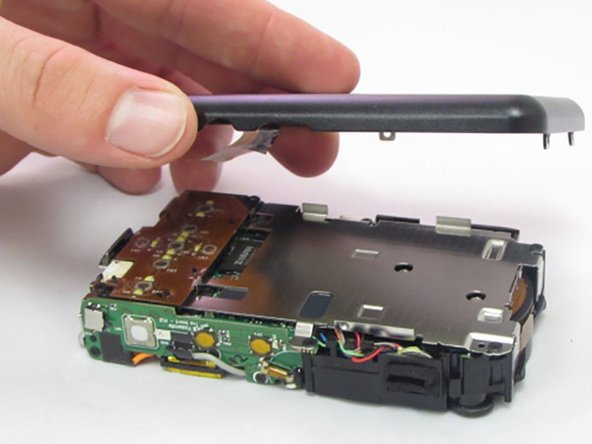
Ana içeriğe geç

General Electric Create Jason Wu Casing Disassembly

Neye ihtiyacın var

  1. General Electric Create Jason Wu Casing Disassembly, General Electric Create Jason Wu Casing Disassembly: adım 1, 3 resimden 1. General Electric Create Jason Wu Casing Disassembly, General Electric Create Jason Wu Casing Disassembly: adım 1, 3 resimden 2. General Electric Create Jason Wu Casing Disassembly, General Electric Create Jason Wu Casing Disassembly: adım 1, 3 resimden 3.
    • Begin by removing the 5 screws (located: 2 screws on either side and 1 screw on the bottom) using the PH000 head in the Precision Phillips Screwdriver.

    • These screws were missing in our example. These screws should have been small Phillips PH000 screws 1.5mm in length.

    • These screws are very small. To keep from losing any pieces, place all small metals on a magnetic project mat.

  2. General Electric Create Jason Wu Casing Disassembly: adım 2, 2 resimden 1. General Electric Create Jason Wu Casing Disassembly: adım 2, 2 resimden 2.
    • After the screws are removed, pull the front casing up and away from the camera.

    • If the casing is difficult to remove, use a plastic opening tool to gently pry up on the front as shown.

  3. General Electric Create Jason Wu Casing Disassembly: adım 3, 3 resimden 1. General Electric Create Jason Wu Casing Disassembly: adım 3, 3 resimden 2. General Electric Create Jason Wu Casing Disassembly: adım 3, 3 resimden 3.
    • Using your hands or an opening tool, pry off the silver frame, taking special care at the top of the camera where the buttons are as it is a little harder to pry off.

    • If the back casing is loose from the camera body, it may be easier to perform step 4 first, then accomplish this step. Proceed as your unit allows.

  4. General Electric Create Jason Wu Casing Disassembly: adım 4, 3 resimden 1. General Electric Create Jason Wu Casing Disassembly: adım 4, 3 resimden 2. General Electric Create Jason Wu Casing Disassembly: adım 4, 3 resimden 3.
    • The last part of the casing to disconnect is the back that houses the LCD screen.

    • The screen is attached by a connection ribbon. Gently pull the casing and screen away from the camera body to disconnect the casing.

    • The LCD screen is held onto the back casing by a small amount of adhesive. This may come loose during this process. Do not worry if they become separated.

    • This plug and the connection ribbon are fragile, try not to tear the connection ribbon when disconnecting.

Sonuç

To reassemble your device, follow these instructions in reverse order.

2 farklı kişi bu kılavuzu tamamladı.

0 Yorum

Yorum Ekle

İstatistikleri Görüntüle:

Son 24 Saat: 0

Son 7 gün: 1

Son 30 gün: 1

Her zaman: 198