Ana içeriğe geç

GoPro Hero3+ Black Edition LCD Display Replacement

Neye ihtiyacın var

  1. GoPro Hero3+ Black Edition LCD Display Replacement, Battery: adım 1, 1 resimden 1.
    • Pull the tab on the back of the device to release the back cover. It should come right off.

    • The device pictured does not include the back cover.

  2. GoPro Hero3+ Black Edition LCD Display Replacement: adım 2, 1 resimden 1.
    • Use the battery tab to pull the battery out of the device.

    • Remove the battery from the slot.

  3. GoPro Hero3+ Black Edition LCD Display Replacement, Front Face Plate: adım 4, 2 resimden 1. GoPro Hero3+ Black Edition LCD Display Replacement, Front Face Plate: adım 4, 2 resimden 2.
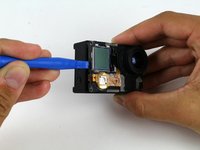
    • Using a plastic opening tool, pry the gray, front face plate until it can be removed from the housing.

    • To avoid breaking or weakening the tabs on the face plate which hold it in place, alternate the sides from which you pry and check each tab before separating the plate from the body.

  4. GoPro Hero3+ Black Edition LCD Display Replacement, Image Sensor: adım 5, 3 resimden 1. GoPro Hero3+ Black Edition LCD Display Replacement, Image Sensor: adım 5, 3 resimden 2. GoPro Hero3+ Black Edition LCD Display Replacement, Image Sensor: adım 5, 3 resimden 3.
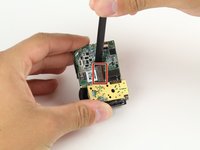
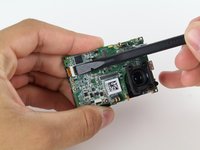
    • Using your screwdriver, remove the four 8.1mm PH00 screws securing the motherboard to the black housing unit and set them aside.

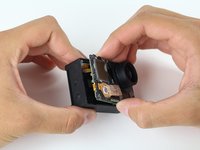
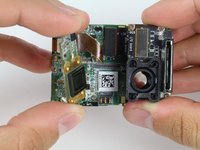
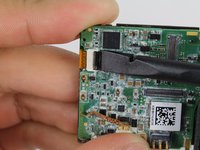
    • Use the plastic opening tool to help pry the motherboard/midframe up from the main housing. Once you can get a hold of the edge, simply pull the internal components up and out!

    • Watch out for the ribbon cable connecting the midframe and the motherboard to the GoPro housing. See the next step.

  5. GoPro Hero3+ Black Edition LCD Display Replacement: adım 6, 2 resimden 1. GoPro Hero3+ Black Edition LCD Display Replacement: adım 6, 2 resimden 2.
    • Remove the ribbon cable connecting the housing to the motherboard by flicking up the black clip with the spudger tool and gently pulling the cable out.

  6. GoPro Hero3+ Black Edition LCD Display Replacement: adım 7, 1 resimden 1.
    • Once the internal components are removed, take out your handy dandy spudger tool and pry off the piece of tape that holds down the image sensor.

    • Disclaimer: Our device is just a teardown unit and no longer has the tape. The markup depicts the location where the tape would be located.

  7. GoPro Hero3+ Black Edition LCD Display Replacement: adım 8, 1 resimden 1.
    • Using your screwdriver, remove the four PH00 screws securing the image sensor to the motherboard.

    • Disclaimer: The unit used for this guide did not include these screws. Set them aside so you do not mix them up with the previously removed screws.

  8. GoPro Hero3+ Black Edition LCD Display Replacement: adım 9, 2 resimden 1. GoPro Hero3+ Black Edition LCD Display Replacement: adım 9, 2 resimden 2.
    • Using the spudger tool, pry off the connector ribbon from the motherboard (don't worry it comes off pretty easily).

    • Remove the image sensor from the motherboard assembly.

  9. GoPro Hero3+ Black Edition LCD Display Replacement, microSD and Accessory Board: adım 10, 1 resimden 1.
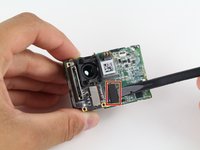
    • Using your screwdriver, remove the three 4mm PH00 screws that hold down the metal plate.

  10. GoPro Hero3+ Black Edition LCD Display Replacement: adım 11, 2 resimden 1. GoPro Hero3+ Black Edition LCD Display Replacement: adım 11, 2 resimden 2.
    • Using the spudger tool, pry off the corresponding ribbon cable from the motherboard.

    • The microSD/accessory board is ready to come off.

  11. GoPro Hero3+ Black Edition LCD Display Replacement, Motherboard: adım 12, 1 resimden 1.
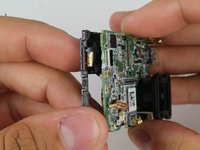
    • Using your trusty screwdriver, remove the single 3.2mm PH00 screw connecting the motherboard to the midframe.

  12. GoPro Hero3+ Black Edition LCD Display Replacement: adım 13, 3 resimden 1. GoPro Hero3+ Black Edition LCD Display Replacement: adım 13, 3 resimden 2. GoPro Hero3+ Black Edition LCD Display Replacement: adım 13, 3 resimden 3.
    • Use the spudger tool to disconnect the front LCD from the motherboard. Gently pull the ribbon cable out.

    • Gently pull the motherboard away from the midframe.

  13. GoPro Hero3+ Black Edition LCD Display Replacement, LCD Display: adım 14, 1 resimden 1.
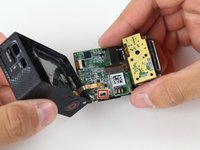
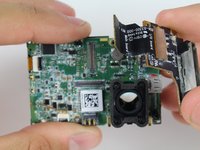
    • Now that you have removed the plastic midframe from the motherboard, nothing is standing in the way of the LCD!

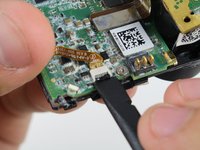
    • Carefully remove the ribbon cable from the midframe. It is attached with glue, so a spudger tool (or a heat gun if it's stubborn) will be needed.

Sonuç

To reassemble your device, follow these instructions in reverse order.

5 farklı kişi bu kılavuzu tamamladı.

Kyle Rooney

Üyelik tarihi: 04/14/15

502 İtibar

3 adet Kılavuz yazıldı

Ekip

Cal Poly, Team 6-15, Maness Spring 2015 Cal Poly, Team 6-15, Maness Spring 2015 üyesi

CPSU-MANESS-S15S6G15

4 Üyeler

13 adet Kılavuz yazıldı

6 Yorum

Where did you buy the replacement from?

Colin Murphy - Yanıt

Merci beaucoup, trés utile pour les pilotes de drones fpv!

Thanks a lot, very helpfull for drone racers!

https://www.banggood.com/Front-LCD-Displ...

PoLy “PoLy” Vincent - Yanıt

Dose it work for the silver édition as well ?

mojooe - Yanıt

Thanks for this! I will just add that there is no need to take off the image sensor and the microSD board. You can simply skip from Step 6 to Step 13 without removing the motherboard. I wasted a lot of effort and almost broke my GoPro doing Steps 6-13.

Devin Roach - Yanıt

Yorum Ekle

İstatistikleri Görüntüle:

Son 24 Saat: 1

Son 7 gün: 3

Son 30 gün: 10

Her zaman: 3,308