Bu sürüm, hatalı düzenlemeler içerebilir. En son doğrulanmış bellek kopyası dönün.
Neye ihtiyacın var
-
Bu adım çevrilmemiş. Çevrilmesine yardım edin
-
Heat an iOpener and apply it to the bottom of the phone for one minute.
-
-
Bu adım çevrilmemiş. Çevrilmesine yardım edin
-
Apply a suction cup to the heated bottom edge of the back cover.
-
Lift on the suction cup with strong, steady force to create a gap.
-
Insert an opening pick into the gap.
-
-
Bu adım çevrilmemiş. Çevrilmesine yardım edin
-
Slice the adhesive along the bottom edge of the phone and around the right corner.
-
Leave a pick in the bottom edge to prevent the adhesive from re-sealing.
-
-
Bu adım çevrilmemiş. Çevrilmesine yardım edin
-
Heat the right edge with an iOpener and continue slicing the adhesive with an opening pick.
-
-
Bu adım çevrilmemiş. Çevrilmesine yardım edin
-
Continue heating and slicing through the rest of the phone perimeter. Leave a pick in each edge to prevent the adhesive from resealing.
-
-
Bu adım çevrilmemiş. Çevrilmesine yardım edin
-
Once you have sliced around the perimeter of the phone, carefully lift the left edge of the back cover.
-
Flip the back cover along its long axis and rest it so that the fingerprint sensor cable is not strained.
-
-
-
Bu adım çevrilmemiş. Çevrilmesine yardım edin
-
Remove the two 4.1 mm-long Phillips screws securing the fingerprint connector bracket.
-
-
Bu adım çevrilmemiş. Çevrilmesine yardım edin
-
Use the point of a spudger to slide the fingerprint connector bracket out from under the NFC coil.
-
Remove the fingerprint connector bracket.
-
-
Bu adım çevrilmemiş. Çevrilmesine yardım edin
-
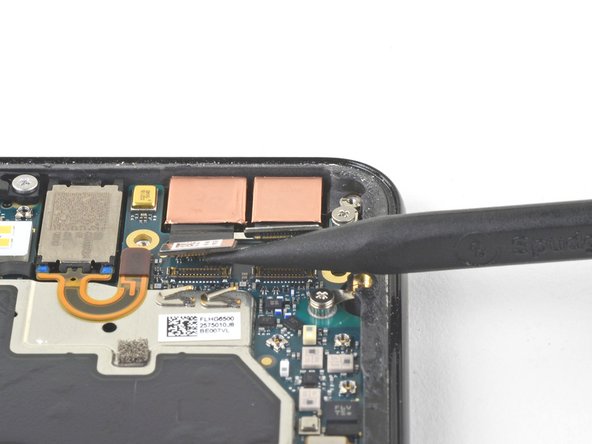
Use the point of a spudger to pry up and disconnect the fingerprint connector from its socket.
-
-
Bu adım çevrilmemiş. Çevrilmesine yardım edin
-
Remove the five Phillips screws securing the wireless charging coil:
-
Two 1.9 mm screws
-
Two 4.2 mm screws
-
One 4.3 mm screw
-
-
Bu adım çevrilmemiş. Çevrilmesine yardım edin
-
Use the point of a spudger to pry up and disconnect the battery press connector from its socket near the right edge of the phone.
-
-
Bu adım çevrilmemiş. Çevrilmesine yardım edin
-
Remove the two screws securing the camera bracket:
-
One 4.1 mm Phillips screw
-
One 4 mm standoff screw
-
Remove the camera bracket.
-
-
Bu adım çevrilmemiş. Çevrilmesine yardım edin
-
Use the point of a spudger to pry up and disconnect the connector for the camera(s) you are replacing.
-
-
Bu adım çevrilmemiş. Çevrilmesine yardım edin
-
Insert the point of a spudger behind the edge of the camera module and pry up to loosen it from the frame.
-
-
Bu adım çevrilmemiş. Çevrilmesine yardım edin
-
Use a pair of blunt nose tweezers to remove the camera(s).
-


İptal et: Bu kılavuzu tamamlamadım.
Bir başkası bu kılavuzu tamamladı.


2 Yorum
There is only 1 front facing camera on a Pixel 3
Pixel 3 have two front facing cameras but Pixel 3a has only one.