Bu sürüm, hatalı düzenlemeler içerebilir. En son doğrulanmış bellek kopyası dönün.
Neye ihtiyacın var
-
Bu adım çevrilmemiş. Çevrilmesine yardım edin
-
Turn off the device.
-
Prepare an iOpener to heat the edges of the display and soften the adhesive underneath. Alternatively, you may use a heat gun or a hair dryer.
-
-
Bu adım çevrilmemiş. Çevrilmesine yardım edin
-
For reference, the back of the display panel is shown at left. Note the narrow clearance between the side of the display unit and the OLED panel. (The bezels indicate this spacing on the front.)
-
-
Bu adım çevrilmemiş. Çevrilmesine yardım edin
-
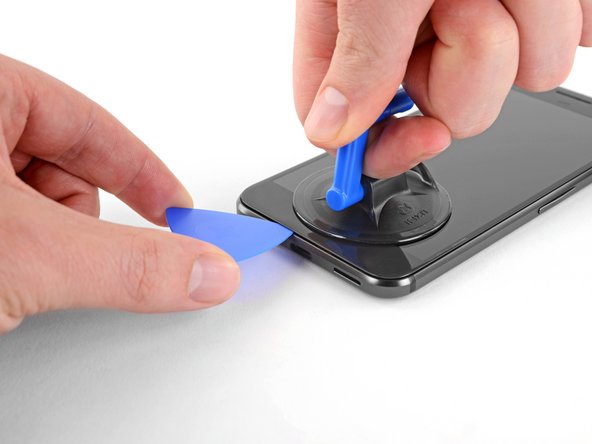
Use a suction handle to pull up on the display and create a slight gap between the display and the phone's chassis.
-
You may need to apply more heat if this doesn't come up. Don't be impatient, this will take time. Once you can gently insert a tool in the gap, move on to the next step.
-
-
Bu adım çevrilmemiş. Çevrilmesine yardım edin
-
Insert an opening pick or a playing card into the gap between the chassis and the display assembly.
-
Begin to slide the opening pick around the edge of the display, cutting through the adhesive that secures it.
-
-
Bu adım çevrilmemiş. Çevrilmesine yardım edin
-
Continue carefully separating the adhesive around the rest of the device.
-
-
Bu adım çevrilmemiş. Çevrilmesine yardım edin
-
With the adhesive cut, slowly lift the display up from the top (the side with the speaker-grille cutout), carefully flip it over vertically toward the bottom of the device, and rest it on its face, as shown.
-
-
Bu adım çevrilmemiş. Çevrilmesine yardım edin
-
Use a T5 Torx driver to remove the two black 3.5 mm T5 screws securing the display cable connector bracket.
-
-
-
Bu adım çevrilmemiş. Çevrilmesine yardım edin
-
Use tweezers to remove the bracket that holds the display connector in place.
-
This is just a piece of metal, and should come up very easily. (The cable is removed in the next step.)
-
-
Bu adım çevrilmemiş. Çevrilmesine yardım edin
-
Use a spudger to pry up the display cable connector, freeing the display.
-
-
Bu adım çevrilmemiş. Çevrilmesine yardım edin
-
Use a T5 Torx driver to remove the nine 3.5 mm screws securing the midframe.
-
-
Bu adım çevrilmemiş. Çevrilmesine yardım edin
-
The midframe is held tightly in place by five clips. To release these clips, apply inward pressure with an opening tool as shown in the steps below.
-
-
Bu adım çevrilmemiş. Çevrilmesine yardım edin
-
Wedge an opening pick into the notch that is located at the bottom right corner of the phone.
-
-
Bu adım çevrilmemiş. Çevrilmesine yardım edin
-
Slide the opening pick up both sides of the device in the small space between the midframe and the rear case to release the clips holding it in place.
-
-
Bu adım çevrilmemiş. Çevrilmesine yardım edin
-
Use a spudger to pry the earpiece speaker cable connector straight up, disconnecting it from the motherboard.
-
Remove the mid-frame from the device.
-
-
Bu adım çevrilmemiş. Çevrilmesine yardım edin
-
Use a spudger to pry up the battery ribbon cable, disconnecting it from the motherboard.
-
-
Bu adım çevrilmemiş. Çevrilmesine yardım edin
-
Using tweezers, peel back the silver tape that covers the cable connecting the motherboard to the daughterboard. Peel just enough to see the connector underneath.
-
Use a spudger to pry the connector straight up and disconnect it from the motherboard.
-
-
Bu adım çevrilmemiş. Çevrilmesine yardım edin
-
Peel up the sticker covering the interconnect cable on the daughterboard side.
-
Use a spudger to disconnect the cable from the daughterboard.
-
Remove the cable from the device.
-
-
Bu adım çevrilmemiş. Çevrilmesine yardım edin
-
The battery has a jacket that can double as a battery removal tab, pull it to remove the battery. If that doesn't work, follow the instructions below.
-
Carefully wedge an opening pick underneath the battery to break the adhesive.
-
If the battery does not come out easily, don't pry aggressively. Apply heat to the back of the phone with an iOpener or a heat gun to loosen the adhesive.
-
-
Bu adım çevrilmemiş. Çevrilmesine yardım edin
-
Remove the battery.
-
Remove any remaining adhesive from the phone, and clean the glued areas with isopropyl alcohol and a lint-free cloth.
-
Secure the new battery with pre-cut adhesive or double-sided adhesive tape. Apply the new adhesive to the phone, not directly onto the battery.
-
Press the new battery firmly into place for 5-10 seconds.
-


İptal et: Bu kılavuzu tamamlamadım.
133 farklı kişi bu kılavuzu tamamladı.

73 Yorum
I doubt many people can get past step 1 without it being game over. Take special care, read the comments, and other guides as well.
I broke mine too. Not the glass but the display panel underneath.
For those who are going to try opening theirs: pay extreme attention to the fact that the display panel extends somewhat beyond the bottom edge of the visible part of the display where the cable connects and, if that wasn’t bad enough, the bottom bezel has a !&&* of a lot adhesive on it. Don’t insert plastic opening tools on the bottom corners - if you do that, you will damage one of the unprotected corners of the panel like I did. If I had to do that again, I’d probably start from the top edge instead.
The new screen ended up costing me the equivalent of $80, and I was surprised I was able to walk into a store and buy one at all in a country where Pixel was never officially available in the first place. They didn’t have white ones in stock so I went with a black one.
Same. Even when being warned and trying to be super careful.
Another trashed screen. This phone is a difficult one if you have not done one before. I would recommend not even bothering with prying under the sides and just concentrate on the top and bottom. The edges only allow about 2mm at most before you run into the LCD.
Tyler -
+1. Don’t bother trying to save the screen. Just save yourself the stress and buy a new screen on ebay for $35 before you begin. I have never botched a repair and I still managed to break my display on this. Yes, I was super careful, it took me like 45 minutes to finally get the display loose, and when I put it all back together, the display was totally dead.