Neye ihtiyacın var
-
-
I took a more destructive approach to splitting the case along the seam, but applying heat to the seam and then a small amount of Isopropyl Alcohol should loosen it enough that you only have to deal with a few plastic clips.
-
The initial tool insertion can be done with a metal pry tool, but once there is a gap opened I strongly recommend switching over to a hard plastic pick to avoid causing the level of damage I did on this disassembly.
-
The ideal entry point for a metal pry tool on this main seam is towards the rear next to the main hinge. There is less or possibly no adhesive applied here, it is relatively far away from any plastic clips that are close together (increasing the risk of cracking/deforming the plastic housing), and it's the least visible part of the seam.
-
When prying along the front of the device where the LED Indicator is located be very cautious. The flex cable that connects to the power pins inside the top-half of the case can be damaged very easily. Additionally, the LED itself could potentially be damaged although that would be less likely as it is solidly anchored.
-
-
-
Once the two halves of the housing are split everything is pretty accessible. The two halves will still be connected by the flex cable assembly that runs from the primary logic board to the charging pins and LED Indicator, but there is quite a bit of slack in it and the top half clears the lip easily.
-
The battery itself is marked as "Model GYJS0, Rated Capacity 500mAh 1.85Wh, Rated Voltage 3.7VDC" and searching the Google Product Support website for more information also tells us that when this cell was tested to make sure it complied with UN 38.3 standards the cell itself weighed in at 10g https://support.google.com/product-docum...
-
-
-
-
Further disassembly is not required and if you're confident in your ability to solder the battery wiring quickly I'd actually recommend against further disassembly. As you can see, I tore the flex cable connecting the LED Indicator section of the flex to the charging pins inside the top half of the housing.
-
Desolder the Black, White, and Red wires that connect the battery to the LED Indicator flex cable. Then clean the pads with some desoldering braid (gently so that you don't remove insulator from the flex) and reverse the process with your new battery. Black to B-, White to N, Red to B+.
-
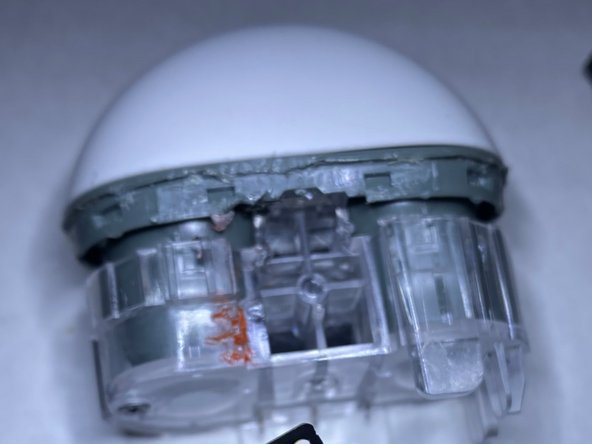
Once your new battery is installed make sure to test it by attaching a power source to the USB-C Charging Port at the bottom of the housing. Watch for the LED Indicator status light to pulse Orange.
-
-
-
If you have any damage to the plastic clips on either the top or bottom half of the housing I suggest just cutting or grinding them down so that they don't catch on anything when you're reassembling the housing. I typically use a surgical scalpel and a dremel for this kind of reshaping. Scalpel is better because it does not heat the plastic.
-
We can't use tape to seal the seam again because it will bunch up and not form an even bond which means that an adhesive like E6000 or anything similar is probably going to be our best bet. Run an even bead around the seam, applying it to the top-half of the housing and making sure that you're not obscuring the LED Indicator.
-
Once your adhesive is applied, press the two halves of the housing back together being mindful of the battery wiring and all flex cables near the seam. A clamp positioned with one side on the top of the housing and the other covering the USB-C Port and/or a rubber band should be applied while the adhesive sets.
-
-
-
In my case there was quite a bit of damage to the housing that was not only visible, but also would allow things like sand and pocket lint into the device internals.
-
To address this, I mixed up a small amount of modeling epoxy and filled in those spots after the seam adhesive had set fully. Then I took a medium grit piece of sandpaper and smoothed out the surface of the epoxy. Finally I used a very high grit piece of sandpaper to blend the plastic surface in with the filler epoxy.
-
This strategy didn't result in a perfect finish (this picture is a stock photo used purely as a reference) but I am confident that on a technical level it has been restored to the same level of protection for internal components.
-


Definitely not a very repair friendly device because of the clips and adhesive on the relatively thin plastic housing, but also more repairable that I thought it would be. Given the opportunity to work on more of these I would probably be able to get it down to about 20 minutes start to finish with no noticeable damage to the housing.
Definitely not a very repair friendly device because of the clips and adhesive on the relatively thin plastic housing, but also more repairable that I thought it would be. Given the opportunity to work on more of these I would probably be able to get it down to about 20 minutes start to finish with no noticeable damage to the housing.
İptal et: Bu kılavuzu tamamlamadım.
Bir başkası bu kılavuzu tamamladı.

Ekip

4 Yorum
Good guide but please be mindful of the flex cable that the battery is attached to. In the third picture of step 1, that cable runs up inside the housing and connects to the pins on the inside where the buds goes for charging. If you're not careful, you will snag/hit it and could break a trace on it. I was able to repair mine (yeah it hit with pry tool hence the comment) but it still didn't work due to water damage (was trying to salvage them). There are some components on the cable up inside the housing that was fried so until I find a replacement flex cable, the buds are dead in the water. If anyone locates the cable, please share.
Yeah, I actually ran into the exact same issue on the first opening of this set and severed the same cable, likely in the same general location. The traces themselves are available to splice with soldered copper tape (my recommend method) or thin copper jumper wires supported by kapton wrapped around them (basically just recreating something similar to the structure of the flex cable) if you scrape back some of the flex coating. That's a pretty involved repair for a flex car though!
Obviously not cutting it would be ideal, but I have not run across another set to iterate this process with. I'll consider throwing down some resources to pick up non functional units in the future to update this guide with better solutions to these problems and some documented repair steps incase they happen anyway. This is definitely intended to be more of a rough draft than a fully polished step by step and I figured literally any documentation would be helpful as there were zero other teardowns available when I made it.
I'm in the process of trying to do this same repair. I'm having trouble locating a third-party source for the battery though. Can you share yours please?
Hey Derek, the listing that I purchased my test cells from is no longer active unfortunately. The best practice for identifying and sourcing replacement custom batteries like this is to just start searching for the alphanumeric codes that are listed on the cell itself. Typically you'll be able to find a six-digit numeric string that represents the height/width/depth and the voltage/capacity are in almost every case very obviously labeled. I doubt that due to my delay this will help you personally, but maybe it'll help the next guy.