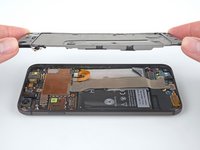
Ana içeriğe geç

Google Pixel Midframe Replacement

Salt Önkoşul
Bu kılavuz yalnızca diğer kılavuzlar için bir ön koşul olarak kullanılmak üzere tasarlanmıştır. Tek başına eksiktir.

Neye ihtiyacın var

  1. Google Pixel Midframe Replacement, Display: adım 1, 1 resimden 1.
    • Turn off the device.

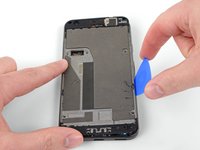
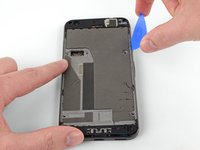
    • Prepare an iOpener to heat the edges of the display and soften the adhesive underneath. Alternatively, you may use a heat gun or a hair dryer.

    • The surfaces near the speaker and microphone (top and bottom respectively) have larger adhesive sections. These areas may require slightly longer heat exposure. The display should be heated until it's slightly too hot to touch, for roughly two minutes.

  2. Google Pixel Midframe Replacement: adım 2, 3 resimden 1. Google Pixel Midframe Replacement: adım 2, 3 resimden 2. Google Pixel Midframe Replacement: adım 2, 3 resimden 3.
    • In the following steps, you will separate the display panel by slicing though the adhesive bonding the display to the Pixel's chassis.

    • For reference, the back of the display panel is shown at left. Note the narrow clearance between the side of the display unit and the OLED panel. (The bezels indicate this spacing on the front.)

    • Inserting an opening tool deeper than 1.5 mm into the sides of the device, or 9 mm into the top and bottom can permanently damage the display.

  3. Google Pixel Midframe Replacement: adım 3, 2 resimden 1. Google Pixel Midframe Replacement: adım 3, 2 resimden 2.
    Bu adımda kullanılan alet:
    Suction Handle
    $2.99
    Satın Al
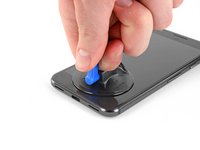
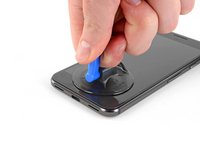
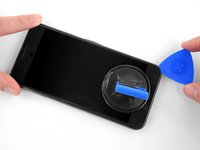
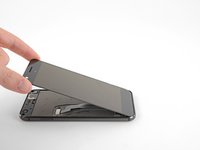
    • Use a suction handle to pull up on the display and create a slight gap between the display and the phone's chassis.

    • If your display is cracked, cover it with packing tape to help the suction cup adhere and prevent glass shards from popping loose.

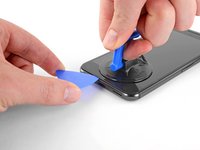
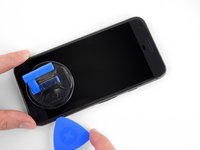
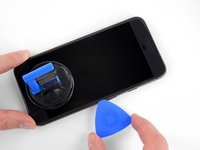
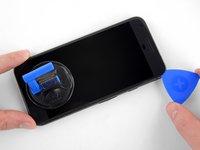
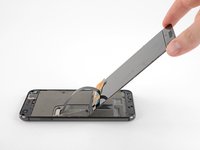
    • You may need to apply more heat if this doesn't come up. Don't be impatient, this will take time. Once you can gently insert a tool in the gap, move on to the next step.

  4. Google Pixel Midframe Replacement: adım 4, 3 resimden 1. Google Pixel Midframe Replacement: adım 4, 3 resimden 2. Google Pixel Midframe Replacement: adım 4, 3 resimden 3.
    • Insert an opening pick or a playing card into the gap between the chassis and the display assembly.

    • Begin to slide the opening pick around the edge of the display, cutting through the adhesive that secures it.

    • Do not try to lift or pry the screen off with the pick. Simply slide it around to detach the adhesive.

    • The display panel is extremely fragile. If you plan to re-use your display, take care to insert your tool only as far as necessary to separate the adhesive. Inserting the tool any further can damage the OLED panel under the glass.

  5. Google Pixel Midframe Replacement: adım 5, 3 resimden 1. Google Pixel Midframe Replacement: adım 5, 3 resimden 2. Google Pixel Midframe Replacement: adım 5, 3 resimden 3.
    • Continue carefully separating the adhesive around the rest of the device.

    • There's a mesh covering the earpiece speaker on the top edge of the screen. If you don’t have a replacement mesh, take care not to damage or lose this component.

    • Take extra care with the side bezels, which are only 1.5 mm deep.

  6. Google Pixel Midframe Replacement: adım 6, 3 resimden 1. Google Pixel Midframe Replacement: adım 6, 3 resimden 2. Google Pixel Midframe Replacement: adım 6, 3 resimden 3.
    Bu adımda kullanılan alet:
    iFixit Opening Picks (Set of 6)
    $4.99
    Satın Al
    • With the adhesive cut, slowly lift the display up from the top (the side with the speaker-grille cutout), carefully flip it over vertically toward the bottom of the device, and rest it on its face, as shown.

    • Don't forget there's sticky adhesive everywhere, so consider resting an opening pick between the screen and display, to avoid spreading the gunk!

    • Do not attempt to completely remove the display yet, as it is still connected by a fragile ribbon cable. Be careful to not to strain the cable while positioning the display.

  7. Google Pixel Midframe Replacement: adım 7, 1 resimden 1.
    Bu adımda kullanılan alet:
    Magnetic Project Mat
    $19.95
    Satın Al
    • Use a T5 Torx driver to remove the two black 3.5 mm T5 screws securing the display cable connector bracket.

    • Throughout this repair, keep track of each screw and make sure it goes back exactly where it came from.

  8. Google Pixel Midframe Replacement: adım 8, 1 resimden 1.
    • Use tweezers to remove the bracket that holds the display connector in place.

    • This is just a piece of metal, and should come up very easily. (The cable is removed in the next step.)

  9. Google Pixel Midframe Replacement: adım 9, 1 resimden 1.
    • Use a spudger to pry up the display cable connector, freeing the display.

    • On reassembly, gently snap one side in, then the other.

    • Do not force this type of connector into place, as damage can occur. (You will need to feel a light snap, but force beyond this will permanently damage your connector.)

  10. Google Pixel Midframe Replacement: adım 10, 1 resimden 1.
    • Remove the display.

    • Some replacement displays do not come with an earpiece speaker grille. If your replacement screen doesn't have one, be sure to transfer the grille from your old display to the new one.

    • During reassembly, pause here to test the functionality of your new part and replace the display adhesive.

    • During the boot-up process after reassembly, the screen will go through a calibration sequence. Do not touch the screen during this process, as it could result in improper touch calibration and create touch issues.

  11. Google Pixel Midframe Replacement, Midframe: adım 11, 1 resimden 1.
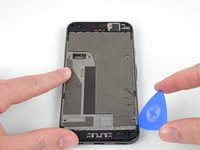
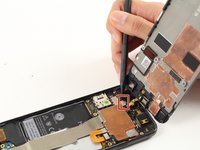
    • Use a T5 Torx driver to remove the nine 3.5 mm screws securing the midframe.

  12. Google Pixel Midframe Replacement: adım 12, 1 resimden 1.
    • The midframe is held tightly in place by five clips. To release these clips, apply inward pressure with an opening tool as shown in the steps below.

  13. Google Pixel Midframe Replacement: adım 13, 1 resimden 1.
    • Wedge an opening pick into the notch that is located at the bottom right corner of the phone.

  14. Google Pixel Midframe Replacement: adım 14, 3 resimden 1. Google Pixel Midframe Replacement: adım 14, 3 resimden 2. Google Pixel Midframe Replacement: adım 14, 3 resimden 3.
    • Slide the opening pick up both sides of the device in the small space between the midframe and the rear case to release the clips holding it in place.

    • Note that the clips are not released by sliding through them, but rather the inward pressure the opening pick creates as it enters the gap around them.

    • If the clasps fail to come undone, try pushing the edge you're working on inward with your hand, or using a thicker tool like a spudger.

    • Do not attempt to remove the midframe yet! There is still a fragile ribbon cable underneath connecting the earpiece speaker to the motherboard.

  15. Google Pixel Midframe Replacement: adım 15, 2 resimden 1. Google Pixel Midframe Replacement: adım 15, 2 resimden 2.
    • Use a spudger to pry the earpiece speaker cable connector straight up, disconnecting it from the motherboard.

    • Remove the mid-frame from the device.

    • During reassembly, reattach the earpiece speaker cable and insert the top side of the midframe before you snap the clips back into place.

Sonuç

To reassemble your device, follow these instructions in reverse order.

3 farklı kişi bu kılavuzu tamamladı.

Claudia Mendez

Üyelik tarihi: 04/26/17

1.824 İtibar

1 Kılavuz yazıldı

Ekip

Cal Poly, Team S23-G1, Livingston Spring 2017 Cal Poly, Team S23-G1, Livingston Spring 2017 üyesi

CPSU-LIVINGSTON-S17S23G1

4 Üyeler

13 adet Kılavuz yazıldı

Bir Yorum

how can i Use the tweezers to remove the bracket that holds the display connector in place ??

Neyla Bhm - Yanıt

Yorum Ekle

İstatistikleri Görüntüle:

Son 24 Saat: 0

Son 7 gün: 0

Son 30 gün: 0

Her zaman: 2,774