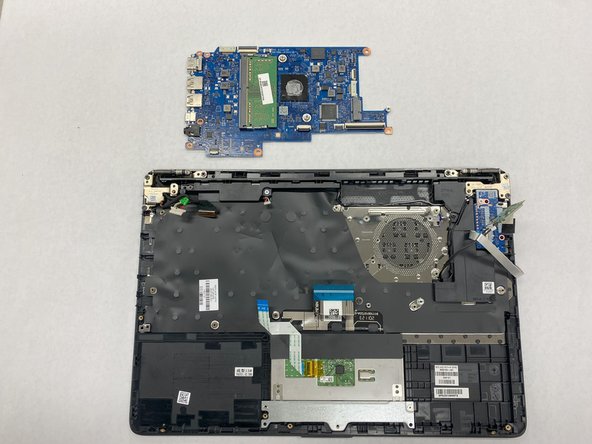
Ana içeriğe geç

HP 14-dq0051dx Motherboard Replacement

Neye ihtiyacın var

  1. HP 14-dq0051dx Motherboard Replacement, Motherboard: adım 1, 2 resimden 1. HP 14-dq0051dx Motherboard Replacement, Motherboard: adım 1, 2 resimden 2.
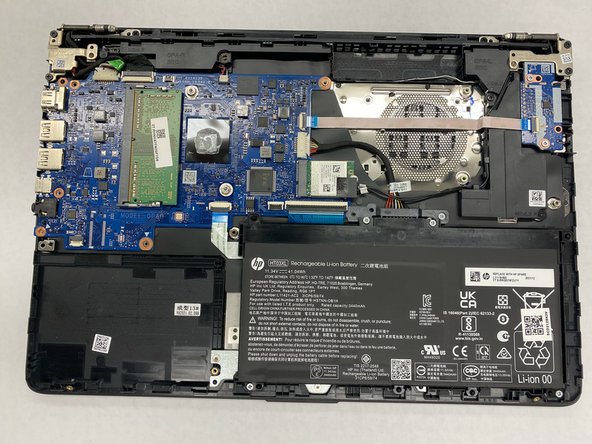
    • Turn the laptop upside down so the backside is facing up.

    • Remove the eight 2.5mm screws from the back case using the Phillips #1 screwdriver.

  2. HP 14-dq0051dx Motherboard Replacement: adım 2, 1 resimden 1.
    • Turn the laptop over and open the screen.

    • Insert the blue opening tool into the seam between the keyboard and bottom panel.

    • Run the blue opening tool along the entire seam in order to separate the bottom panel.

    • You may hear clicking as you release the taps that secure the case.

  3. HP 14-dq0051dx Motherboard Replacement: adım 3, 1 resimden 1.
    • Once the bottom panel is separated from the laptop, carefully close the laptop.

    • Turn the laptop upside down again so the backside is facing up.

    • Place both hands on opposite corners of the bottom panel and carefully lift it up to remove the panel.

  4. HP 14-dq0051dx Motherboard Replacement: adım 4, 3 resimden 1. HP 14-dq0051dx Motherboard Replacement: adım 4, 3 resimden 2. HP 14-dq0051dx Motherboard Replacement: adım 4, 3 resimden 3.
    • Remove the five 2.5 mm screws that secure the motherboard cover using a Phillips #1 screwdriver.

    • Using your hands, remove the motherboard cover from the laptop.

  5. HP 14-dq0051dx Motherboard Replacement: adım 5, 3 resimden 1. HP 14-dq0051dx Motherboard Replacement: adım 5, 3 resimden 2. HP 14-dq0051dx Motherboard Replacement: adım 5, 3 resimden 3.
    • Use a Phillips #1 screwdriver to remove the four 2.5 mm screws that secure the battery.

    • Remove the battery from the laptop.

  6. HP 14-dq0051dx Motherboard Replacement: adım 6, 3 resimden 1. HP 14-dq0051dx Motherboard Replacement: adım 6, 3 resimden 2. HP 14-dq0051dx Motherboard Replacement: adım 6, 3 resimden 3.
    • Use the blue opening tool to flip up the small locking flap from the ZIF connector that attaches the touchpad cable to the motherboard.

    • Gently pull the ribbon cable out from the connector.

  7. HP 14-dq0051dx Motherboard Replacement: adım 7, 2 resimden 1. HP 14-dq0051dx Motherboard Replacement: adım 7, 2 resimden 2.
    • Gently unplug the keyboard connector from the motherboard.

  8. HP 14-dq0051dx Motherboard Replacement: adım 8, 2 resimden 1. HP 14-dq0051dx Motherboard Replacement: adım 8, 2 resimden 2.
    • Lift up the small compartment with your finger.

    • Pull the flat cable out of the connector.

  9. HP 14-dq0051dx Motherboard Replacement: adım 9, 1 resimden 1.
    • Unplug the battery connector from the motherboard using both fingers.

  10. HP 14-dq0051dx Motherboard Replacement: adım 10, 3 resimden 1. HP 14-dq0051dx Motherboard Replacement: adım 10, 3 resimden 2. HP 14-dq0051dx Motherboard Replacement: adım 10, 3 resimden 3.
    • Lift the black square card covering two small cables connected to the WIFI card.

    • Unplug the small wires one and two with your fingers.

    • Use a Phillips #0 screwdriver to unscrew the single 1mm screw that secures the WIFI card.

    • Remove the WIFI card by gently pulling it out of its slot.

  11. HP 14-dq0051dx Motherboard Replacement: adım 11, 2 resimden 1. HP 14-dq0051dx Motherboard Replacement: adım 11, 2 resimden 2.
    • Pull the charging port cable away from the connector in the same direction as the individual wires to unplug the charge port connector.

    • Remove the charging port.

  12. HP 14-dq0051dx Motherboard Replacement: adım 12, 2 resimden 1. HP 14-dq0051dx Motherboard Replacement: adım 12, 2 resimden 2.
    • Lift up the port using the blue opening tool.

    • Continue to lift up until it is unplugged from the motherboard.

  13. HP 14-dq0051dx Motherboard Replacement: adım 13, 2 resimden 1. HP 14-dq0051dx Motherboard Replacement: adım 13, 2 resimden 2.
    • Place both hands on opposite corners of the motherboard and carefully lift it up to remove it from the laptop.

    • Now the motherboard has been successfully removed and is ready to be replaced!

Sonuç

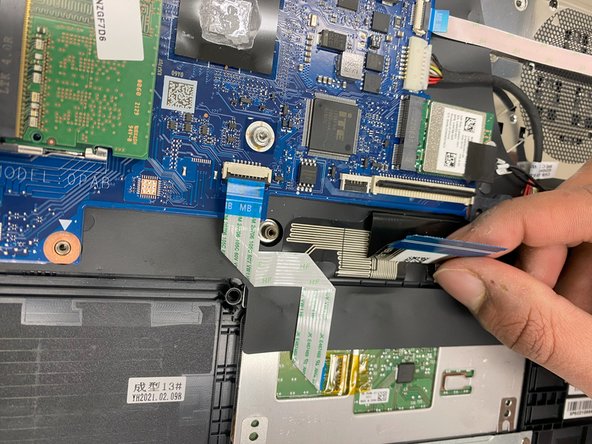
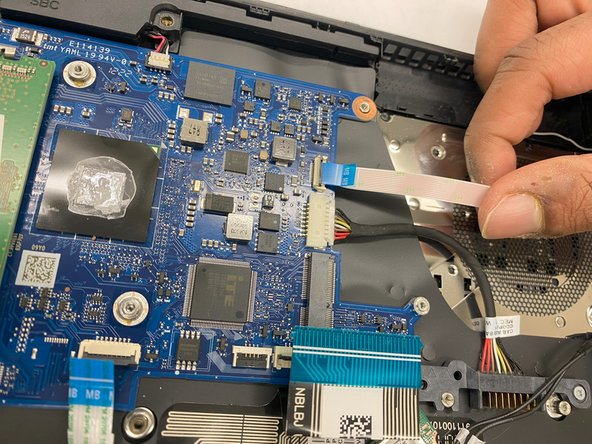
To reassemble your device, follow these instructions in reverse order.

Akash

Üyelik tarihi: 11/09/23

601 İtibar

3 adet Kılavuz yazıldı

Ekip

IUPUI, Team 2-4, Harley Fall 2023 IUPUI, Team 2-4, Harley Fall 2023 üyesi

IUPUI-HARLEY-F23S2G4

3 Üyeler

3 adet Kılavuz yazıldı

0 Yorum

Yorum Ekle

İstatistikleri Görüntüle:

Son 24 Saat: 2

Son 7 gün: 13

Son 30 gün: 52

Her zaman: 223