Ana içeriğe geç
Onarım Topluluğuna Katılın - Hesap Oluşturun

HP 15-ay052nr Fan Replacement

Neye ihtiyacın var

    1. HP 15-ay052nr Fan Replacement, Battery: adım 1, 1 resimden 1.
      • To protect the device and yourself, make sure your device is completely powered down before disassembling. Disconnect all external devices before starting any tear down process.

      • Turn the device and lay it upside-down on a flat surface so the base of the computer is facing upwards.

      FixBot'a Sor

      Yorum Ekle

    2. HP 15-ay052nr Fan Replacement: adım 2, 1 resimden 1.
      • Identify the two (2) sliding lock mechanisms on either side of the battery and slide them towards the center.

      • The sliders are located at the back of the device on the side where the display hinges are.

      • The slider closest to the optical drive (CD reader) clicks open but the opposite slider has a spring.

      FixBot'a Sor

      Yorum Ekle

    3. HP 15-ay052nr Fan Replacement: adım 3, 1 resimden 1.
      • Pull the battery slightly up and out to remove.

      • If the battery doesn't pop out, the sliders weren't pushed in far enough. Push the sliders towards the center until the battery pops out.

      FixBot'a Sor

      Yorum Ekle

    1. HP 15-ay052nr Fan Replacement, Bottom Cover: adım 4, 1 resimden 1.
      • Remove the rubber feet on the bottom of the device to access all the screws.

      • There are two rubber feet, one on each side of the battery compartment.

      FixBot'a Sor

      Yorum Ekle

    2. HP 15-ay052nr Fan Replacement: adım 5, 1 resimden 1.
      • Unscrew the twelve 9 mm JIS #0 screws on the back of the device.

      • Gently remove the optical drive (CD reader) to more easily separate the base.

      FixBot'a Sor

      Yorum Ekle

    3. HP 15-ay052nr Fan Replacement: adım 6, 1 resimden 1.
      • Unclip the keyboard surface from the base using an iFixit opening tool around the entire border.

      FixBot'a Sor

      Yorum Ekle

    4. HP 15-ay052nr Fan Replacement: adım 7, 1 resimden 1.
      • Separate the base of the computer from the component assembly.

      • The optical drive can be placed in the base where it corresponds to prevent misplacing it.

      FixBot'a Sor

      Yorum Ekle

    1. HP 15-ay052nr Fan Replacement, Fan: adım 8, 1 resimden 1.
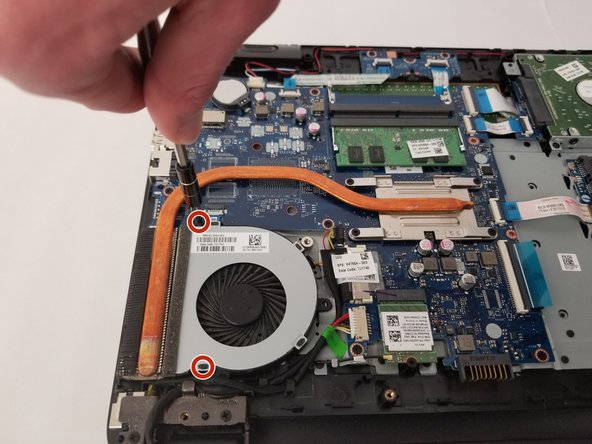
      • Remove the two 6.5 mm JIS #0 screws holding the cooling fan to the base.

      • The base is the side by the heatsink, which is made of copper.

      FixBot'a Sor

      Yorum Ekle

    2. HP 15-ay052nr Fan Replacement: adım 9, 1 resimden 1.
      • Unplug the fan cable from the motherboard.

      • The fan can now be removed.

      FixBot'a Sor

      Yorum Ekle

Sonuç

To reassemble your device, follow these instructions in reverse order.

İptal et: Bu kılavuzu tamamlamadım.

0Kılavuz Yorumları

Yorum Ekle

İstatistikleri Görüntüle:

Son 24 Saat: 0

Son 7 gün: 7

Son 30 gün: 24

Her zaman: 775