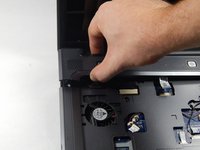
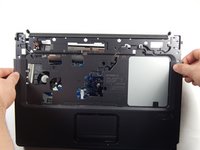
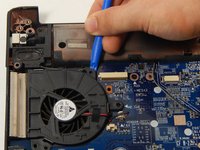
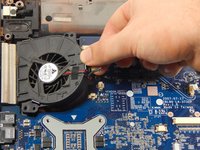
Ana içeriğe geç

HP Compaq C700 Fan Replacement

Neye ihtiyacın var

  1. HP Compaq C700 Fan Replacement, Keyboard: adım 1, 1 resimden 1.
    • It is advised to work on the device only when it is powered off so as to avoid electrocution risks.

    • Turn off computer by pressing and holding the power button.

  2. HP Compaq C700 Fan Replacement: adım 2, 3 resimden 1. HP Compaq C700 Fan Replacement: adım 2, 3 resimden 2. HP Compaq C700 Fan Replacement: adım 2, 3 resimden 3.
    • Locate and unscrew the two screws on the back marked with a small keyboard. These screws hold the keyboard in place.

    • Locate the metal hooks where the keyboard connects to the laptop and use a metal spudger to gently pry up the keyboard.

  3. HP Compaq C700 Fan Replacement: adım 3, 1 resimden 1.
    • Gently lift up and remove the keyboard.

  4. HP Compaq C700 Fan Replacement, Fan: adım 4, 1 resimden 1.
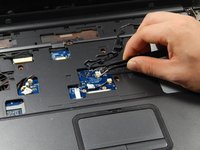
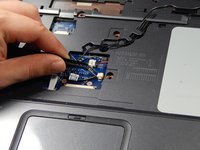
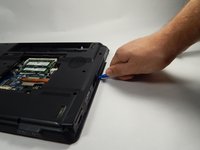
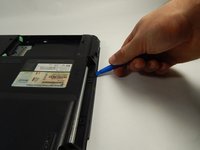
    • Turn the laptop over so that you see the bottom.

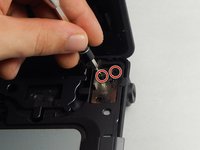
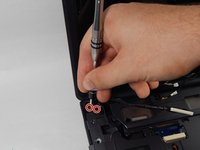
    • Locate the twenty 3 mm Phillips head screws.

    • Unscrew them using the PH0 screwdriver

  5. HP Compaq C700 Fan Replacement: adım 5, 1 resimden 1.
    • After unscrewing the 3 mm screws, remove the hard drive covering by lifting upward.

  6. HP Compaq C700 Fan Replacement: adım 6, 1 resimden 1.
    • Remove the hard drive by pulling on the plastic tab and lifting upward.

  7. HP Compaq C700 Fan Replacement: adım 7, 1 resimden 1.
    • Remove the covering that houses the RAM modules.

  8. HP Compaq C700 Fan Replacement: adım 8, 1 resimden 1.
    • Locate and unscrew the two Phillips head 3 mm screws on the wireless card.

  9. HP Compaq C700 Fan Replacement: adım 9, 1 resimden 1.
    • Unhook the two wires connecting to the wireless card by gently pulling them out.

  10. HP Compaq C700 Fan Replacement: adım 10, 1 resimden 1.
    • Gently lift and pull out the card.

  11. HP Compaq C700 Fan Replacement: adım 11, 1 resimden 1.
    • Locate the power button connector wire. (This can be found where the keyboard sits.)

    • Using the tweezers, unhook the wire.

  12. HP Compaq C700 Fan Replacement: adım 12, 2 resimden 1. HP Compaq C700 Fan Replacement: adım 12, 2 resimden 2.
    • Press and hold the lock to pop the panel piece above the keyboard and pull up to remove it.

  13. HP Compaq C700 Fan Replacement: adım 13, 2 resimden 1. HP Compaq C700 Fan Replacement: adım 13, 2 resimden 2.
    • Unplug the remaining wires using the tweezers.

  14. HP Compaq C700 Fan Replacement: adım 14, 1 resimden 1.
    • Gently pull out the three wires.

  15. HP Compaq C700 Fan Replacement: adım 15, 2 resimden 1. HP Compaq C700 Fan Replacement: adım 15, 2 resimden 2.
    • Locate the four 3 mm Phillips head screws.

    • Unscrew them using the PH0 screwdriver.

  16. HP Compaq C700 Fan Replacement: adım 16, 1 resimden 1.
    • Unhook the display connector wire.

  17. HP Compaq C700 Fan Replacement: adım 17, 1 resimden 1.
    • Gently disconnect the display by pulling it upwards.

  18. HP Compaq C700 Fan Replacement: adım 18, 1 resimden 1.
    • Locate the disk drive on the side of the device.

    • Remove it by pulling it all the way out.

  19. HP Compaq C700 Fan Replacement: adım 19, 1 resimden 1.
    • Use the PH0 screwdriver to remove the two 3 mm Phillips head screws in the disk drive port.

  20. HP Compaq C700 Fan Replacement: adım 20, 1 resimden 1.
    • Locate and unplug the touchpad connection using the tweezers.

  21. HP Compaq C700 Fan Replacement: adım 21, 3 resimden 1. HP Compaq C700 Fan Replacement: adım 21, 3 resimden 2. HP Compaq C700 Fan Replacement: adım 21, 3 resimden 3.
    • Using the Opening tool, gently pry up the cover and remove it.

  22. HP Compaq C700 Fan Replacement: adım 22, 1 resimden 1.
    • Unplug the fan wire connection using the tweezers.

  23. HP Compaq C700 Fan Replacement: adım 23, 1 resimden 1.
    • Locate the 3 mm Phillips head screw.

    • Unscrew it using the PH0 screwdriver.

  24. HP Compaq C700 Fan Replacement: adım 24, 2 resimden 1. HP Compaq C700 Fan Replacement: adım 24, 2 resimden 2.
    • Using the opening tool, gently pry up and remove the fan.

Sonuç

To reassemble your device, follow these instructions in reverse order.

Bir başkası bu kılavuzu tamamladı.

Taylor Johansen

Üyelik tarihi: 10/20/16

690 İtibar

5 adet Kılavuz yazıldı

Ekip

UMass Dartmouth, Team 5-6, Martin Fall 2016 UMass Dartmouth, Team 5-6, Martin Fall 2016 üyesi

UMASSD-MARTIN-F16S5G6

3 Üyeler

6 adet Kılavuz yazıldı

0 Yorum

Yorum Ekle

İstatistikleri Görüntüle:

Son 24 Saat: 0

Son 7 gün: 0

Son 30 gün: 10

Her zaman: 1,283