Giriş
This guide provides step-by-step instructions to remove and replace the button circuit board on an HP Deskjet 1055 printer using basic tools. This repair may be necessary if the power or function buttons stop responding. Only basic tools, including a Torx T-10 screwdriver, are required.
Neye ihtiyacın var
-
-
Press your thumb firmly on the center of the button plate on the left side of the printer.
-
Hook your fingers under the front edge of the button plate and pull upward while maintaining pressure in the center with your thumb.
-
-
-
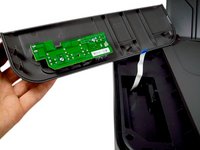
Once the front of the plate is loose, lift it up a few inches making sure to hold the back (paper feeding side) of the plate down.
-
Slide the plate towards the back of the printer and then lift up on the back of the plate.
-
The plate should now be disconnected from the tabs on the printer.
-
-
-
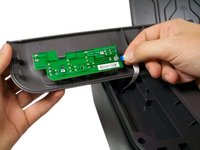
Flip the plate over to reveal the white ribbon cable that connects it to the printer.
-
Locate where the white ribbon cable is attached to the green button circuit board (circled in red).
-
Hold the ribbon cable near the connection point and gently pull it straight out from the circuit board to avoid damage.
-


To reassemble your device, follow these instructions in reverse order.
To reassemble your device, follow these instructions in reverse order.
İptal et: Bu kılavuzu tamamlamadım.
2 farklı kişi bu kılavuzu tamamladı.
Ekip

Cal Poly, Team 9-18, Amido Fall 2012 Cal Poly, Team 9-18, Amido Fall 2012 üyesi
CPSU-AMIDO-F12S9G18
4 Üyeler
10 adet Kılavuz yazıldı