Ana içeriğe geç

HP Deskjet F4480 Paper Roller Motor Replacement

Neye ihtiyacın var

  1. HP Deskjet F4480 Paper Roller Motor Replacement, Open front access panel: adım 1, 1 resimden 1.
    • Open the front access panel by placing your finger in the front slot and pulling gently.

  2. HP Deskjet F4480 Paper Roller Motor Replacement, Top Lid: adım 2, 1 resimden 1.
    • Open the protective lid that is covering the glass. Press gently against the base of the panel to remove the lid from the rest of the printer.

  3. HP Deskjet F4480 Paper Roller Motor Replacement: adım 3, 3 resimden 1. HP Deskjet F4480 Paper Roller Motor Replacement: adım 3, 3 resimden 2. HP Deskjet F4480 Paper Roller Motor Replacement: adım 3, 3 resimden 3.
    • Remove the four 9mm T10 Torx screws on the top.

  4. HP Deskjet F4480 Paper Roller Motor Replacement: adım 4, 2 resimden 1. HP Deskjet F4480 Paper Roller Motor Replacement: adım 4, 2 resimden 2.
    • Carefully lift the top panel off of the printer.

    • Do not tear or damage the two cables that connect the top lid to the motherboard.

  5. HP Deskjet F4480 Paper Roller Motor Replacement: adım 5, 3 resimden 1. HP Deskjet F4480 Paper Roller Motor Replacement: adım 5, 3 resimden 2. HP Deskjet F4480 Paper Roller Motor Replacement: adım 5, 3 resimden 3.
    • Remove the two cables by gripping each one close to their connection ports on the motherboard and gently disconnecting them.

  6. HP Deskjet F4480 Paper Roller Motor Replacement, Paper Roller Motor: adım 6, 2 resimden 1. HP Deskjet F4480 Paper Roller Motor Replacement, Paper Roller Motor: adım 6, 2 resimden 2.
    • Detach the white ribbon cable.

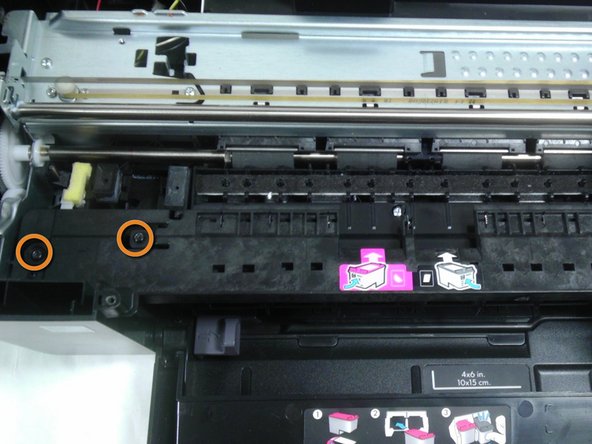
    • Remove the two 9mm Torx screws on either side of the white bracket.

  7. HP Deskjet F4480 Paper Roller Motor Replacement: adım 7, 2 resimden 1. HP Deskjet F4480 Paper Roller Motor Replacement: adım 7, 2 resimden 2.
    • Remove the three black 9mm Torx screws and pull the black panel out from under the ink carriage.

  8. HP Deskjet F4480 Paper Roller Motor Replacement: adım 8, 1 resimden 1.
    • Remove the five 9mm Torx screws on the silver panel.

    • Pull out the silver panel.

  9. HP Deskjet F4480 Paper Roller Motor Replacement: adım 9, 1 resimden 1.
    • Remove the green & yellow cable and the black & white cable.

  10. HP Deskjet F4480 Paper Roller Motor Replacement: adım 10, 1 resimden 1.
    • Turn the printer over.

    • Locate the gap at the bottom corner near the product information sticker.

    • Reach a flat head screwdriver inside the gap and unlatch the silver tab.

    • A spudger tool is not the correct tool for this step, it has the potential to break.

    • For better visibility of the silver tab inside the gap, the use of a flashlight is recommended.

  11. HP Deskjet F4480 Paper Roller Motor Replacement: adım 11, 2 resimden 1. HP Deskjet F4480 Paper Roller Motor Replacement: adım 11, 2 resimden 2.
    • Remove the two 9mm Torx screws in order to detach the roller assembly from the system.

  12. HP Deskjet F4480 Paper Roller Motor Replacement: adım 12, 1 resimden 1.
    • Remove the roller assembly from the printer case.

  13. HP Deskjet F4480 Paper Roller Motor Replacement: adım 13, 1 resimden 1.
    • Remove the two 6mm torx screws using a T9 Torx bit.

  14. HP Deskjet F4480 Paper Roller Motor Replacement: adım 14, 1 resimden 1.
    • Remove the paper roller motor.

    • Replace the old motor.

Sonuç

To reassemble your device, with the addition of a new motor, follow these instructions in reverse order.

7 farklı kişi bu kılavuzu tamamladı.

Kevin Raives

Üyelik tarihi: 01/15/13

93 İtibar

2 adet Kılavuz yazıldı

Ekip

Cal Poly, Team 18-35, Regan Winter 2013 Cal Poly, Team 18-35, Regan Winter 2013 üyesi

CPSU-REGAN-W13S18G35

5 Üyeler

15 adet Kılavuz yazıldı

0 Yorum

Yorum Ekle

İstatistikleri Görüntüle:

Son 24 Saat: 0

Son 7 gün: 7

Son 30 gün: 26

Her zaman: 5,412