Ana içeriğe geç

HP Envy dv7t-7200 Hard Drive Replacement

Neye ihtiyacın var

  1. HP Envy dv7t-7200 Hard Drive Replacement, Battery: adım 1, 1 resimden 1.
    • Turn the power off and disconnect all cables and cords from the laptop.

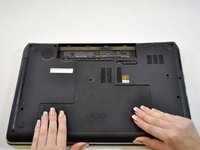
    • Place the computer on its top on a flat surface with the hinges facing away from you.

  2. HP Envy dv7t-7200 Hard Drive Replacement: adım 2, 3 resimden 1. HP Envy dv7t-7200 Hard Drive Replacement: adım 2, 3 resimden 2. HP Envy dv7t-7200 Hard Drive Replacement: adım 2, 3 resimden 3.
    • Slide the battery release latch to the left which is located on the right-hand side of the battery.

  3. HP Envy dv7t-7200 Hard Drive Replacement: adım 3, 1 resimden 1.
    • Tilt the battery away from you and lift out.

  4. HP Envy dv7t-7200 Hard Drive Replacement, Service Cover: adım 4, 1 resimden 1.
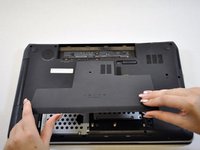
    • Using a Phillips #01 screwdriver, remove the Phillips PM2.5×5.5 screw on the service cover.

    • This screw does not come out of the service cover completely once loosened.

  5. HP Envy dv7t-7200 Hard Drive Replacement: adım 5, 2 resimden 1. HP Envy dv7t-7200 Hard Drive Replacement: adım 5, 2 resimden 2.
    • Slide the service cover toward the front of the laptop.

    • Lift the service cover to remove it from the laptop.

  6. HP Envy dv7t-7200 Hard Drive Replacement, Hard Drive: adım 6, 1 resimden 1.
    • Remove the 2 Phillips PM2.5×5.5 top screws from brackets on both hard drives.

  7. HP Envy dv7t-7200 Hard Drive Replacement: adım 7, 1 resimden 1.
    • Remove the primary drive first located on the right hand side.

    • Use the black tab to lift the drive up and out.

  8. HP Envy dv7t-7200 Hard Drive Replacement: adım 8, 1 resimden 1.
    • Remove the 2 Phillips PM2.5×5.5 screws on each side of the drive bracket.

  9. HP Envy dv7t-7200 Hard Drive Replacement: adım 9, 1 resimden 1.
    • Remove the hard drive connector cable.

    • This cable can be difficult to remove. Try to pull this cable firmly and carefully.

  10. HP Envy dv7t-7200 Hard Drive Replacement: adım 10, 1 resimden 1.
    • Repeat steps 6-9 for the secondary hard drive.

Sonuç

To reassemble your device, follow these instructions in the reverse order.

Bir başkası bu kılavuzu tamamladı.

Krystal

Üyelik tarihi: 10/16/17

882 İtibar

8 adet Kılavuz yazıldı

Ekip

UW Tacoma, Team S3-G3, Liner Fall 2017 UW Tacoma, Team S3-G3, Liner Fall 2017 üyesi

UWT-LINER-F17S3G3

5 Üyeler

8 adet Kılavuz yazıldı

0 Yorum

Yorum Ekle

İstatistikleri Görüntüle:

Son 24 Saat: 0

Son 7 gün: 5

Son 30 gün: 8

Her zaman: 335