Ana içeriğe geç
Onarım Topluluğuna Katılın - Hesap Oluşturun

HP Mini 210-1199DX CMOS Battery Replacement

Neye ihtiyacın var

  1. HP Mini 210-1199DX CMOS Battery Replacement, Battery: adım 1, 2 resimden 1. HP Mini 210-1199DX CMOS Battery Replacement, Battery: adım 1, 2 resimden 2.
    • Unplug the netbook.

    • Secure the netbook in a upright position.

    • Slide the plastic battery latch that secures it into the netbook.

    • Keep thumb secure on the right tab as you begin to remove the battery.

    FixBot'a Sor

    Yorum Ekle

  2. HP Mini 210-1199DX CMOS Battery Replacement: adım 2, 1 resimden 1.
    • Remove the battery from the device.

    FixBot'a Sor

    Yorum Ekle

  3. HP Mini 210-1199DX CMOS Battery Replacement, Bottom Cover: adım 3, 1 resimden 1.
    • Press down on the two orange buttons to release.

    • If the case does not pop off, begin to use Spudger to pry the case off the back.

    FixBot'a Sor

    Yorum Ekle

  4. HP Mini 210-1199DX CMOS Battery Replacement: adım 4, 3 resimden 1. HP Mini 210-1199DX CMOS Battery Replacement: adım 4, 3 resimden 2. HP Mini 210-1199DX CMOS Battery Replacement: adım 4, 3 resimden 3.
    • Place the spudger on corners and openings in order to begin removal of the back.

    • Continue this on all corner until the case comes fully off of the back.
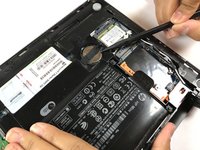
    FixBot'a Sor

    Yorum Ekle

  5. HP Mini 210-1199DX CMOS Battery Replacement: adım 5, 1 resimden 1.
    • Pull the case off of the device

    FixBot'a Sor

    Yorum Ekle

  6. HP Mini 210-1199DX CMOS Battery Replacement, CMOS Battery: adım 6, 2 resimden 1. HP Mini 210-1199DX CMOS Battery Replacement, CMOS Battery: adım 6, 2 resimden 2.
    Bu adımda kullanılan alet:
    Tweezers
    $4.99
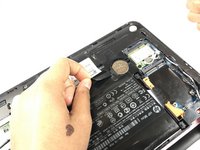
    • Simply pull the small black ribbon off of the battery with either your finger or a pair of tweezers.

    FixBot'a Sor

    Yorum Ekle

  7. HP Mini 210-1199DX CMOS Battery Replacement: adım 7, 2 resimden 1. HP Mini 210-1199DX CMOS Battery Replacement: adım 7, 2 resimden 2.
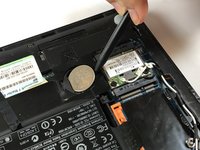
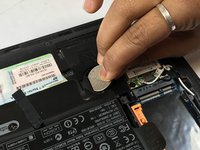
    • Using the spudger, carefully pop the battery out of the right side as seen in the picture.

    • To reinstall, carefully place slide the battery back into place with the positive side facing upwards.

    FixBot'a Sor

    Yorum Ekle

Sonuç

To reassemble your device, follow these instructions in reverse order.

İptal et: Bu kılavuzu tamamlamadım.

Phillip Winston

Üyelik tarihi: 03/21/17

655 İtibar

6 adet Kılavuz yazıldı

Ekip

Texas Tech, Team S46-G3, Bennett Spring 2017 Texas Tech, Team S46-G3, Bennett Spring 2017 üyesi

TTU-BENNETT-S17S46G3

3 Üyeler

6 adet Kılavuz yazıldı

0Kılavuz Yorumları

Yorum Ekle

İstatistikleri Görüntüle:

Son 24 Saat: 0

Son 7 gün: 8

Son 30 gün: 29

Her zaman: 1,074