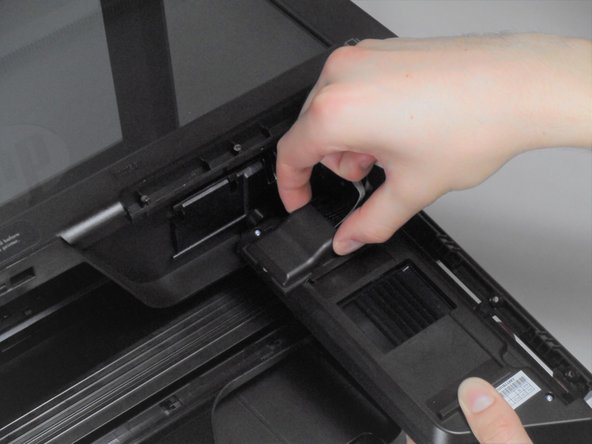
Ana içeriğe geç

HP Officejet Pro 8600 Plus Control Panel Replacement

Neye ihtiyacın var

  1. HP Officejet Pro 8600 Plus Control Panel Replacement, Control Panel: adım 1, 1 resimden 1.
    • Lift the scanner lid to a resting position.

  2. HP Officejet Pro 8600 Plus Control Panel Replacement: adım 2, 1 resimden 1.
    • Wedge the plastic opening tool into each of the three plugs to pry them from the control panel hinge located above the control panel screen.

  3. HP Officejet Pro 8600 Plus Control Panel Replacement: adım 3, 1 resimden 1.
    • Remove the three 10mm-T10 Torx screws.

  4. HP Officejet Pro 8600 Plus Control Panel Replacement: adım 4, 1 resimden 1.
    • Disconnect the control panel from the hinge by gently lifting upward, then outward towards you.

  5. HP Officejet Pro 8600 Plus Control Panel Replacement: adım 5, 3 resimden 1. HP Officejet Pro 8600 Plus Control Panel Replacement: adım 5, 3 resimden 2. HP Officejet Pro 8600 Plus Control Panel Replacement: adım 5, 3 resimden 3.
    • Detach the control panel from the black plastic latch by gently lifting upward, then outward towards you.

    • Pull up on the left side when sliding up so the panel does not get stuck at the end of the track.

  6. HP Officejet Pro 8600 Plus Control Panel Replacement: adım 6, 3 resimden 1. HP Officejet Pro 8600 Plus Control Panel Replacement: adım 6, 3 resimden 2. HP Officejet Pro 8600 Plus Control Panel Replacement: adım 6, 3 resimden 3.
    • Turn over the control panel, making the screen face downwards.

    • Place two fingers on the rectangular, plastic wire cover and squeeze inward. Slide the cover downward, away from the cables, until the cover is fully removed.

  7. HP Officejet Pro 8600 Plus Control Panel Replacement: adım 7, 2 resimden 1. HP Officejet Pro 8600 Plus Control Panel Replacement: adım 7, 2 resimden 2.
    • Disconnect the two ribbon cables from the panel by pulling them upward out of their ports.

    • This does not break the cables. They can easily be reconnected by plugging them into their ports again.

Sonuç

To reassemble your device, follow these instructions in reverse order.

9 farklı kişi bu kılavuzu tamamladı.

Mackinnon Buck

Üyelik tarihi: 04/18/18

1.182 İtibar

3 adet Kılavuz yazıldı

Ekip

Cal Poly, Team S16-G4, Livingston Spring 2018 Cal Poly, Team S16-G4, Livingston Spring 2018 üyesi

CPSU-LIVINGSTON-S18S16G4

4 Üyeler

10 adet Kılavuz yazıldı

4 Yorum

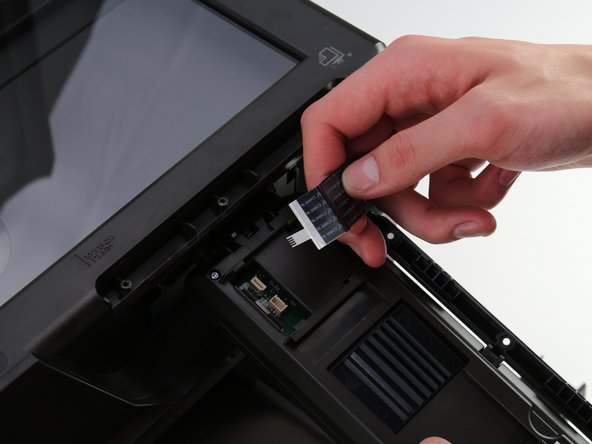
This worked pretty much exactly as described; was a fairly straightforward procedure. Just have to be super-careful with those ribbon cables - they’re pretty delicate!

Angus McAllister - Yanıt

This is the easy one. Please do one for the HP Officejet Pro 8610. How the !&&* do you remove the led panel. It’s maddening!

Greg Freeman - Yanıt

Now if only I could find a replacement panel that I can trust! Any suggestions on where to buy the part?

L R Shukla - Yanıt

I’ve two of these printers and the screen is shot on both of them. Very frustrating that replacement screens aren’t available. Almost looks like a planned failure????

Jon Pagh - Yanıt

Yorum Ekle

İstatistikleri Görüntüle:

Son 24 Saat: 3

Son 7 gün: 24

Son 30 gün: 94

Her zaman: 9,164