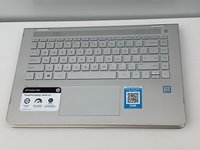
Ana içeriğe geç

HP Pavilion x360 14m-ba114dx DC Power Jack Replacement

Neye ihtiyacın var

  1. HP Pavilion x360 14m-ba114dx DC Power Jack Replacement, Battery: adım 1, 3 resimden 1. HP Pavilion x360 14m-ba114dx DC Power Jack Replacement, Battery: adım 1, 3 resimden 2. HP Pavilion x360 14m-ba114dx DC Power Jack Replacement, Battery: adım 1, 3 resimden 3.
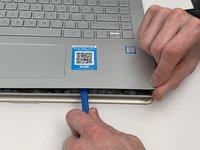
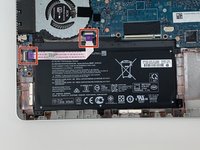
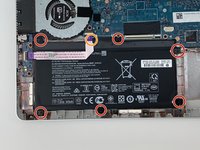
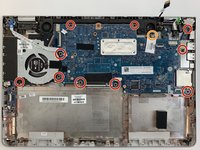
    • Using a #0 Phillips-head screwdriver, remove the three 5 mm screws along the bottom of the back cover.

    • Using a #0 Phillips-head screwdriver, remove the 6 mm screw at the top of the back cover.

  2. HP Pavilion x360 14m-ba114dx DC Power Jack Replacement: adım 2, 3 resimden 1. HP Pavilion x360 14m-ba114dx DC Power Jack Replacement: adım 2, 3 resimden 2. HP Pavilion x360 14m-ba114dx DC Power Jack Replacement: adım 2, 3 resimden 3.
    • Using the flat end of the Spudger, pry up the two rubber feet on the top of the laptop's back cover.

    • Using a #0 Phillips-head screwdriver, remove the 8 mm screw under each of the rubber feet.

  3. HP Pavilion x360 14m-ba114dx DC Power Jack Replacement: adım 3, 3 resimden 1. HP Pavilion x360 14m-ba114dx DC Power Jack Replacement: adım 3, 3 resimden 2. HP Pavilion x360 14m-ba114dx DC Power Jack Replacement: adım 3, 3 resimden 3.
    • Open the laptop, with the display fully extended to 360 degrees so that the screen is on the table.

    • In this orientation, sliding the laptop around may scratch the screen. A blanket or a mat placed under the screen will help to prevent scratching.

    • Using the thinner end of an iFixit Plastic Opening Tool, pry open the keyboard panel from the base of the laptop near the screen hinges.

  4. HP Pavilion x360 14m-ba114dx DC Power Jack Replacement: adım 4, 3 resimden 1. HP Pavilion x360 14m-ba114dx DC Power Jack Replacement: adım 4, 3 resimden 2. HP Pavilion x360 14m-ba114dx DC Power Jack Replacement: adım 4, 3 resimden 3.
    • Using the iFixit Plastic Opening Tool and the iFixit Opening Picks, work your way around the rest of the keyboard and pry it out of the base.

  5. HP Pavilion x360 14m-ba114dx DC Power Jack Replacement: adım 5, 1 resimden 1.
    • Grasp the keyboard with both hands and gently lift it out of the base.

    • Do not lift the keyboard completely out of the base, as there are ZIF connectors that must be removed first.

  6. HP Pavilion x360 14m-ba114dx DC Power Jack Replacement: adım 6, 3 resimden 1. HP Pavilion x360 14m-ba114dx DC Power Jack Replacement: adım 6, 3 resimden 2. HP Pavilion x360 14m-ba114dx DC Power Jack Replacement: adım 6, 3 resimden 3.
    • Using a plastic Spudger, remove the ZIF connectors that attach the motherboard to the touchpad and the keyboard. Use the flat end of the Spudger to pop up the cap on top of the connector. The connector will then slide out of place.

    • Repeat this step for all three connectors.

  7. HP Pavilion x360 14m-ba114dx DC Power Jack Replacement: adım 7, 2 resimden 1. HP Pavilion x360 14m-ba114dx DC Power Jack Replacement: adım 7, 2 resimden 2.
    • Using the flat end of the plastic Spudger, remove the ZIF connector attaching the volume button and headphone jack to the motherboard.

    • This ZIF ribbon is glued to the middle of the battery. You do not need to separate this ribbon from the battery in order to remove the battery from the device. You only need to unclip it at both ends.

  8. HP Pavilion x360 14m-ba114dx DC Power Jack Replacement: adım 8, 2 resimden 1. HP Pavilion x360 14m-ba114dx DC Power Jack Replacement: adım 8, 2 resimden 2.
    • Using a #1 Phillips-head screwdriver, remove the seven 4 mm screws around the battery.

    • Gently move the ZIF connector out of the way to reach the screw marked in orange. Then use the #1 Phillips-head screwdriver to unscrew it.

  9. HP Pavilion x360 14m-ba114dx DC Power Jack Replacement: adım 9, 3 resimden 1. HP Pavilion x360 14m-ba114dx DC Power Jack Replacement: adım 9, 3 resimden 2. HP Pavilion x360 14m-ba114dx DC Power Jack Replacement: adım 9, 3 resimden 3.
    • Using the thin end of the iFixit Plastic Opening Tool, pry the battery out of its place inside the laptop's base.

    • Next, use your fingers to pull the battery out of its position.

  10. HP Pavilion x360 14m-ba114dx DC Power Jack Replacement, Motherboard: adım 10, 3 resimden 1. HP Pavilion x360 14m-ba114dx DC Power Jack Replacement, Motherboard: adım 10, 3 resimden 2. HP Pavilion x360 14m-ba114dx DC Power Jack Replacement, Motherboard: adım 10, 3 resimden 3.
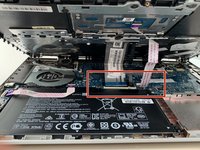
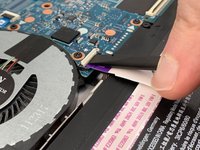
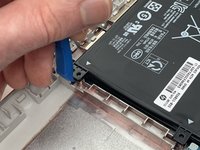
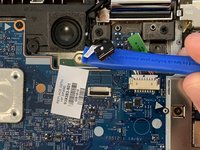
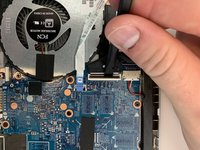
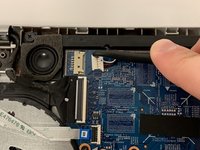
    • Using the plastic Spudger, remove the ZIF connector connecting the power button board to the motherboard. Remove the connector by popping the cap up on top of the connector and sliding it out of its slot.

    • This ZIF ribbon is glued to the middle of the fan and will not come off.

  11. HP Pavilion x360 14m-ba114dx DC Power Jack Replacement: adım 11, 3 resimden 1. HP Pavilion x360 14m-ba114dx DC Power Jack Replacement: adım 11, 3 resimden 2. HP Pavilion x360 14m-ba114dx DC Power Jack Replacement: adım 11, 3 resimden 3.
    • Using the iFixit Plastic Opening Tool or the plastic Spudger, disconnect the touch screen cable from the motherboard. Flip up the ZIF connector and move the wire away from the connection point.

    • Pull the wire out from its track next to the speaker.

  12. HP Pavilion x360 14m-ba114dx DC Power Jack Replacement: adım 12, 3 resimden 1. HP Pavilion x360 14m-ba114dx DC Power Jack Replacement: adım 12, 3 resimden 2. HP Pavilion x360 14m-ba114dx DC Power Jack Replacement: adım 12, 3 resimden 3.
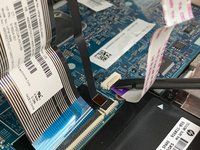
    • Use the Blunt Tweezers to disconnect the Wireless Card Antenna Cables. Start with the cable labeled M2, which is connected to Port #2. To disconnect he cable, grab it on both sides with the tweezers and pull up.

  13. HP Pavilion x360 14m-ba114dx DC Power Jack Replacement: adım 13, 3 resimden 1. HP Pavilion x360 14m-ba114dx DC Power Jack Replacement: adım 13, 3 resimden 2. HP Pavilion x360 14m-ba114dx DC Power Jack Replacement: adım 13, 3 resimden 3.
    • Use the Blunt Tweezers to disconnect the Antenna Cable labeled A1, which is connected to Port #1. To disconnect he cable, grab it on both sides with the tweezers and pull up.

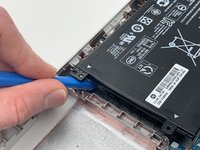
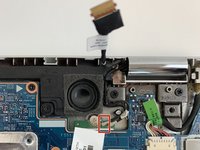
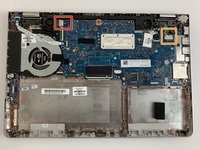
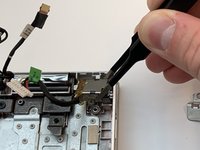
    • Using the Blunt Tweezers, unwind the cables from the track to the right of the speaker. The cables are held in place by two black hooks.

  14. HP Pavilion x360 14m-ba114dx DC Power Jack Replacement: adım 14, 3 resimden 1. HP Pavilion x360 14m-ba114dx DC Power Jack Replacement: adım 14, 3 resimden 2. HP Pavilion x360 14m-ba114dx DC Power Jack Replacement: adım 14, 3 resimden 3.
    • Using the plastic Spudger, remove the ZIF connector that connects the motherboard to the Display Cable. To remove a ZIF connector, use the flat end of the Spudger to flip up the cap on the top. Then the connector should slide out.

  15. HP Pavilion x360 14m-ba114dx DC Power Jack Replacement: adım 15, 3 resimden 1. HP Pavilion x360 14m-ba114dx DC Power Jack Replacement: adım 15, 3 resimden 2. HP Pavilion x360 14m-ba114dx DC Power Jack Replacement: adım 15, 3 resimden 3.
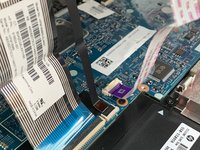
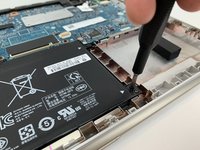
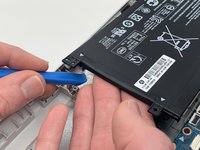
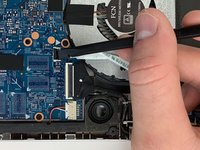
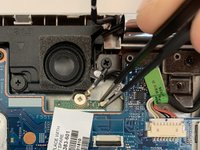
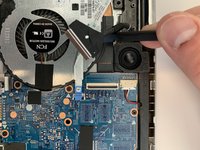
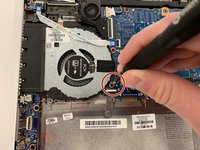
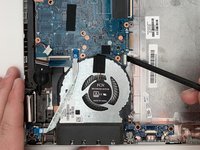
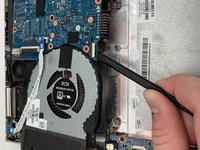
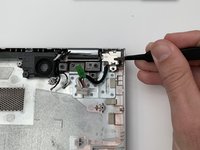
    • Using the curved end of the Halberd Spudger, disconnect the Speaker Cable from the port that connects it to the motherboard by prying it out of the port.

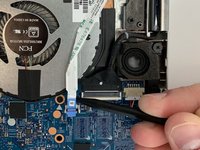
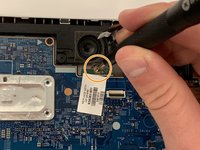
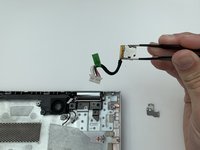
    • Using the same process to disconnect the DC Power Jack Cable from the port that connects it to the motherboard.

  16. HP Pavilion x360 14m-ba114dx DC Power Jack Replacement: adım 16, 3 resimden 1. HP Pavilion x360 14m-ba114dx DC Power Jack Replacement: adım 16, 3 resimden 2. HP Pavilion x360 14m-ba114dx DC Power Jack Replacement: adım 16, 3 resimden 3.
    • Using a #1 Phillips-head Screwdriver, remove the ten 5 mm screws that secure the motherboard and fan to the base.

    • Using a #1 Phillips-head Screwdriver, remove the singular 2 mm screw that connects the motherboard to the wireless card.

  17. HP Pavilion x360 14m-ba114dx DC Power Jack Replacement: adım 17, 3 resimden 1. HP Pavilion x360 14m-ba114dx DC Power Jack Replacement: adım 17, 3 resimden 2. HP Pavilion x360 14m-ba114dx DC Power Jack Replacement: adım 17, 3 resimden 3.
    • Using the plastic Spudger, gently lift up on the motherboard from the side that has the fan connected to it and remove the motherboard from the base.

    • Ensure that all connections to the motherboard have been disconnected. If they are not, the motherboard could be damaged upon removal.

  18. HP Pavilion x360 14m-ba114dx DC Power Jack Replacement, DC Power Jack: adım 18, 3 resimden 1. HP Pavilion x360 14m-ba114dx DC Power Jack Replacement, DC Power Jack: adım 18, 3 resimden 2. HP Pavilion x360 14m-ba114dx DC Power Jack Replacement, DC Power Jack: adım 18, 3 resimden 3.
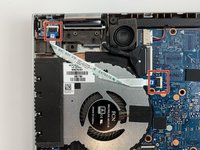
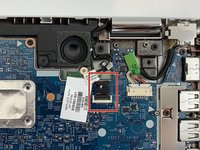
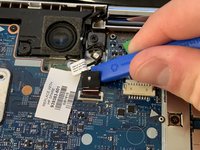
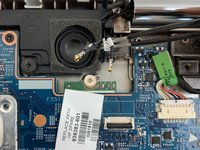
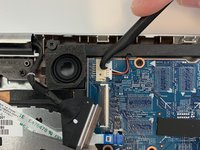
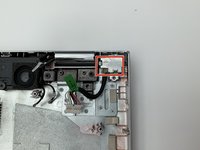
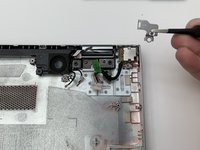
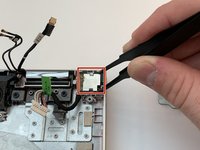
    • Using the Blunt Tweezers, gently lift the metal piece that covers the DC Power Jack unit and the metal piece will pop out.

    • Don't forcefully pull on the metal piece because it could break.

  19. HP Pavilion x360 14m-ba114dx DC Power Jack Replacement: adım 19, 3 resimden 1. HP Pavilion x360 14m-ba114dx DC Power Jack Replacement: adım 19, 3 resimden 2. HP Pavilion x360 14m-ba114dx DC Power Jack Replacement: adım 19, 3 resimden 3.
    • Using the Blunt Tweezers, grab the DC Power Jack unit and gently lift it out.

Sonuç

To reassemble your device, follow these instructions in reverse order.

2 farklı kişi bu kılavuzu tamamladı.

Bir Yorum

This is an amazing guide to repairing Hp Power Jack.

Check online HP DC Jack in India.

Moni1234 Moni - Yanıt

Yorum Ekle

İstatistikleri Görüntüle:

Son 24 Saat: 1

Son 7 gün: 10

Son 30 gün: 52

Her zaman: 2,078