Ana içeriğe geç

HP Pavilion x360 14m-ba114dx Screen Assembly Replacement

Neye ihtiyacın var

  1. HP Pavilion x360 14m-ba114dx Screen Assembly Replacement, Battery: adım 1, 3 resimden 1. HP Pavilion x360 14m-ba114dx Screen Assembly Replacement, Battery: adım 1, 3 resimden 2. HP Pavilion x360 14m-ba114dx Screen Assembly Replacement, Battery: adım 1, 3 resimden 3.
    • Using a #0 Phillips-head screwdriver, remove the three 5 mm screws along the bottom of the back cover.

    • Using a #0 Phillips-head screwdriver, remove the 6 mm screw at the top of the back cover.

  2. HP Pavilion x360 14m-ba114dx Screen Assembly Replacement: adım 2, 3 resimden 1. HP Pavilion x360 14m-ba114dx Screen Assembly Replacement: adım 2, 3 resimden 2. HP Pavilion x360 14m-ba114dx Screen Assembly Replacement: adım 2, 3 resimden 3.
    • Using the flat end of the Spudger, pry up the two rubber feet on the top of the laptop's back cover.

    • Using a #0 Phillips-head screwdriver, remove the 8 mm screw under each of the rubber feet.

  3. HP Pavilion x360 14m-ba114dx Screen Assembly Replacement: adım 3, 3 resimden 1. HP Pavilion x360 14m-ba114dx Screen Assembly Replacement: adım 3, 3 resimden 2. HP Pavilion x360 14m-ba114dx Screen Assembly Replacement: adım 3, 3 resimden 3.
    • Open the laptop, with the display fully extended to 360 degrees so that the screen is on the table.

    • In this orientation, sliding the laptop around may scratch the screen. A blanket or a mat placed under the screen will help to prevent scratching.

    • Using the thinner end of an iFixit Plastic Opening Tool, pry open the keyboard panel from the base of the laptop near the screen hinges.

  4. HP Pavilion x360 14m-ba114dx Screen Assembly Replacement: adım 4, 3 resimden 1. HP Pavilion x360 14m-ba114dx Screen Assembly Replacement: adım 4, 3 resimden 2. HP Pavilion x360 14m-ba114dx Screen Assembly Replacement: adım 4, 3 resimden 3.
    • Using the iFixit Plastic Opening Tool and the iFixit Opening Picks, work your way around the rest of the keyboard and pry it out of the base.

  5. HP Pavilion x360 14m-ba114dx Screen Assembly Replacement: adım 5, 1 resimden 1.
    • Grasp the keyboard with both hands and gently lift it out of the base.

    • Do not lift the keyboard completely out of the base, as there are ZIF connectors that must be removed first.

  6. HP Pavilion x360 14m-ba114dx Screen Assembly Replacement: adım 6, 3 resimden 1. HP Pavilion x360 14m-ba114dx Screen Assembly Replacement: adım 6, 3 resimden 2. HP Pavilion x360 14m-ba114dx Screen Assembly Replacement: adım 6, 3 resimden 3.
    • Using a plastic Spudger, remove the ZIF connectors that attach the motherboard to the touchpad and the keyboard. Use the flat end of the Spudger to pop up the cap on top of the connector. The connector will then slide out of place.

    • Repeat this step for all three connectors.

  7. HP Pavilion x360 14m-ba114dx Screen Assembly Replacement: adım 7, 2 resimden 1. HP Pavilion x360 14m-ba114dx Screen Assembly Replacement: adım 7, 2 resimden 2.
    • Using the flat end of the plastic Spudger, remove the ZIF connector attaching the volume button and headphone jack to the motherboard.

    • This ZIF ribbon is glued to the middle of the battery. You do not need to separate this ribbon from the battery in order to remove the battery from the device. You only need to unclip it at both ends.

  8. HP Pavilion x360 14m-ba114dx Screen Assembly Replacement: adım 8, 2 resimden 1. HP Pavilion x360 14m-ba114dx Screen Assembly Replacement: adım 8, 2 resimden 2.
    • Using a #1 Phillips-head screwdriver, remove the seven 4 mm screws around the battery.

    • Gently move the ZIF connector out of the way to reach the screw marked in orange. Then use the #1 Phillips-head screwdriver to unscrew it.

  9. HP Pavilion x360 14m-ba114dx Screen Assembly Replacement: adım 9, 3 resimden 1. HP Pavilion x360 14m-ba114dx Screen Assembly Replacement: adım 9, 3 resimden 2. HP Pavilion x360 14m-ba114dx Screen Assembly Replacement: adım 9, 3 resimden 3.
    • Using the thin end of the iFixit Plastic Opening Tool, pry the battery out of its place inside the laptop's base.

    • Next, use your fingers to pull the battery out of its position.

  10. HP Pavilion x360 14m-ba114dx Screen Assembly Replacement, Screen: adım 10, 1 resimden 1.
    • Orient the laptop so it is in tablet mode.

  11. HP Pavilion x360 14m-ba114dx Screen Assembly Replacement: adım 11, 2 resimden 1. HP Pavilion x360 14m-ba114dx Screen Assembly Replacement: adım 11, 2 resimden 2.
    • Wedge the edge of the iFixit Plastic Opening Tool between the outer casing and the screen and begin prying the screen away from its casing.

    • It is most effective to start this prying motion at one of the top corners.

  12. HP Pavilion x360 14m-ba114dx Screen Assembly Replacement: adım 12, 2 resimden 1. HP Pavilion x360 14m-ba114dx Screen Assembly Replacement: adım 12, 2 resimden 2.
    • Once an initial separation between the casing and the screen has been made, use the iFixit Plastic Opening Picks to work your way around the screen, separating it from its casing.

  13. HP Pavilion x360 14m-ba114dx Screen Assembly Replacement: adım 13, 2 resimden 1. HP Pavilion x360 14m-ba114dx Screen Assembly Replacement: adım 13, 2 resimden 2.
    • Plant the Suction Cup in the center of the screen.

    • After fully separating the screen from its casing using the iFixit Opening Picks, use the Suction Cup to lift the screen out of the casing.

  14. HP Pavilion x360 14m-ba114dx Screen Assembly Replacement: adım 14, 3 resimden 1. HP Pavilion x360 14m-ba114dx Screen Assembly Replacement: adım 14, 3 resimden 2. HP Pavilion x360 14m-ba114dx Screen Assembly Replacement: adım 14, 3 resimden 3.
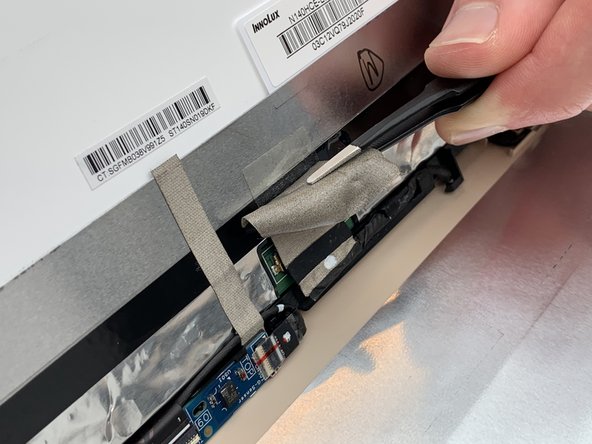
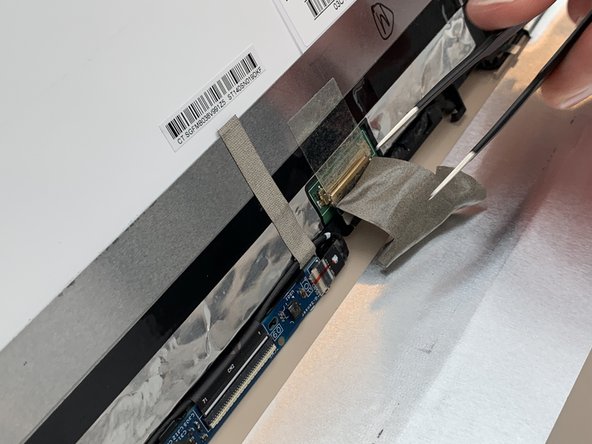
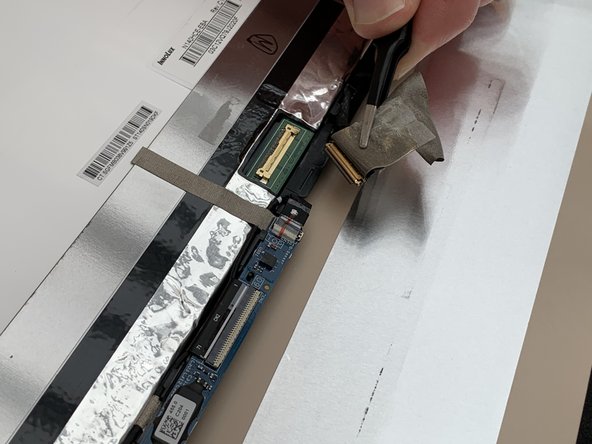
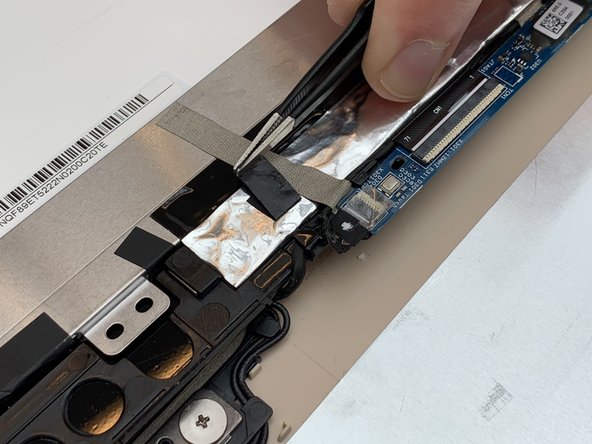
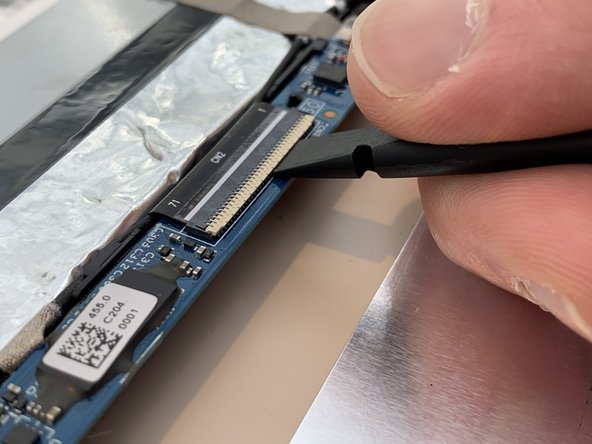
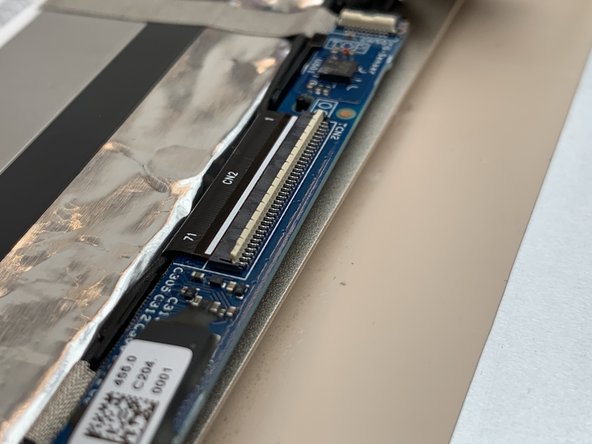
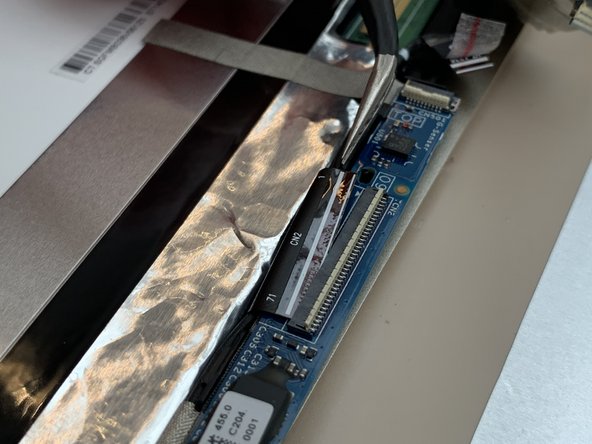
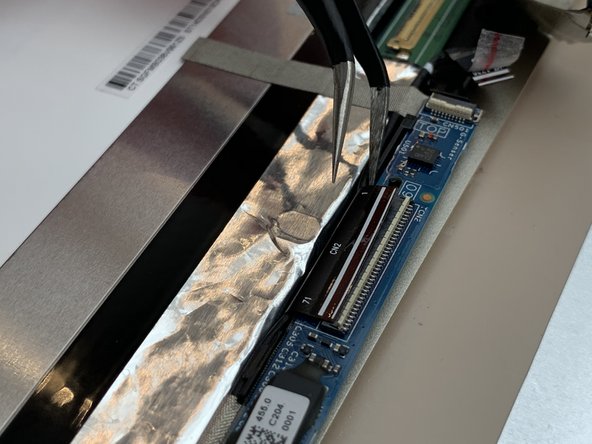
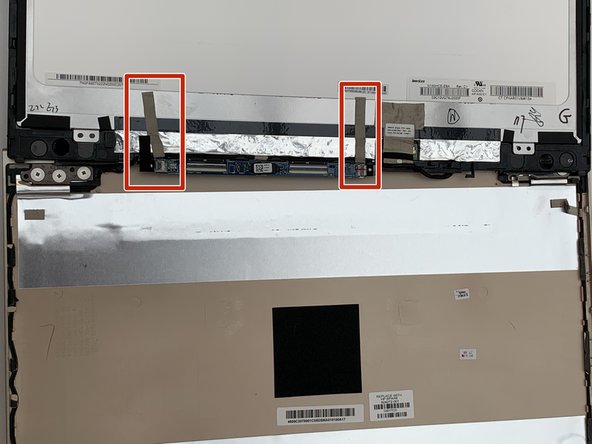
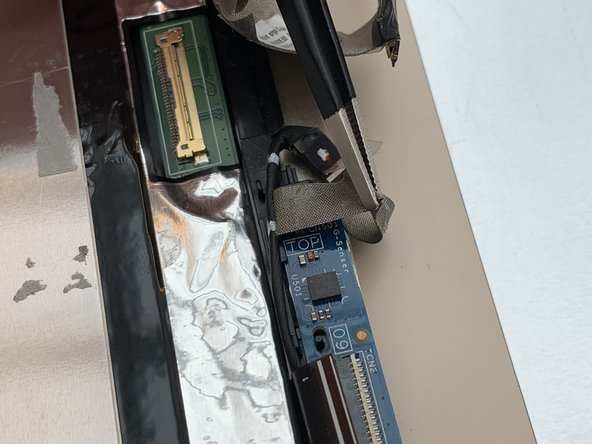
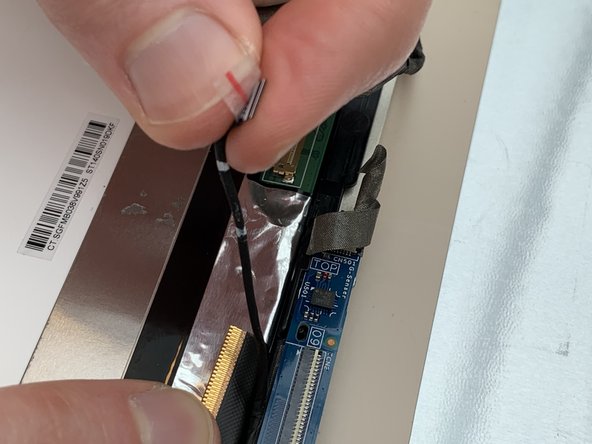
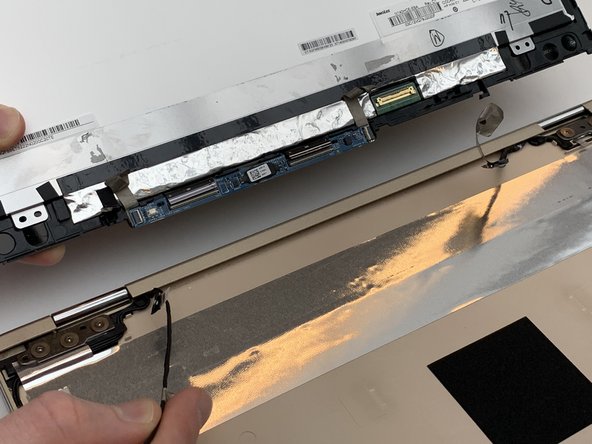
    • Using the Blunt Tweezers, remove the large piece of gray tape over the LCD Display connector.

    • This tape is located on the back of the screen assembly, on the bottom and near the hinges.

  15. HP Pavilion x360 14m-ba114dx Screen Assembly Replacement: adım 15, 2 resimden 1. HP Pavilion x360 14m-ba114dx Screen Assembly Replacement: adım 15, 2 resimden 2.
    • Using the Blunt Tweezers, remove the clear tape over the LCD Display connector.

    • The LCD display connector is not a ZIF connector and it will slide out easily as you remove the second piece of tape.

    • If the connector does not slide out, the Blunt Tweezers can be used to gently pull it out of place.

  16. HP Pavilion x360 14m-ba114dx Screen Assembly Replacement: adım 16, 2 resimden 1. HP Pavilion x360 14m-ba114dx Screen Assembly Replacement: adım 16, 2 resimden 2.
    • Using the Blunt Tweezers, remove the black tape covering the connection cable between the screen and the rest of the laptop.

  17. HP Pavilion x360 14m-ba114dx Screen Assembly Replacement: adım 17, 3 resimden 1. HP Pavilion x360 14m-ba114dx Screen Assembly Replacement: adım 17, 3 resimden 2. HP Pavilion x360 14m-ba114dx Screen Assembly Replacement: adım 17, 3 resimden 3.
    • Using the Blunt Tweezers, remove the tape on top of the ZIF connectors for the gravity induction line and the touch line.

    • These connectors are both located to the left of LCD Display Connector on the bottom of the screen assembly.

  18. HP Pavilion x360 14m-ba114dx Screen Assembly Replacement: adım 18, 3 resimden 1. HP Pavilion x360 14m-ba114dx Screen Assembly Replacement: adım 18, 3 resimden 2. HP Pavilion x360 14m-ba114dx Screen Assembly Replacement: adım 18, 3 resimden 3.
    • Using the pointed end of a #3 Plastic Spudger, flip the cap on the two ZIF connectors that attach the motherboard to the gravity induction line and the touch line.

    • After flipping the cap, gently pull the connectors out of their slots.

  19. HP Pavilion x360 14m-ba114dx Screen Assembly Replacement: adım 19, 3 resimden 1. HP Pavilion x360 14m-ba114dx Screen Assembly Replacement: adım 19, 3 resimden 2. HP Pavilion x360 14m-ba114dx Screen Assembly Replacement: adım 19, 3 resimden 3.
    • Using the flat end of a plastic Spudger, flip up the cap on the two ZIF connectors covering the gravity induction line and the touch line.

  20. HP Pavilion x360 14m-ba114dx Screen Assembly Replacement: adım 20, 3 resimden 1. HP Pavilion x360 14m-ba114dx Screen Assembly Replacement: adım 20, 3 resimden 2. HP Pavilion x360 14m-ba114dx Screen Assembly Replacement: adım 20, 3 resimden 3.
    • Using the Angled Tweezers, pull the ZIF connectors out of their housing.

  21. HP Pavilion x360 14m-ba114dx Screen Assembly Replacement: adım 21, 3 resimden 1. HP Pavilion x360 14m-ba114dx Screen Assembly Replacement: adım 21, 3 resimden 2. HP Pavilion x360 14m-ba114dx Screen Assembly Replacement: adım 21, 3 resimden 3.
    • Using the Blunt Tweezers, remove the two grey pieces of tape that cover the cable.

    • There is a third piece of tape secured around the wire. This piece of tape should come out easily when the wire is pulled out in the next step, so there is no need to remove it here.

  22. HP Pavilion x360 14m-ba114dx Screen Assembly Replacement: adım 22, 3 resimden 1. HP Pavilion x360 14m-ba114dx Screen Assembly Replacement: adım 22, 3 resimden 2. HP Pavilion x360 14m-ba114dx Screen Assembly Replacement: adım 22, 3 resimden 3.
    • Slowly pull the cable out of its track. (You may need to use the tweezers to grab the cable if it is stuck under a plastic piece in the track).

    • This cable is secured around many plastic notches in the casing. You should be able to pull out the cable, just do it slowly and be mindful of the areas where it may get caught.

    • After removing the cable, remove the screen assembly from the laptop casing.

Sonuç

To reassemble your device, follow these instructions in reverse order.

2 farklı kişi bu kılavuzu tamamladı.

0 Yorum

Yorum Ekle

İstatistikleri Görüntüle:

Son 24 Saat: 1

Son 7 gün: 6

Son 30 gün: 40

Her zaman: 2,202