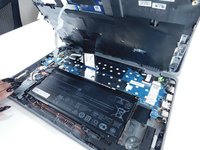
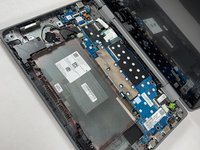
Ana içeriğe geç

HP ProBook x360 11 G5 EE Charging Port Replacement

Neye ihtiyacın var

  1. HP ProBook x360 11 G5 EE Charging Port Replacement, Keyboard Assembly: adım 1, 3 resimden 1. HP ProBook x360 11 G5 EE Charging Port Replacement, Keyboard Assembly: adım 1, 3 resimden 2. HP ProBook x360 11 G5 EE Charging Port Replacement, Keyboard Assembly: adım 1, 3 resimden 3.
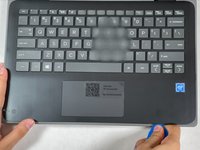
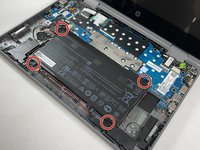
    • Remove the 4.1 mm screws with a T5 Torx screwdriver.

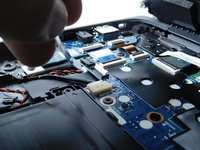
    • Remove the 4.1 mm screws using a JIS #0 screwdriver.

  2. HP ProBook x360 11 G5 EE Charging Port Replacement: adım 2, 1 resimden 1.
    • Use an opening pick to pry the corners of the keyboard deck.

  3. HP ProBook x360 11 G5 EE Charging Port Replacement: adım 3, 3 resimden 1. HP ProBook x360 11 G5 EE Charging Port Replacement: adım 3, 3 resimden 2. HP ProBook x360 11 G5 EE Charging Port Replacement: adım 3, 3 resimden 3.
    • Use an opening pick or opening tool to pry around the sides of the keyboard assembly.

  4. HP ProBook x360 11 G5 EE Charging Port Replacement: adım 4, 3 resimden 1. HP ProBook x360 11 G5 EE Charging Port Replacement: adım 4, 3 resimden 2. HP ProBook x360 11 G5 EE Charging Port Replacement: adım 4, 3 resimden 3.
    • Lift the keyboard assembly to expose two ribbon cables.

    • Lift the two plastic tabs that hold the cables in place on the motherboard

    • Slide the ribbon cables out of each connector.

  5. HP ProBook x360 11 G5 EE Charging Port Replacement: adım 5, 2 resimden 1. HP ProBook x360 11 G5 EE Charging Port Replacement: adım 5, 2 resimden 2.
    • Remove the keyboard assembly from the rest of the computer.

  6. HP ProBook x360 11 G5 EE Charging Port Replacement, Battery: adım 6, 2 resimden 1. HP ProBook x360 11 G5 EE Charging Port Replacement, Battery: adım 6, 2 resimden 2.
    • Remove the four 3 mm screws from the battery with the JIS #0 screwdriver.

  7. HP ProBook x360 11 G5 EE Charging Port Replacement: adım 7, 3 resimden 1. HP ProBook x360 11 G5 EE Charging Port Replacement: adım 7, 3 resimden 2. HP ProBook x360 11 G5 EE Charging Port Replacement: adım 7, 3 resimden 3.
    • Pry the battery up from the laptop using an opening pick.

    • Lift the battery out of its place.

  8. HP ProBook x360 11 G5 EE Charging Port Replacement, Charging Port: adım 8, 2 resimden 1. HP ProBook x360 11 G5 EE Charging Port Replacement, Charging Port: adım 8, 2 resimden 2.
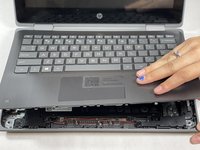
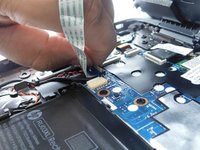
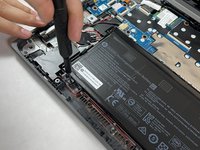
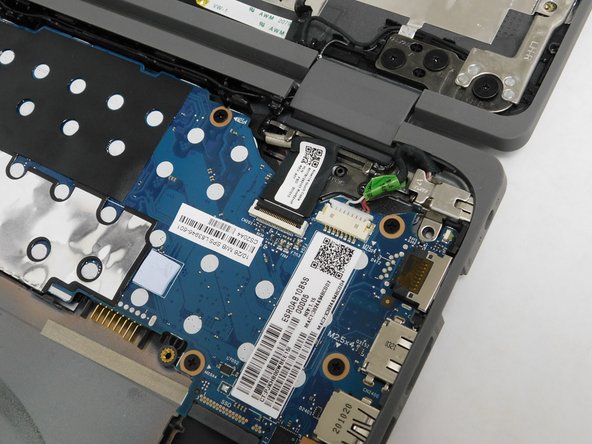
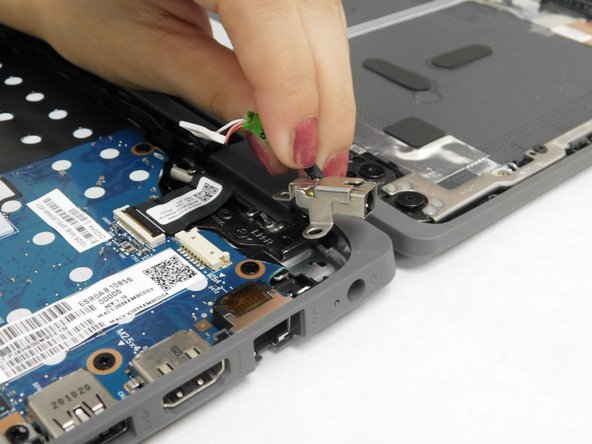
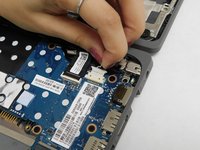
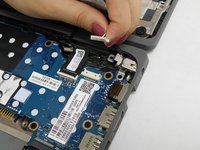
    • Remove the single 3 mm screw from the charging port using a T5 Torx screwdriver.

  9. HP ProBook x360 11 G5 EE Charging Port Replacement: adım 9, 3 resimden 1. HP ProBook x360 11 G5 EE Charging Port Replacement: adım 9, 3 resimden 2. HP ProBook x360 11 G5 EE Charging Port Replacement: adım 9, 3 resimden 3.
    • Disconnect the charging port wire from the motherboard.

    • Remove the charging port from your device.

Sonuç

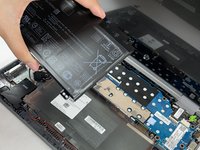
To reassemble your device, follow these instructions in reverse order.

Bir başkası bu kılavuzu tamamladı.

Michelle Pina

Üyelik tarihi: 10/26/21

506 İtibar

4 adet Kılavuz yazıldı

Ekip

Gateway, Team 1-4, Pee Fall 2021 Gateway, Team 1-4, Pee Fall 2021 üyesi

GCC-PEE-F21S1G4

5 Üyeler

5 adet Kılavuz yazıldı

2Kılavuz Yorumları

Hi!! I have the same model of notebook with 64 giga emmc. Is it possible installing an ssd or an hdd?

Riccardo Insolera - Yanıt

I followed each and every step, and realised a little too late that my laptop is a HP ProBook x360 11 G1 -and not a G5. The G1 requires the ability to de-solder the built in charging port.

On step 6, I noticed there were 6 screws holding the battery in, not 4.
Then on step 9, I noticed that the charging port is actually soldered to the motherboard and there is no visible cable attaching it to the board which can be unhooked.

Sam T - Yanıt

Yorum Ekle

İstatistikleri Görüntüle:

Son 24 Saat: 1

Son 7 gün: 3

Son 30 gün: 63

Her zaman: 1,209