Giriş
One of the most frustrating things that can happen to your tablet is the inability for it to charge; the tablet is practically useless if you're unable to charge it. This guide will breakdown all the necessary steps to ensure that you're able to charge life into your tablet. In this guide, you will be removing the following:
- Back Cover
- Battery
- Charging Port
Prepare your required tools, a new charging port for your tablet, and set aside about 10 to 20 minutes to delve into the inner workings of your HP Slate.
Neye ihtiyacın var
-
-
Begin your replacement by using a T3 or T4 Torx screwdriver.
-
Remove the two 1.4mm x 3mm Torx Head screws at the top of the device.
-
-
-
With the pointed end of the spudger, remove the thin metal band.
-
-
-
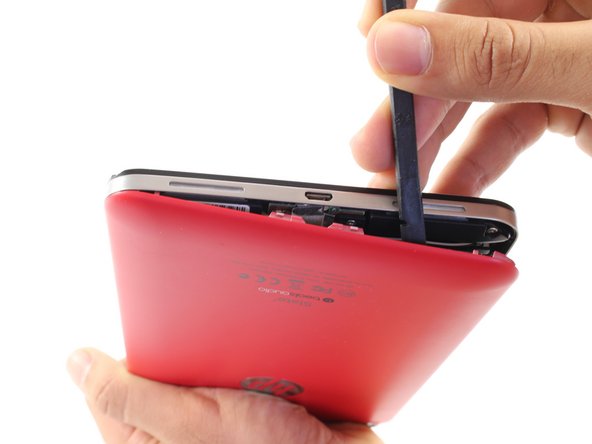
Using the flat end of the spudger, pry back the rear plastic cover.
This is basically how I opened my HP 10 Plus 2201. "Using the flat end of the spudger, pry back (apart) the rear plastic cover from tablet.
-
-
-
Locate and remove the yellow tape covering the red and white speaker wires.
The inside of my HP 10 Plus 2210 looks similar but not exactly as this illustration
The battery connections weren't the plug in type. The three battery battery wires (red, white, & black) were soldered into place,
-
-
-
-
Using the pointed end of the spudger, push both sides of the speaker wire connector out of its base.
Do not pull on wires. Never force anything.
note the route of the speaker cables round the battery
-
-
-
Gently pull back the foil covering the gold charging port ribbon.
Hpcom Support Helps HP Printer users to download and install All Hp Printers drivers. We also provide all possible solutions to fix hp Printer problems. If you face any issue in install Hp printer driver or having other problems with the hp Printer, you can follow our 100 % working solutions. In case you can’t able to continue printing, then feel free to contact us. We are happy to serve you.
-
-
-
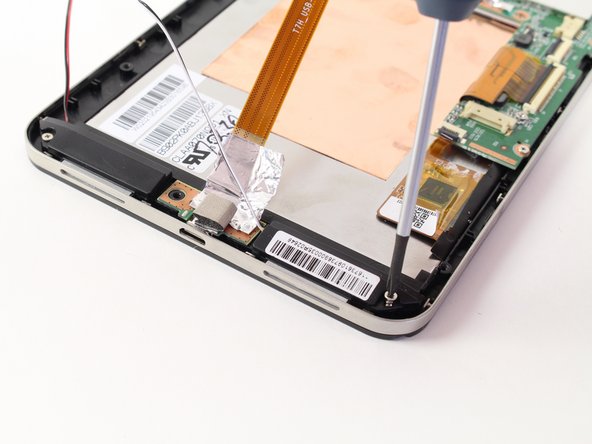
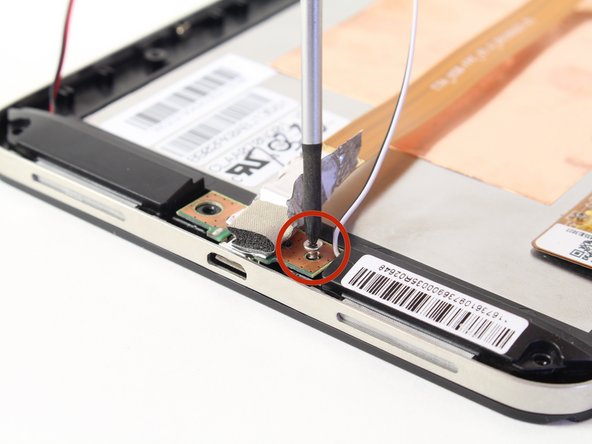
To free the speaker assembly, you will need a #00 Phillips Head screwdriver.
-
Remove the two 1.75mm x 3mm Phillips Head screws from the speaker assembly.
-


To reassemble your device, follow these instructions in reverse order.
To reassemble your device, follow these instructions in reverse order.
İptal et: Bu kılavuzu tamamlamadım.
34 farklı kişi bu kılavuzu tamamladı.

Ekip

Cal Poly, Team 13-30, Maness Spring 2014 Cal Poly, Team 13-30, Maness Spring 2014 üyesi
CPSU-MANESS-S14S13G30
3 Üyeler
8 adet Kılavuz yazıldı
15 Yorum
where do you get the replacement parts for charging port
Since HP does not supply the replacement ribbon, or many other parts for that matter, it is easiest to search on eBay and/or Craigslist for the parts needed. I found that the UK version of Amazon and eBay offer the best availability for such parts.
Zachary -
Thank you so much ifixit.com! Paid an extortionate £24.99 for a replacement cable on Amazon, then used a Torx 4 to do the necessary, following your superb instructions. Worked a treat and my daughter's Slate7 is now charging. Still cheaper than a new tablet (and I hate throwing things away that are all-but working). If it helps anybody, the packet that my replacement came in had the following part numbers: 749770-001 and 729883-001 (these are HP part numbers).
Here's a somewhat simpler approach that may work for you as well.
I found, that once I got the back off, the charger seemed to work better. I think, with the back off it gave the frame a little more flexibility, and allowed me to push the USB charger in a little tighter and make better contact. That told me, that the internal mirco USB port and cable were OK, but just not making good contact with my charger.
So, I sealed up the tablet, and using a sharp knife, I shaved a bit of the rubber insulation off the end of my USB charger. That allowed for more of the metal end to stick out and make better contact.
For the moment, it seems to be working, and saves mucking around with the inside of the tablet.
Cheers!
How do these steps correlate to the hd version of the slate7?
Guide was excellent and replaced power strip. Unfortunately device is still dead. Is it worth replacing battery, or should the device work with a dead battery anyway as the power connects direct to the motherboard
Mine too, have you found a fix, yet?
Instructions very clear, thank you.
I got both the usb harness and a set screw drivers for less than £18. Unit hopfully now fixed.
On the HP 10 Plus 2201 there are no head screws. I used the spudger to 'carefully' separate the case. There are little snaps on the inside of case that will separate with little pressure on spudger.
RB Richter - Yanıt
I used these directions to replace HP Plus 10 2201 battery. I bypassed speaker installation.
RB Richter - Yanıt