Ana içeriğe geç
Onarım Topluluğuna Katılın - Hesap Oluşturun

HP Windows Mixed Reality Controllers TPC-Q044 Trigger Replacement

Neye ihtiyacın var

  1. HP Windows Mixed Reality Controllers TPC-Q044 Trigger Replacement, Batteries: adım 1, 3 resimden 1. HP Windows Mixed Reality Controllers TPC-Q044 Trigger Replacement, Batteries: adım 1, 3 resimden 2. HP Windows Mixed Reality Controllers TPC-Q044 Trigger Replacement, Batteries: adım 1, 3 resimden 3.
    • Slide the rear compartment cover in the direction of the arrow.

    • If replacing batteries, ensure the (+) and (-) on the battery match the (+) and (-) labeled in the battery compartment.

    FixBot'a Sor
  2. HP Windows Mixed Reality Controllers TPC-Q044 Trigger Replacement, Shell: adım 2, 2 resimden 1. HP Windows Mixed Reality Controllers TPC-Q044 Trigger Replacement, Shell: adım 2, 2 resimden 2.
    • Remove the four 4mm screws using a Phillips #00 screwdriver.

    FixBot'a Sor
  3. HP Windows Mixed Reality Controllers TPC-Q044 Trigger Replacement: adım 3, 3 resimden 1. HP Windows Mixed Reality Controllers TPC-Q044 Trigger Replacement: adım 3, 3 resimden 2. HP Windows Mixed Reality Controllers TPC-Q044 Trigger Replacement: adım 3, 3 resimden 3.
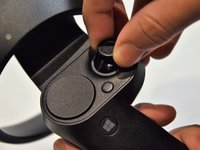
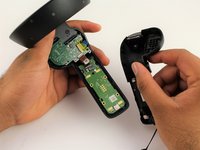
    • Grip the main body and pull the joystick outwards until the entire front panel pops off.

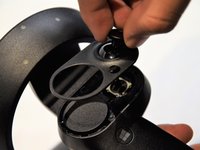
    • Remove the 6mm screw in the corner of the joystick well using a Phillips #00 screwdriver.

    FixBot'a Sor
  4. HP Windows Mixed Reality Controllers TPC-Q044 Trigger Replacement: adım 4, 2 resimden 1. HP Windows Mixed Reality Controllers TPC-Q044 Trigger Replacement: adım 4, 2 resimden 2.
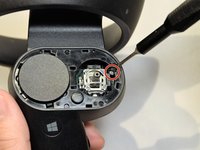
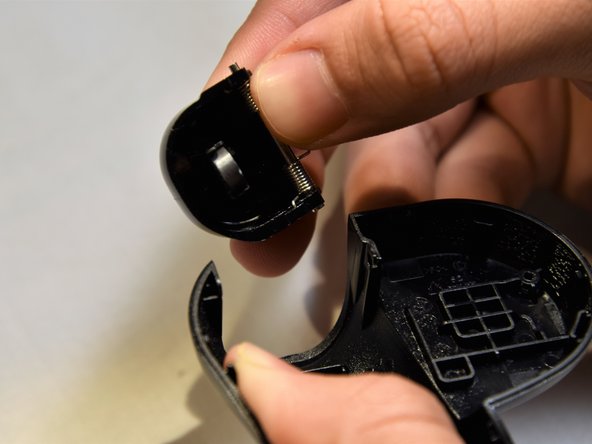
    • Use a spudger to pry apart the two halves of the assembly.

    • Work slowly, prying a small section at a time until the halves are completely separated.

    FixBot'a Sor
  5. HP Windows Mixed Reality Controllers TPC-Q044 Trigger Replacement, Trigger: adım 5, 3 resimden 1. HP Windows Mixed Reality Controllers TPC-Q044 Trigger Replacement, Trigger: adım 5, 3 resimden 2. HP Windows Mixed Reality Controllers TPC-Q044 Trigger Replacement, Trigger: adım 5, 3 resimden 3.
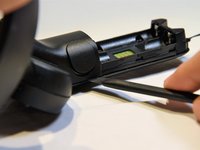
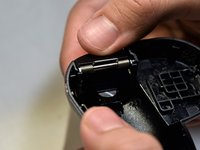
    • Grasp the trigger with one hand while pushing against the outer wall of the shell.

    • Apply pressure, pulling the wall away from the trigger.

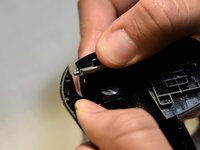
    • Remove the trigger starting from the freed edge.

    • The spring-rod assembly can easily come apart. Inserting the large end first during reassembly may make the process easier.

    FixBot'a Sor
Sonuç

To reassemble your device, follow these instructions in reverse order.

4 farklı kişi bu kılavuzu tamamladı.

Clement Cheung

Üyelik tarihi: 01/24/19

643 İtibar

5 adet Kılavuz yazıldı

Ekip

Cal Poly, Team S18-G5, White Winter 2019 Cal Poly, Team S18-G5, White Winter 2019 üyesi

CPSU-WHITE-W19S18G5

2 Üyeler

14 adet Kılavuz yazıldı

0Kılavuz Yorumları

Yorum Ekle

İstatistikleri Görüntüle:

Son 24 Saat: 0

Son 7 gün: 5

Son 30 gün: 35

Her zaman: 1,929