Bu sürüm, hatalı düzenlemeler içerebilir. En son doğrulanmış bellek kopyası dönün.
Neye ihtiyacın var
-
Bu adım çevrilmemiş. Çevrilmesine yardım edin
-
Lift back cover while pressing highlighted release switch towards the center of the phone.
-
-
Bu adım çevrilmemiş. Çevrilmesine yardım edin
-
Remove the four white stickers in each corner that cover the Tri-Wing screws.
-
Remove the white sticker near the buttons that control the volume.
-
Remove the white sticker near the SIM card.
-
Remove the big white sticker with the bar-code in the center of the phone.
-
-
Bu adım çevrilmemiş. Çevrilmesine yardım edin
-
Remove the thirteen Tri-Wing Y00 screws (Upper & Lower screws are 5 mm length, middle screws are 3.8 mm length) from the back case.
-
Disconnect the cable near the volume buttons.
-
-
Bu adım çevrilmemiş. Çevrilmesine yardım edin
-
Use the small plastic opening tool to pry between the screen and the rear case.
-
-
Bu adım çevrilmemiş. Çevrilmesine yardım edin
-
Use Tweezers to disconnect the ribbon cable connecting the fingerprint sensor to the motherboard.
-
When replacing the fingerprint sensor, make sure the ribbon cable snaps into the port on the motherboard.
-
-
Bu adım çevrilmemiş. Çevrilmesine yardım edin
-
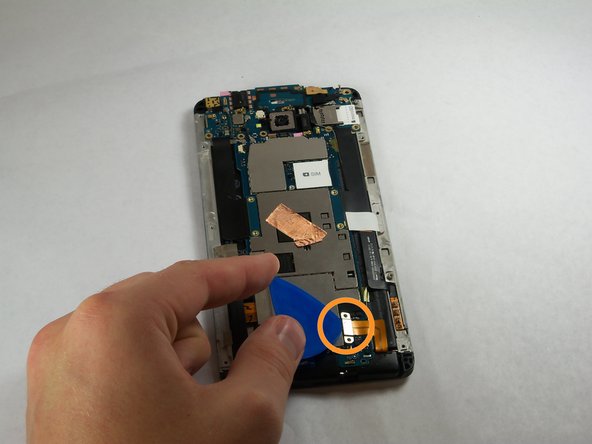
Remove the two 2.2 mm Phillips #000 screws holding the battery cable.
-
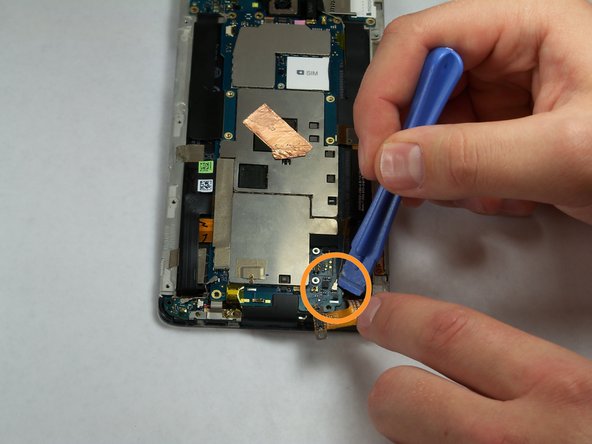
Use a plastic tool to remove the ribbon cable.
-
-
-
Bu adım çevrilmemiş. Çevrilmesine yardım edin
-
Use the plastic opening tool to disconnect the two antenna wires at the top of the phone.
-
Use the plastic opening tool to disconnect a third antenna wire at the bottom of the phone.
-
-
Bu adım çevrilmemiş. Çevrilmesine yardım edin
-
Remove the seven 3 mm Phillips #000 screws from the motherboard.
-
-
Bu adım çevrilmemiş. Çevrilmesine yardım edin
-
Use a plastic tool to pry up and disconnect the large ribbon cables on each side of the motherboard.
-
-
Bu adım çevrilmemiş. Çevrilmesine yardım edin
-
Remove the tape covering three flex cable gate connectors on the bottom left side of the phone.
-
Use small plastic opening tool to pry open the latch on each of these gate connectors to disconnect the three cables.
-
Use small plastic opening tool to pry open the latch on each of these gate connectors to disconnect the three cables.
-
-
Bu adım çevrilmemiş. Çevrilmesine yardım edin
-
Use a plastic tool to lift and remove the motherboard.
-
Use a heat gun to loosen adhesive at bottom if needed.
-
-
Bu adım çevrilmemiş. Çevrilmesine yardım edin
-
Remove the three 3 mm Phillips #000 screws from the secondary board at the top.
-
-
Bu adım çevrilmemiş. Çevrilmesine yardım edin
-
Pull out the secondary board with the camera attached.
-
-
Bu adım çevrilmemiş. Çevrilmesine yardım edin
-
Remove two screws from the bottom.
-
Set aside metal retaining plate.
-
-
Bu adım çevrilmemiş. Çevrilmesine yardım edin
-
Pry back the speaker and microphone assembly from the bottom.
-
-
Bu adım çevrilmemiş. Çevrilmesine yardım edin
-
Pry the battery away from the back of the screen with a plastic tool.
-


İptal et: Bu kılavuzu tamamlamadım.
15 farklı kişi bu kılavuzu tamamladı.

Ekip

USF Tampa, Team 11-3, Blackwell Fall 2014 USF Tampa, Team 11-3, Blackwell Fall 2014 üyesi
USFT-BLACKWELL-F14S11G3
4 Üyeler
7 adet Kılavuz yazıldı
4 Yorum
Microphone in the article, battery in the title.
How to change LCD screen for this model?