Bu sürüm, hatalı düzenlemeler içerebilir. En son doğrulanmış bellek kopyası dönün.
Neye ihtiyacın var
-
Bu adım çevrilmemiş. Çevrilmesine yardım edin
-
Place a finger on the top edge of the compartment cover assembly and slide the assembly toward the front of the Vive until it comes loose from the headset.
-
Lift the cover away from the headset and slide it up the cables until it's out of the way.
-
-
Bu adım çevrilmemiş. Çevrilmesine yardım edin
-
Lift the HDMI cable straight up to unplug it from the headset.
-
-
Bu adım çevrilmemiş. Çevrilmesine yardım edin
-
Repeat the lifting and unplugging process with the remaining USB, power, and audio cables.
-
-
Bu adım çevrilmemiş. Çevrilmesine yardım edin
-
Use a T5 Torx driver to remove the two 12 mm-long screws securing the head strap mounts on either side of the headset.
-
-
Bu adım çevrilmemiş. Çevrilmesine yardım edin
-
Slide the facerest straight away from the headset to remove it.
-
-
Bu adım çevrilmemiş. Çevrilmesine yardım edin
-
Use tweezers to remove the small stickers over the four screws securing the outer shell.
-
Use a T5 Torx driver to remove the four 3.4 mm-long screws securing the outer shell.
-
-
-
Bu adım çevrilmemiş. Çevrilmesine yardım edin
-
Grasp the top edge of the right half of the outer shell, behind the component cover and near the seam in the center. Pull it to the right and upward, away from the headset to release the clip securing that part of the shell.
-
-
Bu adım çevrilmemiş. Çevrilmesine yardım edin
-
Grasp the right half the outer shell and pull it to the right and toward the front of the headset in a twisting motion until you feel the clips on the front of the cover release.
-
-
Bu adım çevrilmemiş. Çevrilmesine yardım edin
-
Slide the right side of the outer shell to the right and off of the headset.
-
-
Bu adım çevrilmemiş. Çevrilmesine yardım edin
-
Repeat the last three steps for the left side of the outer shell and remove it.
-
-
Bu adım çevrilmemiş. Çevrilmesine yardım edin
-
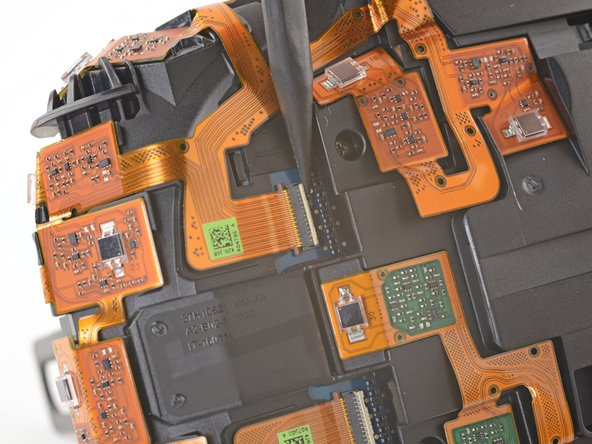
Use tweezers to remove the clear tape over all four of the sensor array cable connectors.
-
-
Bu adım çevrilmemiş. Çevrilmesine yardım edin
-
Use the pointed end of a spudger to flip up the small locking flap on one of the sensor array ZIF connectors.
-
Slide the cable straight out of its socket on the motherboard.
-
-
Bu adım çevrilmemiş. Çevrilmesine yardım edin
-
Repeat the previous step for the remaining three sensor array cables to disconnect the remaining cables.
-
-
Bu adım çevrilmemiş. Çevrilmesine yardım edin
-
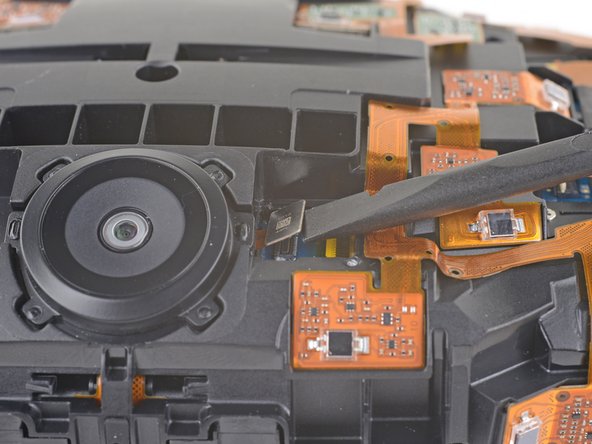
Use tweezers or a spudger to pry up the camera cable cover and remove it.
-
-
Bu adım çevrilmemiş. Çevrilmesine yardım edin
-
Use the flat end of a spudger to pry the camera cable connector straight up from its socket on the motherboard.
-
-
Bu adım çevrilmemiş. Çevrilmesine yardım edin
-
Use a PH000 driver to remove the five 3.9 mm screws securing the sensor array.
-
-
Bu adım çevrilmemiş. Çevrilmesine yardım edin
-
Use a PH000 driver to remove the four 3.9 mm screws securing the sensor array.
-
-
Bu adım çevrilmemiş. Çevrilmesine yardım edin
-
Use a PH000 driver to remove the four 3.9 mm screws securing the sensor array.
-
-
Bu adım çevrilmemiş. Çevrilmesine yardım edin
-
Lift the sensor array away from the headset to remove it.
-


İptal et: Bu kılavuzu tamamlamadım.
3 farklı kişi bu kılavuzu tamamladı.
