Ana içeriğe geç

Honda EU2200IT A2 Oil Level Switch Replacement

Neye ihtiyacın var

  1. Honda EU2200IT A2 Oil Level Switch Replacement, Honda EU2200IT A2 Safety Precautions: adım 1, 1 resimden 1.
    • Before you begin, make sure the generator is switched off and the generator is cool to the touch.

  2. Honda EU2200IT A2 Oil Level Switch Replacement, Disconnect the spark plug: adım 2, 2 resimden 1. Honda EU2200IT A2 Oil Level Switch Replacement, Disconnect the spark plug: adım 2, 2 resimden 2.
    • Lift and remove the spark plug cover.

  3. Honda EU2200IT A2 Oil Level Switch Replacement: adım 3, 2 resimden 1. Honda EU2200IT A2 Oil Level Switch Replacement: adım 3, 2 resimden 2.
    • Grab the plastic housing at the end of the spark plug wire.

    • Pull firmly to disconnect the wire from the spark plug.

  4. Honda EU2200IT A2 Oil Level Switch Replacement, Remove the maintenance cover: adım 4, 1 resimden 1.
    • Use a Phillips #2 screwdriver to loosen the screw holding the maintenance cover in place.

  5. Honda EU2200IT A2 Oil Level Switch Replacement: adım 5, 3 resimden 1. Honda EU2200IT A2 Oil Level Switch Replacement: adım 5, 3 resimden 2. Honda EU2200IT A2 Oil Level Switch Replacement: adım 5, 3 resimden 3.
    • Swing the top of the maintenance cover out.

    • Remove the maintenance cover.

  6. Honda EU2200IT A2 Oil Level Switch Replacement, Drain the engine oil: adım 6, 2 resimden 1. Honda EU2200IT A2 Oil Level Switch Replacement, Drain the engine oil: adım 6, 2 resimden 2.
    • Unscrew and remove the oil filler cap.

  7. Honda EU2200IT A2 Oil Level Switch Replacement: adım 7, 2 resimden 1. Honda EU2200IT A2 Oil Level Switch Replacement: adım 7, 2 resimden 2.
    • Place an oil pan below the fill port to catch the engine oil.

    • Carefully tilt the generator towards the oil pan to drain the oil.

  8. Honda EU2200IT A2 Oil Level Switch Replacement: adım 8, 1 resimden 1.
    • During reassembly, be sure to refill the engine oil:

    • If you recently resealed the crankcase cover with liquid sealant, wait at least 20 minutes before adding oil.

    • Use SAE 10W-30 oil, up to 0.46 US quarts.

    • Add oil until the dipstick is almost completely submerged.

  9. Honda EU2200IT A2 Oil Level Switch Replacement, Drain the carburetor fuel bowl: adım 9, 1 resimden 1.
    • Place a container below the drain tube to catch the excess fuel.

  10. Honda EU2200IT A2 Oil Level Switch Replacement: adım 10, 2 resimden 1. Honda EU2200IT A2 Oil Level Switch Replacement: adım 10, 2 resimden 2.
    • The carburetor drain screw is located at the bottom of the carburetor.

    • Use a flathead screwdriver to loosen the fuel drain screw until fuel begins to drain out of the carburetor.

    • Once you drain the fuel bowl, re-tighten the fuel drain screw.

  11. Honda EU2200IT A2 Oil Level Switch Replacement, Back Cover: adım 11, 1 resimden 1.
    • Remove the four Phillips screws securing the back cover.

  12. Honda EU2200IT A2 Oil Level Switch Replacement: adım 12, 2 resimden 1. Honda EU2200IT A2 Oil Level Switch Replacement: adım 12, 2 resimden 2.
    • Remove the back cover.

  13. Honda EU2200IT A2 Oil Level Switch Replacement, Loosen the front cover: adım 13, 3 resimden 1. Honda EU2200IT A2 Oil Level Switch Replacement, Loosen the front cover: adım 13, 3 resimden 2. Honda EU2200IT A2 Oil Level Switch Replacement, Loosen the front cover: adım 13, 3 resimden 3.
    • Remove the four screws securing the front cover:

    • Two Phillips screws

    • Two Phillips screws (one on each side)

  14. Honda EU2200IT A2 Oil Level Switch Replacement: adım 14, 3 resimden 1. Honda EU2200IT A2 Oil Level Switch Replacement: adım 14, 3 resimden 2. Honda EU2200IT A2 Oil Level Switch Replacement: adım 14, 3 resimden 3.
    • Swing the top edge of the front cover away from the generator.

    • Pull the front cover away slightly away.

    • The front cover still has many wires connected to it. Be careful not to strain any wires.

  15. Honda EU2200IT A2 Oil Level Switch Replacement, Remove the left cover: adım 15, 3 resimden 1. Honda EU2200IT A2 Oil Level Switch Replacement, Remove the left cover: adım 15, 3 resimden 2. Honda EU2200IT A2 Oil Level Switch Replacement, Remove the left cover: adım 15, 3 resimden 3.
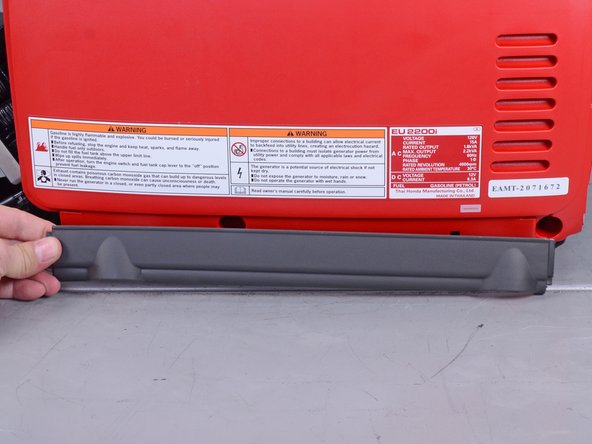
    • Remove the lower gray plates from both sides of the generator.

    • During reassembly, be sure to reinstall the gray plate with the air vent cutout onto the right (access-side) cover.

  16. Honda EU2200IT A2 Oil Level Switch Replacement: adım 16, 2 resimden 1. Honda EU2200IT A2 Oil Level Switch Replacement: adım 16, 2 resimden 2.
    • Remove the fasteners securing the left (non-access) cover:

    • Two Phillips screws

    • Two 10 mm bolts

  17. Honda EU2200IT A2 Oil Level Switch Replacement: adım 17, 2 resimden 1. Honda EU2200IT A2 Oil Level Switch Replacement: adım 17, 2 resimden 2.
    • Remove the left (non-access) cover.

  18. Honda EU2200IT A2 Oil Level Switch Replacement, Remove the right cover: adım 18, 3 resimden 1. Honda EU2200IT A2 Oil Level Switch Replacement, Remove the right cover: adım 18, 3 resimden 2. Honda EU2200IT A2 Oil Level Switch Replacement, Remove the right cover: adım 18, 3 resimden 3.
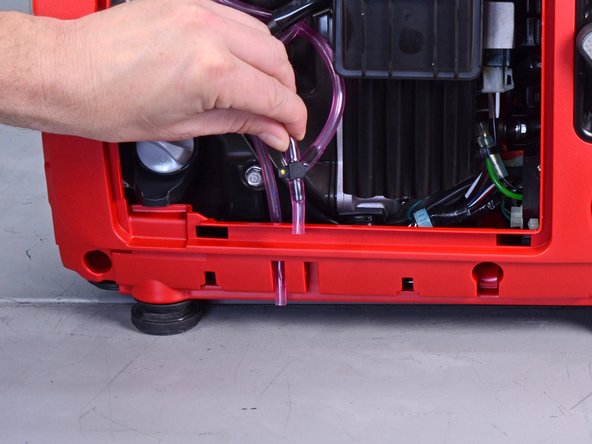
    • Slide the vent and drain tubes out of their cover ports along the bottom of the right cover.

  19. Honda EU2200IT A2 Oil Level Switch Replacement: adım 19, 1 resimden 1.
    • Remove the Phillips screw securing the starter rope port.

  20. Honda EU2200IT A2 Oil Level Switch Replacement: adım 20, 2 resimden 1. Honda EU2200IT A2 Oil Level Switch Replacement: adım 20, 2 resimden 2.
    • Thread the starter rope handle through the port's cutout.

  21. Honda EU2200IT A2 Oil Level Switch Replacement: adım 21, 2 resimden 1. Honda EU2200IT A2 Oil Level Switch Replacement: adım 21, 2 resimden 2.
    • Remove the right (access-side) cover.

  22. Honda EU2200IT A2 Oil Level Switch Replacement, Fuel Tank: adım 22, 3 resimden 1. Honda EU2200IT A2 Oil Level Switch Replacement, Fuel Tank: adım 22, 3 resimden 2. Honda EU2200IT A2 Oil Level Switch Replacement, Fuel Tank: adım 22, 3 resimden 3.
    • If you are replacing only the fuel tank, you can skip the next six steps.

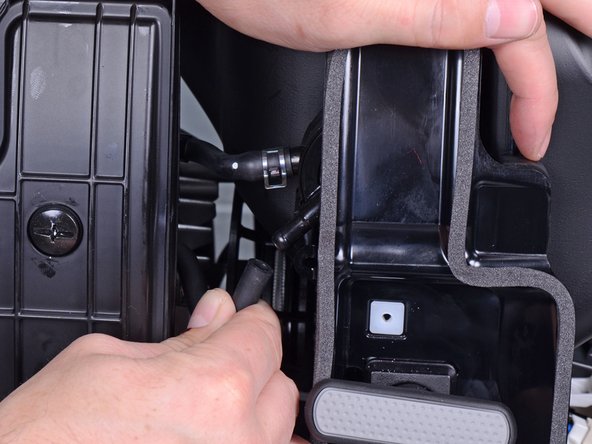
    • Use a screwdriver to pry and loosen the diaphragm tube from the fuel pump.

    • Disconnect the diaphragm tube from the fuel pump.

  23. Honda EU2200IT A2 Oil Level Switch Replacement: adım 23, 2 resimden 1. Honda EU2200IT A2 Oil Level Switch Replacement: adım 23, 2 resimden 2.
    • Use a pair of pliers to squeeze and slide the spring clip off the fuel pump port.

  24. Honda EU2200IT A2 Oil Level Switch Replacement: adım 24, 2 resimden 1. Honda EU2200IT A2 Oil Level Switch Replacement: adım 24, 2 resimden 2.
    • Residual fuel may leak out of this hose. Be ready to contain any spillage.

    • Disconnect the fuel hose from the fuel pump.

  25. Honda EU2200IT A2 Oil Level Switch Replacement: adım 25, 2 resimden 1. Honda EU2200IT A2 Oil Level Switch Replacement: adım 25, 2 resimden 2.
    • Pull and disconnect the engine stop switch connector from its socket.

  26. Honda EU2200IT A2 Oil Level Switch Replacement: adım 26, 1 resimden 1.
    • Remove the Phillips screw securing the starter rope guide.

  27. Honda EU2200IT A2 Oil Level Switch Replacement: adım 27, 2 resimden 1. Honda EU2200IT A2 Oil Level Switch Replacement: adım 27, 2 resimden 2.
    • Feed the starter rope handle and guide through the panel cutout.

  28. Honda EU2200IT A2 Oil Level Switch Replacement, Remove the fuel tank: adım 28, 2 resimden 1. Honda EU2200IT A2 Oil Level Switch Replacement, Remove the fuel tank: adım 28, 2 resimden 2.
    • Any residual fuel in the tank will leak. Be ready to contain any spillage.

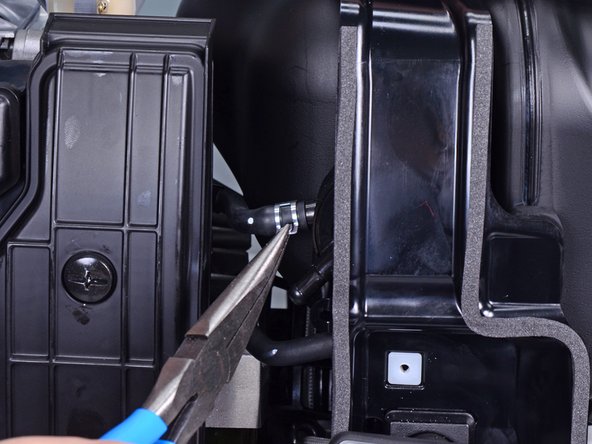
    • Use a pair of pliers to squeeze and slide the spring clip off the fuel tank port.

  29. Honda EU2200IT A2 Oil Level Switch Replacement: adım 29, 2 resimden 1. Honda EU2200IT A2 Oil Level Switch Replacement: adım 29, 2 resimden 2.
    • Disconnect the fuel line and filter from the fuel tank.

  30. Honda EU2200IT A2 Oil Level Switch Replacement: adım 30, 1 resimden 1.
    • Remove the Phillips screw securing the left (non-access) frame assembly.

  31. Honda EU2200IT A2 Oil Level Switch Replacement: adım 31, 2 resimden 1. Honda EU2200IT A2 Oil Level Switch Replacement: adım 31, 2 resimden 2.
    • Remove the left (non-access) frame assembly.

  32. Honda EU2200IT A2 Oil Level Switch Replacement: adım 32, 2 resimden 1. Honda EU2200IT A2 Oil Level Switch Replacement: adım 32, 2 resimden 2.
    • Lift and remove the fuel tank.

  33. Honda EU2200IT A2 Oil Level Switch Replacement, Remove the muffler: adım 33, 1 resimden 1.
    • Use a 10 mm socket to remove the three bolts securing the muffler:

    • Two 50 mm-long bolts

    • One 75 mm-long bolt

    • During reassembly, these bolts should be tightened to 8.7 lb-ft.

  34. Honda EU2200IT A2 Oil Level Switch Replacement: adım 34, 1 resimden 1.
    • Remove the muffler.

  35. Honda EU2200IT A2 Oil Level Switch Replacement: adım 35, 1 resimden 1.
    • Use a wire brush to clean any deposits off the spark arrester.

  36. Honda EU2200IT A2 Oil Level Switch Replacement: adım 36, 1 resimden 1.
    • During reassembly, replace the muffler gasket if it shows signs of wear.

  37. Honda EU2200IT A2 Oil Level Switch Replacement, Remove the under-cover: adım 37, 1 resimden 1.
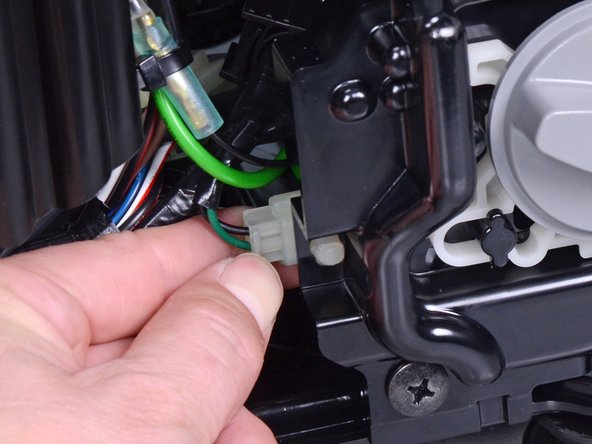
    • Use a flathead screwdriver to pry up the blue wire harness from the under-cover.

  38. Honda EU2200IT A2 Oil Level Switch Replacement: adım 38, 3 resimden 1. Honda EU2200IT A2 Oil Level Switch Replacement: adım 38, 3 resimden 2. Honda EU2200IT A2 Oil Level Switch Replacement: adım 38, 3 resimden 3.
    • Use a mallet and punch to tap out the front collar (closest to the electrical panel) securing the motor assembly to the under-cover.

  39. Honda EU2200IT A2 Oil Level Switch Replacement: adım 39, 1 resimden 1.
    • Use a 10 mm socket to remove the two bolts securing the motor rear to the under-cover.

  40. Honda EU2200IT A2 Oil Level Switch Replacement: adım 40, 3 resimden 1. Honda EU2200IT A2 Oil Level Switch Replacement: adım 40, 3 resimden 2. Honda EU2200IT A2 Oil Level Switch Replacement: adım 40, 3 resimden 3.
    • The motor assembly is heavy. Follow safe lifting practices when you lift the assembly.

    • Lift the motor assembly off the under-cover and set it aside.

  41. Honda EU2200IT A2 Oil Level Switch Replacement, Remove the left shroud: adım 41, 1 resimden 1.
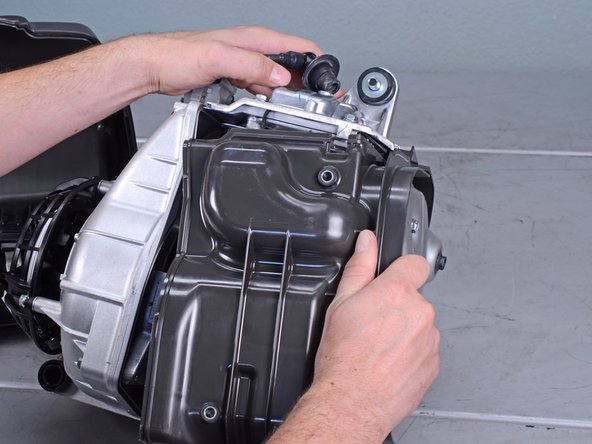
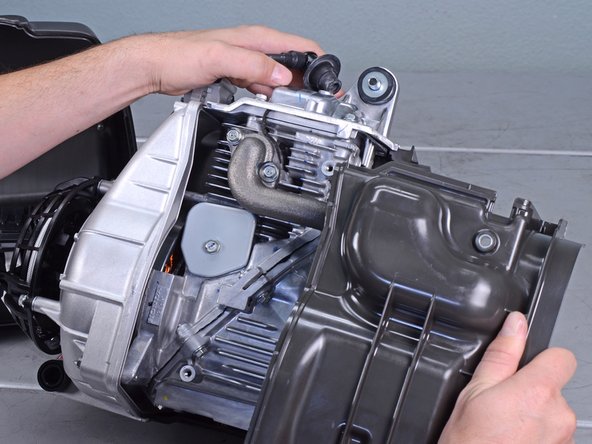
    • Use a 10 mm socket to remove the two bolts securing the left shroud.

  42. Honda EU2200IT A2 Oil Level Switch Replacement: adım 42, 2 resimden 1. Honda EU2200IT A2 Oil Level Switch Replacement: adım 42, 2 resimden 2.
    • Begin separating the left shroud from the engine assembly by pulling it away from the assembly.

    • The shroud sits in a groove on the engine assembly and may take some force to pull out.

  43. Honda EU2200IT A2 Oil Level Switch Replacement: adım 43, 3 resimden 1. Honda EU2200IT A2 Oil Level Switch Replacement: adım 43, 3 resimden 2. Honda EU2200IT A2 Oil Level Switch Replacement: adım 43, 3 resimden 3.
    • Pull along the edge of the shroud until you separate the shroud from the engine assembly.

    • Remove the shroud.

  44. Honda EU2200IT A2 Oil Level Switch Replacement, Remove the air filter housing: adım 44, 2 resimden 1. Honda EU2200IT A2 Oil Level Switch Replacement, Remove the air filter housing: adım 44, 2 resimden 2.
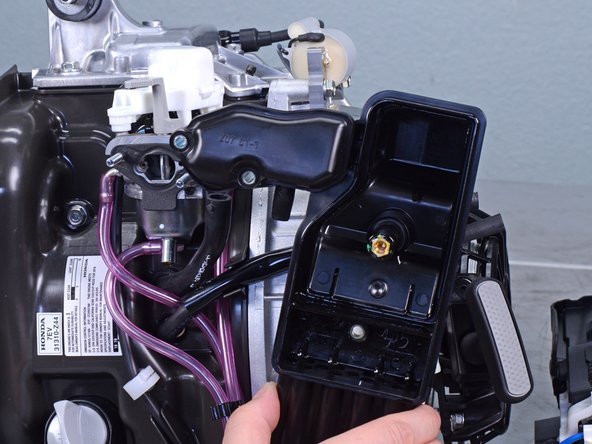
    • Remove the Phillips screw securing the filter cover.

    • During reassembly, be sure to tighten the screw to at least 1.7 ft-lb to prevent it from loosening during operation.

    • Remove the filter cover.

  45. Honda EU2200IT A2 Oil Level Switch Replacement: adım 45, 2 resimden 1. Honda EU2200IT A2 Oil Level Switch Replacement: adım 45, 2 resimden 2.
    • Remove the air filters from the filter box.

    • To clean the filters:

    • Clean the filters in warm soapy water

    • Allow the filters to dry thoroughly

    • Dip the filters in clean engine oil, and squeeze out excess oil

  46. Honda EU2200IT A2 Oil Level Switch Replacement: adım 46, 2 resimden 1. Honda EU2200IT A2 Oil Level Switch Replacement: adım 46, 2 resimden 2.
    • Disconnect the breather tube from the air cleaner housing.

  47. Honda EU2200IT A2 Oil Level Switch Replacement: adım 47, 1 resimden 1.
    • Remove the following fasteners securing the housing:

    • Two 8 mm nuts

    • During reassembly, tighten these to 3.6 ft-lb.

    • One 8 mm bolt

  48. Honda EU2200IT A2 Oil Level Switch Replacement: adım 48, 2 resimden 1. Honda EU2200IT A2 Oil Level Switch Replacement: adım 48, 2 resimden 2.
    • Remove the air filter housing.

  49. Honda EU2200IT A2 Oil Level Switch Replacement: adım 49, 1 resimden 1.
    • During reassembly, replace the air intake gasket if it shows signs of wear.

  50. Honda EU2200IT A2 Oil Level Switch Replacement: adım 50, 1 resimden 1.
    • During reassembly, use this photo as a reference for how to route the hoses.

  51. Honda EU2200IT A2 Oil Level Switch Replacement: adım 51, 3 resimden 1. Honda EU2200IT A2 Oil Level Switch Replacement: adım 51, 3 resimden 2. Honda EU2200IT A2 Oil Level Switch Replacement: adım 51, 3 resimden 3.
    • Unclip the fuel and air hoses from the side of the motor assembly.

  52. Honda EU2200IT A2 Oil Level Switch Replacement: adım 52, 2 resimden 1. Honda EU2200IT A2 Oil Level Switch Replacement: adım 52, 2 resimden 2.
    • Pull the breather tube straight out of its port.

  53. Honda EU2200IT A2 Oil Level Switch Replacement: adım 53, 2 resimden 1. Honda EU2200IT A2 Oil Level Switch Replacement: adım 53, 2 resimden 2.
    • Use a flathead screwdriver to unclip the carburetor wires from the side of the motor assembly.

  54. Honda EU2200IT A2 Oil Level Switch Replacement: adım 54, 2 resimden 1. Honda EU2200IT A2 Oil Level Switch Replacement: adım 54, 2 resimden 2.
    • Slide the carburetor off its two bolt rails.

  55. Honda EU2200IT A2 Oil Level Switch Replacement: adım 55, 1 resimden 1.
    • During reassembly, replace the carburetor seal if it shows signs of wear.

  56. Honda EU2200IT A2 Oil Level Switch Replacement: adım 56, 1 resimden 1.
    • Use an 8 mm socket to remove the two bolts securing the carburetor insulator.

    • During reassembly, tighten these bolts to 2.2 ft-lb.

  57. Honda EU2200IT A2 Oil Level Switch Replacement: adım 57, 2 resimden 1. Honda EU2200IT A2 Oil Level Switch Replacement: adım 57, 2 resimden 2.
    • Remove the carburetor insulator along with the two bolt rails.

  58. Honda EU2200IT A2 Oil Level Switch Replacement: adım 58, 1 resimden 1.
    • During reassembly, replace the insulator gasket if it shows signs of wear.

  59. Honda EU2200IT A2 Oil Level Switch Replacement: adım 59, 1 resimden 1.
    • Use a 10 mm socket to remove the bolts securing the right shroud.

  60. Honda EU2200IT A2 Oil Level Switch Replacement: adım 60, 2 resimden 1. Honda EU2200IT A2 Oil Level Switch Replacement: adım 60, 2 resimden 2.
    • Begin separating the right shroud from the engine assembly by pulling it away from the assembly.

  61. Honda EU2200IT A2 Oil Level Switch Replacement: adım 61, 3 resimden 1. Honda EU2200IT A2 Oil Level Switch Replacement: adım 61, 3 resimden 2. Honda EU2200IT A2 Oil Level Switch Replacement: adım 61, 3 resimden 3.
    • Pull the shroud away along the edge. Use a flathead screwdriver to pry it out of the engine assembly groove.

  62. Honda EU2200IT A2 Oil Level Switch Replacement: adım 62, 2 resimden 1. Honda EU2200IT A2 Oil Level Switch Replacement: adım 62, 2 resimden 2.
    • Remove the right shroud from the engine assembly.

  63. Honda EU2200IT A2 Oil Level Switch Replacement, Remove the exhaust pipe: adım 63, 1 resimden 1.
    • Use a 10 mm socket to remove the two bolts securing the exhaust pipe.

  64. Honda EU2200IT A2 Oil Level Switch Replacement: adım 64, 2 resimden 1. Honda EU2200IT A2 Oil Level Switch Replacement: adım 64, 2 resimden 2.
    • Remove the exhaust pipe from the engine assembly.

  65. Honda EU2200IT A2 Oil Level Switch Replacement, Disconnect the engine oil sensor: adım 65, 1 resimden 1.
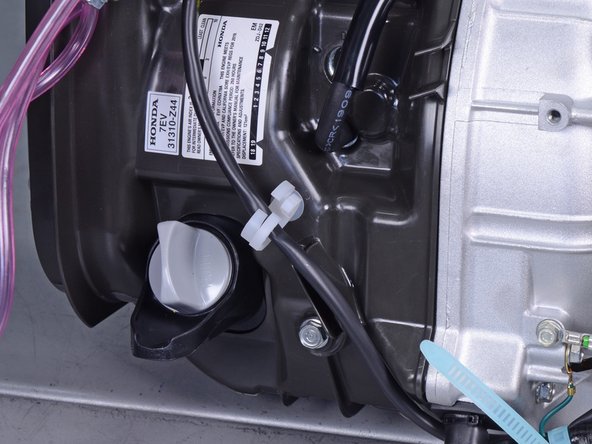
    • Loosen the cable tie securing the engine oil sensor.

  66. Honda EU2200IT A2 Oil Level Switch Replacement: adım 66, 2 resimden 1. Honda EU2200IT A2 Oil Level Switch Replacement: adım 66, 2 resimden 2.
    • Disconnect the yellow engine oil sensor wire by pulling the connector apart.

  67. Honda EU2200IT A2 Oil Level Switch Replacement: adım 67, 2 resimden 1. Honda EU2200IT A2 Oil Level Switch Replacement: adım 67, 2 resimden 2.
    • Use a 10 mm socket to remove the bolt securing the engine oil sensor ground.

  68. Honda EU2200IT A2 Oil Level Switch Replacement, Remove the crankcase cover: adım 68, 2 resimden 1. Honda EU2200IT A2 Oil Level Switch Replacement, Remove the crankcase cover: adım 68, 2 resimden 2.
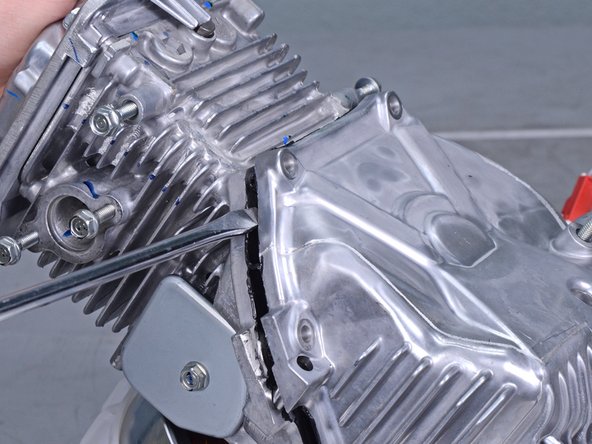
    • Use a 10 mm socket to remove the eight bolts securing the crankcase cover.

    • During reassembly, hand-tighten the crankcase cover bolts in the pattern indicated in the second image.

  69. Honda EU2200IT A2 Oil Level Switch Replacement: adım 69, 3 resimden 1. Honda EU2200IT A2 Oil Level Switch Replacement: adım 69, 3 resimden 2. Honda EU2200IT A2 Oil Level Switch Replacement: adım 69, 3 resimden 3.
    • The crankcase cover is sealed with liquid sealant and must be pried apart.

    • Be ready to contain any residual engine oil that may spill from the crankcase.

    • Insert a large flathead screwdriver or pry bar into the crankcase seam and pry to loosen the crankcase cover.

    • Do not use too much force, or you may gouge the mating surface.

    • Pry along the entire crankcase perimeter until you fully loosen the crankcase cover.

  70. Honda EU2200IT A2 Oil Level Switch Replacement: adım 70, 2 resimden 1. Honda EU2200IT A2 Oil Level Switch Replacement: adım 70, 2 resimden 2.
    • Separate and remove the crankcase cover.

  71. Honda EU2200IT A2 Oil Level Switch Replacement, Reseal the crankcase: adım 71, 1 resimden 1.
    • To reseal the crankcase during reassembly:

    • Clean all adhesive and oil residue off of the cover and crankcase mating surfaces.

    • Apply a bead of liquid sealant to the crankcase.

    • Fit the crankcase cover to the crankcase.

    • Do not fill the crankcase with engine oil for at least 20 minutes after sealing the crankcase.

  72. Honda EU2200IT A2 Oil Level Switch Replacement, Remove the oil level sensor: adım 72, 1 resimden 1.
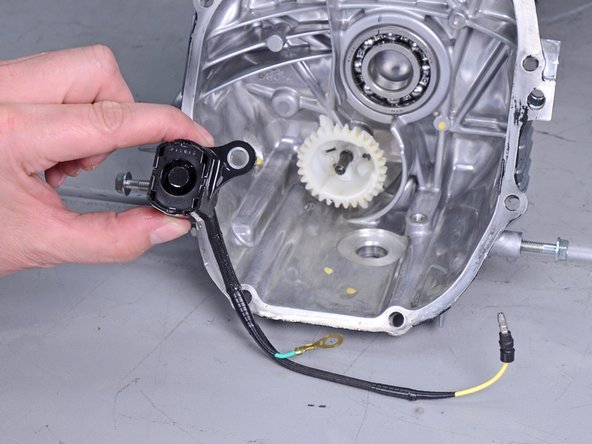
    • Use a 10 mm socket to remove the bolt securing the oil level sensor.

  73. Honda EU2200IT A2 Oil Level Switch Replacement: adım 73, 3 resimden 1. Honda EU2200IT A2 Oil Level Switch Replacement: adım 73, 3 resimden 2. Honda EU2200IT A2 Oil Level Switch Replacement: adım 73, 3 resimden 3.
    • Thread the sensor cable through the port and remove the sensor.

    • Be sure to check if your replacement sensor has an O-ring pre-installed on the sensor's mating surface. If it doesn't, transfer the O-ring over.

Sonuç

To reassemble your device, follow these instructions in reverse order.

Arthur Shi

Üyelik tarihi: 01/03/18

253.505 İtibar

526 adet Kılavuz yazıldı

Ekip

iFixit iFixit üyesi

Staff

135 Üyeler

17.199 adet Kılavuz yazıldı

0 Yorum

Yorum Ekle

İstatistikleri Görüntüle:

Son 24 Saat: 2

Son 7 gün: 37

Son 30 gün: 163

Her zaman: 4,339