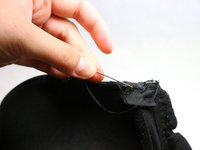
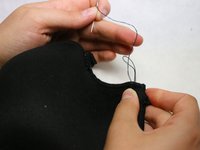
Ana içeriğe geç

How to Repair a Bra Underwire

Neye ihtiyacın var

  1. How to Repair a Bra Underwire, How to Repair a Bra Underwire: adım 1, 1 resimden 1.
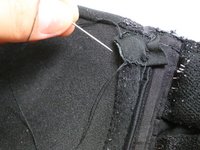
    • Locate the problem: find where the underwire breaks through the fabric of the bra.

  2. How to Repair a Bra Underwire: adım 2, 2 resimden 1. How to Repair a Bra Underwire: adım 2, 2 resimden 2.
    • Push the underwire back into the fabric of the side of the cup.

    • When back in place, the wire should not be visible.

  3. How to Repair a Bra Underwire: adım 3, 1 resimden 1.
    • Take a piece of matching scrap fabric and cut to the appropriate size.

    • Make sure the fabric is a bit bigger than the wire's puncture hole.

    • If the fabric is too thin, you can fold it to create a thicker piece.

  4. How to Repair a Bra Underwire: adım 4, 3 resimden 1. How to Repair a Bra Underwire: adım 4, 3 resimden 2. How to Repair a Bra Underwire: adım 4, 3 resimden 3.
    • Measure the appropriate length of thread and cut it.

    • Thread the needle and pull both ends evenly to double up the thread.

    • Tie the two loose ends of the thread together with a simple knot.

  5. How to Repair a Bra Underwire: adım 5, 2 resimden 1. How to Repair a Bra Underwire: adım 5, 2 resimden 2.
    • Place the fabric over the hole. Sew along the perimeter of the fabric square with a simple overlock stitch.

    • An overlock stitch is a sewing technique where the edges of one or more pieces of fabric are sewn together. Watch a short video to learn how to sew the overlock stitch by hand.

    • Make sure to sew through only the patch fabric and the bra's inner fabric layer. The thread should not show at the front of the bra!

  6. How to Repair a Bra Underwire: adım 6, 3 resimden 1. How to Repair a Bra Underwire: adım 6, 3 resimden 2. How to Repair a Bra Underwire: adım 6, 3 resimden 3.
    • In the last stitch, leave a loop of tread and pull the needle through the loop.

    • Finish by tying a knot in the end of the tread.

    • Cut the excess thread close to the fabric.

    • Do not cut the thread too close to the knot. This will make the stitches unravel.

  7. How to Repair a Bra Underwire: adım 7, 2 resimden 1. How to Repair a Bra Underwire: adım 7, 2 resimden 2.
    • Cut the excess fabric off the finished patch.

    • Inspect the patch to make sure it is securely sewed on the bra.

    • The final product should be a small patch on the inside of the cup.

  8. How to Repair a Bra Underwire: adım 8, 1 resimden 1.
    • No damage or evidence of sewing is shown on the outside of the bra.

    • Try on the final product to ensure correct fit and comfort.

Sonuç

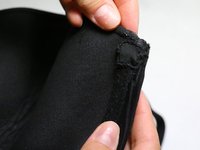
To reassemble your device, follow these instructions in reverse order.

5 farklı kişi bu kılavuzu tamamladı.

Celeste Stoker

Üyelik tarihi: 04/28/17

213 İtibar

1 Kılavuz yazıldı

Ekip

UC Davis, Team S4-G2, Cole Spring 2017 UC Davis, Team S4-G2, Cole Spring 2017 üyesi

UCD-COLE-S17S4G2

3 Üyeler

1 Kılavuz yazıldı

2 Yorum

You made something that is a total pain in the #$@ not so painful anymore and thanks for adding the video cause that helped a lot

Willow Reignes - Yanıt

I agree with Wllow. Thank you on behalf of my wife and wallet.

Daniel Pollard - Yanıt

Yorum Ekle

İstatistikleri Görüntüle:

Son 24 Saat: 3

Son 7 gün: 16

Son 30 gün: 49

Her zaman: 8,569