Ana içeriğe geç

How to Repair a Bra Underwire

Neye ihtiyacın var

  1. How to Repair a Bra Underwire, How to Repair a Bra Underwire: adım 1, 3 resimden 1. How to Repair a Bra Underwire, How to Repair a Bra Underwire: adım 1, 3 resimden 2. How to Repair a Bra Underwire, How to Repair a Bra Underwire: adım 1, 3 resimden 3.
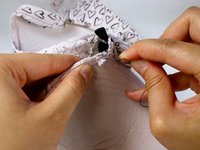
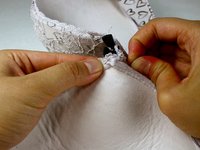
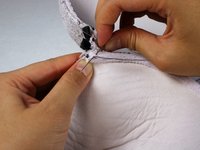
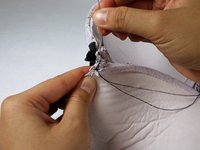
    • Push the underwire into the hole until it is no longer visible.

  2. How to Repair a Bra Underwire: adım 2, 3 resimden 1. How to Repair a Bra Underwire: adım 2, 3 resimden 2. How to Repair a Bra Underwire: adım 2, 3 resimden 3.
    • Thread the needle.

    • Pull the thread to a length of about 8 inches.

    • Match the length of the thread on each side of the loop and cut with the scissors.

    • Doubling up the thread in this way allows for stronger and longer-lasting stitches.

  3. How to Repair a Bra Underwire: adım 3, 3 resimden 1. How to Repair a Bra Underwire: adım 3, 3 resimden 2. How to Repair a Bra Underwire: adım 3, 3 resimden 3.
    • Loop both ends of the thread around your index finger.

    • Pinch the ends of the thread between your index finger and thumb and roll your index finger downwards until the loop slips off.

    • Carefully take hold of the loop and pull to create a knot.

    • Sometimes the knot created the first time may not be large enough. Repeat the last three instructions a second time to make a larger knot.

  4. How to Repair a Bra Underwire: adım 4, 3 resimden 1. How to Repair a Bra Underwire: adım 4, 3 resimden 2. How to Repair a Bra Underwire: adım 4, 3 resimden 3.
    • Insert the needle just above the tear in the bra where the underwire came out.

    • This ensures that the hole will not expand any further and provides extra stability in the stitches.

    • Handle the needle with care to not accidentally injure yourself!

  5. How to Repair a Bra Underwire: adım 5, 2 resimden 1. How to Repair a Bra Underwire: adım 5, 2 resimden 2.
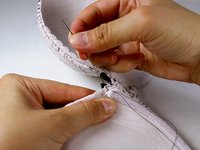
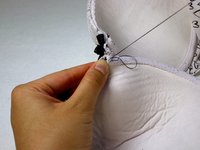
    • Use a whip stitch to mend the tear.

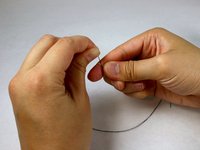
    • Pull the needle through the fabric until the knot at the end of the thread approaches the incision.

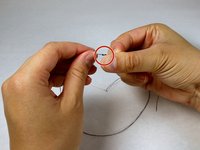
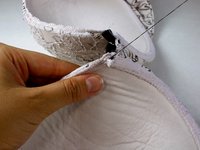
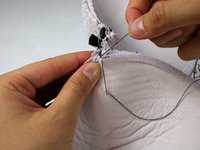
    • On the opposite side, insert the needle again at a point just after the first incision and pull it through the fabric.

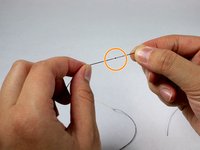
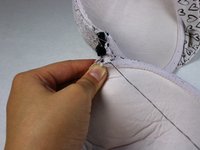
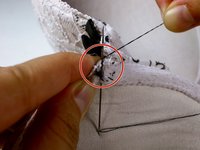
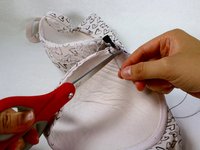
    • Continue this pattern two or three stitches below the tear.

  6. How to Repair a Bra Underwire: adım 6, 2 resimden 1. How to Repair a Bra Underwire: adım 6, 2 resimden 2.
    • Repeat the process from Step 4 going back upwards towards the tear, over your current stitching.

    • This gives your stitches extra reinforcement to make sure the tear is not reopened or pushes through the stitches.

  7. How to Repair a Bra Underwire: adım 7, 3 resimden 1. How to Repair a Bra Underwire: adım 7, 3 resimden 2. How to Repair a Bra Underwire: adım 7, 3 resimden 3.
    • Close the stitch.

    • Near your first incision, where the knot is, insert the needle into the fabric halfway through.

    • Wind the leftover thread around the sharp end of the needle 3-4 times, then pull the needle through completely.

    • Tug on the needle upwards to tighten the knot created.

  8. How to Repair a Bra Underwire: adım 8, 3 resimden 1. How to Repair a Bra Underwire: adım 8, 3 resimden 2. How to Repair a Bra Underwire: adım 8, 3 resimden 3.
    • Trim the thread with scissors. Leave a few millimeters of thread leftover to ensure that the knot does not come loose.

    • Optional: use a small amount of fabric adhesive over the stitching to fully reinforce it and seal the tear.

    • Leave it without glue and you are done.

Sonuç

Wear your bra a few times to make sure the underwire doesn't force its way out again. If it does, use tighter stitches and sew them a little closer together.

Cody Gunderson

Üyelik tarihi: 04/28/17

107 İtibar

1 Kılavuz yazıldı

Ekip

UC Davis, Team S1-G2, Coad Spring 2017 UC Davis, Team S1-G2, Coad Spring 2017 üyesi

UCD-COAD-S17S1G2

4 Üyeler

1 Kılavuz yazıldı

0 Yorum

Yorum Ekle

İstatistikleri Görüntüle:

Son 24 Saat: 4

Son 7 gün: 10

Son 30 gün: 31

Her zaman: 4,180