Bu sürüm, hatalı düzenlemeler içerebilir. En son doğrulanmış bellek kopyası dönün.
Neye ihtiyacın var
-
Bu adım çevrilmemiş. Çevrilmesine yardım edin
-
The following steps can be performed in sequential order or one component at a time noting to be very careful when removing and replacing components to assure the connections are clean, not damaged and connected properly.
-
The easiest connections to verify are the Hard Drive, UltraBay Slim Device connections and the Memory Module under the memory cover on the bottom side of the laptop.
-
You can also try this method and see if that is effective
-
- Unplug the AC adapter.
-
- Take out the battery.
-
- Press the power button 10 times in a row at one second intervals.
-
- Press and hold the power button for 30 seconds.
-
- Replace the battery back and push the power button.
-
-
Bu adım çevrilmemiş. Çevrilmesine yardım edin
-
Verify Hard Drive connections are clean, not damaged and connected properly.
-
Remove the Hard Drive to inspect and assure the Hard Drive connectors are clean and not damaged. See pgs 75-76, or as noted in the PDF reader as pgs 81-82, of the "thinkpad t40 t40p t41 t41p t42 t42p Maintenance Manual" for more details if needed. This manual is found in the Attached Documents section at the end of this Guide.
-
Insert and reconnect the Hard Drive making sure the connection is properly seated.
-
-
Bu adım çevrilmemiş. Çevrilmesine yardım edin
-
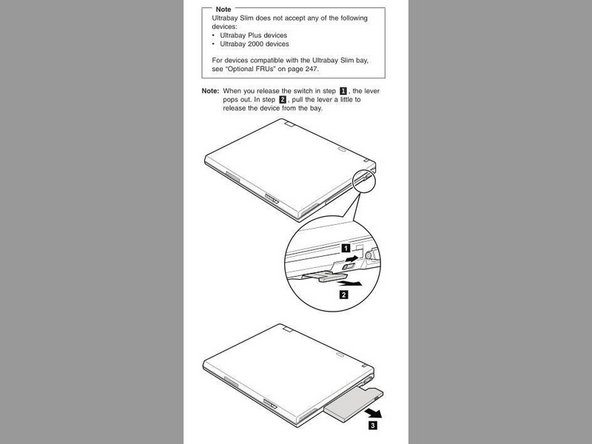
Verify UltraBay Slim Device connector is clean, not damaged and connected properly.
-
Remove the UltraBay Slim Device to inspect and assure the UltraBay Slim Device is clean and not damaged. See pg 74, or as noted in the PDF reader as pg 80, of the "thinkpad t40 t40p t41 t41p t42 t42p Maintenance Manual" for more details if needed. This manual is found in the Attached Documents section at the end of this Guide.
-
Insert and reconnect the UltraBay Slim Device making sure the connection is properly seated.
-
-
Bu adım çevrilmemiş. Çevrilmesine yardım edin
-
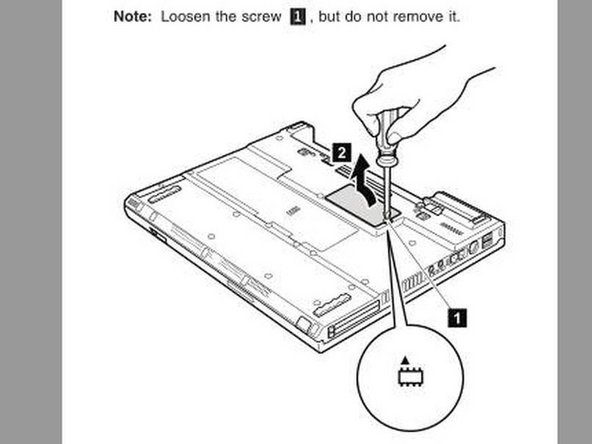
Verify the memory modules connections are clean and inserted properly.
-
Remove the memory module to inspect and assure the memory module connections are clean and not damaged. See pgs 77-78, or as noted in the PDF reader as pgs 83-84, of the "thinkpad t40 t40p t41 t41p t42 t42p Maintenance Manual" for more details if needed. This manual is found in the Attached Documents section at the end of this Guide.
-
Insert and reconnect the memory module making sure the connection is even and properly seated.
-
-
-
Bu adım çevrilmemiş. Çevrilmesine yardım edin
-
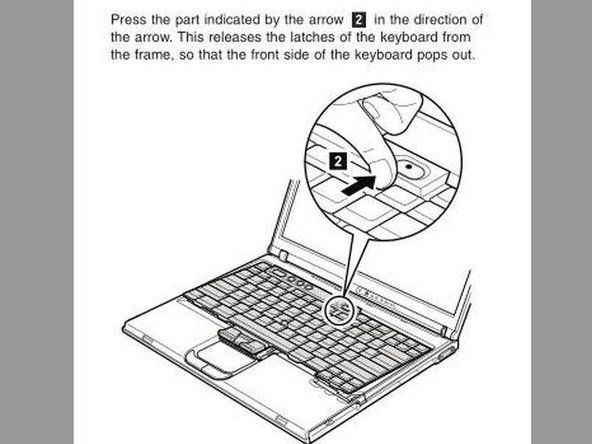
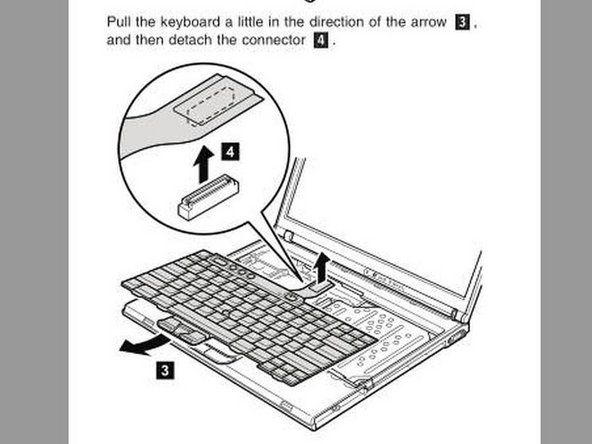
Very the Keyboard connectors are clean and no pins are damaged before verifying connected properly.
-
Remove the Keyboard to inspect and assure the Keyboard connectors are clean and not damaged. See pgs 79-81, or as noted in the PDF reader as pgs 85-87, of the "thinkpad t40 t40p t41 t41p t42 t42p Maintenance Manual" for more details if needed. This manual is found in the Attached Documents section at the end of this Guide.
-
Proceed to the next steps to inspect, clean and reconnect the memory module under the keyboard, palm rest, antenna, fan, LCD screen and CMOS connections before reconnecting the keyboard, otherwise reconnect the keyboard connection and install the keyboard.
-
-
Bu adım çevrilmemiş. Çevrilmesine yardım edin
-
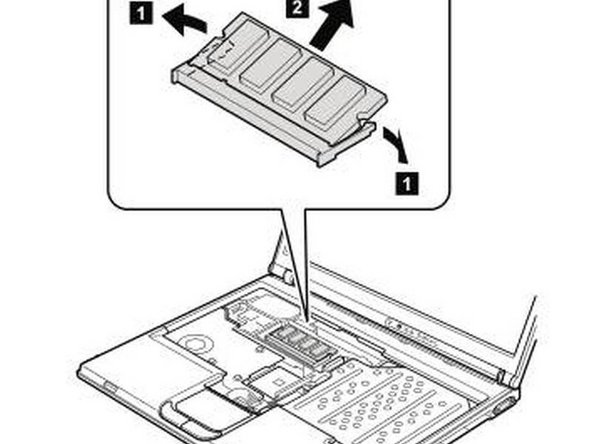
Verify Optional Memory Module Connectors are clean, not damaged and connected properly.
-
Remove the Optional Memory Module connector to inspect and assure the Memory Module connectors are clean and not damaged. See pg 83, or as noted in the PDF reader as pg 89, of the "thinkpad t40 t40p t41 t41p t42 t42p Maintenance Manual" for more details if needed. This manual is found in the Attached Documents section at the end of this Guide.
-
Insert and reconnect the Optional Memory Module making sure the connection is properly seated.
-
-
Bu adım çevrilmemiş. Çevrilmesine yardım edin
-
Verify Palm Rest Connectors are clean, not damaged and connected properly.
-
Remove the Palm Rest connector to inspect and assure the Palm Rest connectors are clean and not damaged. See pg 89-90, or as noted in the PDF reader as pg 95-96, of the "thinkpad t40 t40p t41 t41p t42 t42p Maintenance Manual" for more details if needed. This manual is found in the Attached Documents section at the end of this Guide.
-
Insert and reconnect the Palm Rest connector making sure the connection is properly seated.
-
-
Bu adım çevrilmemiş. Çevrilmesine yardım edin
-
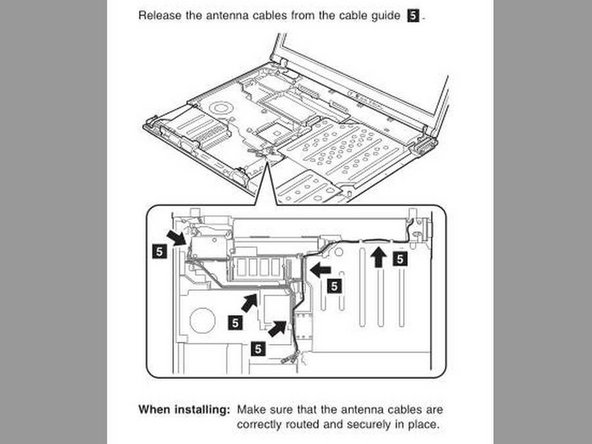
Verify WiFi Antenna Connectors are clean, not damaged and connected properly.
-
Remove the WiFi Antenna connectors to inspect and assure the WiFi antenna connectors are clean and not damaged. See pg 126, or as noted in the PDF reader as pg 132, of the "thinkpad t40 t40p t41 t41p t42 t42p Maintenance Manual" for more details if needed. This manual is found in the Attached Documents section at the end of this Guide.
-
Reconnect the WiFi Antenna module making sure the connections are properly seated.
-
-
Bu adım çevrilmemiş. Çevrilmesine yardım edin
-
Verify the Fan Assembly Connectors are clean, not damaged and connected properly.
-
Remove the Fan Assembly connector to inspect and assure the Fan Assembly connectors are clean and not damaged. See pg 104, or as noted in the PDF reader as pg 110, of the "thinkpad t40 t40p t41 t41p t42 t42p Maintenance Manual" for more details if needed. This manual is found in the Attached Documents section at the end of this Guide.
-
Install and reconnect the Fan Assembly connector making sure the connection is properly seated.
-
-
Bu adım çevrilmemiş. Çevrilmesine yardım edin
-
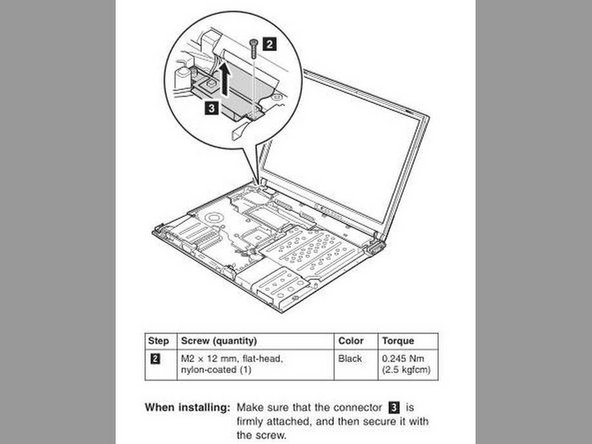
Verify LCD Assembly Connector is clean, not damaged and connected properly.
-
Remove the LCD Assembly connector to inspect and assure the LCD Assembly connectors are clean and not damaged. See pg 124, or as noted in the PDF reader as pg 130, of the "thinkpad t40 t40p t41 t41p t42 t42p Maintenance Manual" for more details if needed. This manual is found in the Attached Documents section at the end of this Guide.
-
Insert and reconnect the LCD Assembly connector making sure the connection is properly seated.
-
-
Bu adım çevrilmemiş. Çevrilmesine yardım edin
-
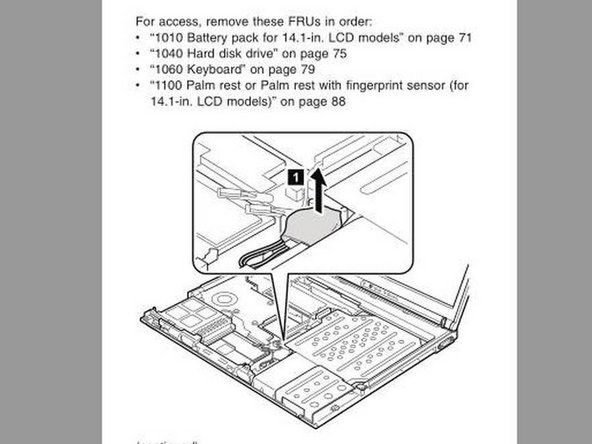
Verify CMOS Battery Connectors are clean, not damaged and connected properly.
-
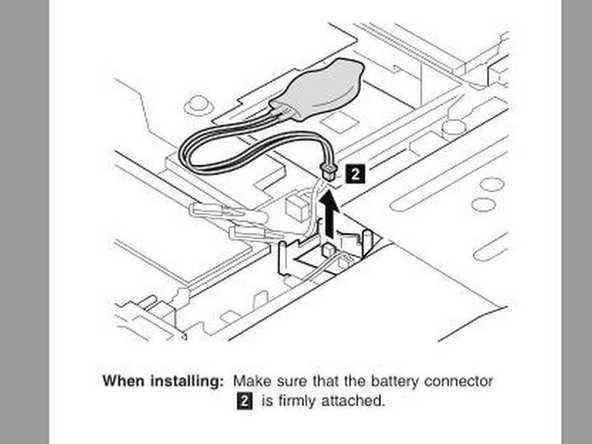
Remove the CMOS Battery connector to inspect and assure the CMOS Battery connectors are clean and not damaged. See pgs 106-109, or as noted in the PDF reader as pgs 112-115, of the "thinkpad t40 t40p t41 t41p t42 t42p Maintenance Manual" for more details if needed. This manual is found in the Attached Documents section at the end of this Guide.
-
Insert and reconnect the CMOS Battery connector making sure the connection is properly seated.
-


İptal et: Bu kılavuzu tamamlamadım.
3 farklı kişi bu kılavuzu tamamladı.
Ekli Belgeler
Bir Yorum
Update 052124: The BIOS battery died on me and I decided on a quick fix using a 2032 Duracell battery from the local hardware store along with some electrical tape. I removed the two shrink wrap pieces with a razor blade, carefully cutting along one side so to reuse. Then I used a needle nose plier to remove the tabs and flatten back out the tabs once removed. The flat tabs didn't work well, so I remove the electrical tape and shrink wrap, bent the tabs ends so bending downwards towards the contact surface with another two bends for the tab to go over the shrink wrap piece that was around the perimeter of the cell. Taped back over again and other than resetting the BIOS date and time, there was a longer startup time and the computer was back to life.