Bu sürüm, hatalı düzenlemeler içerebilir. En son doğrulanmış bellek kopyası dönün.
Neye ihtiyacın var
-
Bu adım çevrilmemiş. Çevrilmesine yardım edin
-
Turn the Roomba upside down to be able to see the yellow battery pack.
-
-
Bu adım çevrilmemiş. Çevrilmesine yardım edin
-
Remove the battery by placing your fingers into the two holes and firmly press your fingers against both sides of the battery.
-
Lift the battery directly up and out of the device.
-
-
Bu adım çevrilmemiş. Çevrilmesine yardım edin
-
Insert the replacement battery into the empty space and firmly press down onto the battery until two audible clicks are heard.
-
-
Bu adım çevrilmemiş. Çevrilmesine yardım edin
-
Lay the Roomba upside down on a flat surface with the blue strip away from you.
-
-
Bu adım çevrilmemiş. Çevrilmesine yardım edin
-
Use your index fingers to pull the yellow tabs towards you.
-
While still pulling the yellow tabs with your index fingers, tilt up the brush guard.
-
-
-
Bu adım çevrilmemiş. Çevrilmesine yardım edin
-
Pull back the brush guard to unhook it from the latches.
-
Remove the brush guard by lifting it up and out of the Roomba.
-
-
Bu adım çevrilmemiş. Çevrilmesine yardım edin
-
Remove the flexible rubber brush by grabbing it and pulling it up and out of the Roomba.
-
First, insert the black end of the flexible rubber brush into the black square opening on the right side.
-
Second, lay the flexible rubber brush back into place.
-
-
Bu adım çevrilmemiş. Çevrilmesine yardım edin
-
Lay the Roomba on a flat surface with the red side up.
-
-
Bu adım çevrilmemiş. Çevrilmesine yardım edin
-
Push in the red, gumdrop-shaped button with your thumb.
-
While holding in the button, slide the back piece away from the main body of the Roomba.
-
-
Bu adım çevrilmemiş. Çevrilmesine yardım edin
-
Flip the back piece over in your hand.
-
Using your other hand, grab the yellow tab and pull it away from the back piece.
-
-
Bu adım çevrilmemiş. Çevrilmesine yardım edin
-
Pinch the black plastic of the filter and pull it away from the yellow filter holder.
-
-
Bu adım çevrilmemiş. Çevrilmesine yardım edin
-
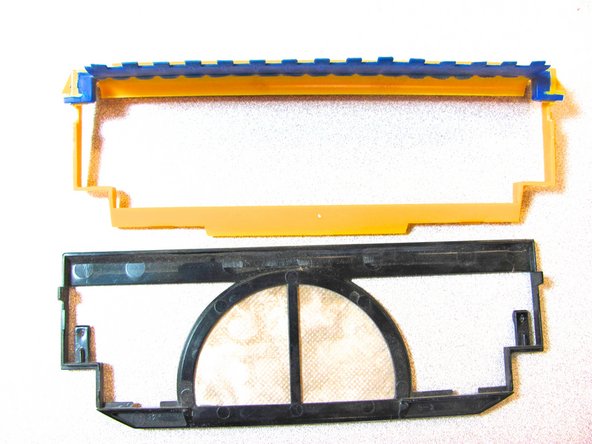
Pop out the two yellow tabs to remove the brush cover.
-
-
Bu adım çevrilmemiş. Çevrilmesine yardım edin
-
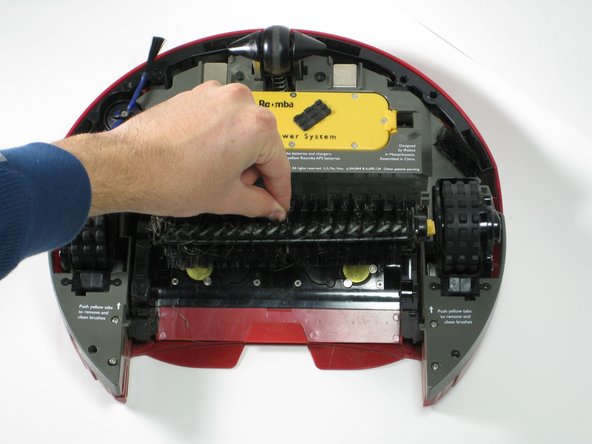
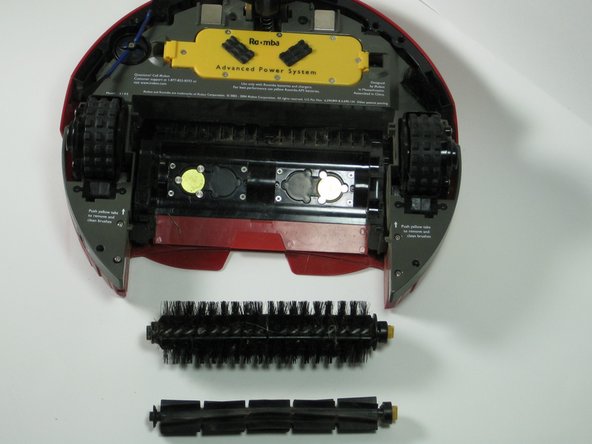
Remove the two brushes from the iRobot Roomba 1400.
-
Completely remove any debris or tangled hair around the brushes when cleaning.
-


İptal et: Bu kılavuzu tamamlamadım.
4 farklı kişi bu kılavuzu tamamladı.
Ekip

Cal Poly, Team 20-6, Maness Fall 2010 Cal Poly, Team 20-6, Maness Fall 2010 üyesi
CPSU-MANESS-F10S20G6
2 Üyeler
3 adet Kılavuz yazıldı