Giriş
There seems to be an issue with the Keurig Single Serve Coffeemaker Brewing System. After a while it appears as if scale build-up or other contaminants prevent the Keurig from brewing full 12oz. It takes longer to brew, the Keurig becomes louder and it dispense on the average 4oz or less. This is a "quick and dirty" guide only to assist in fixing this. The Keurig for this guide came from a workshop and is used quite frequently under less than optimal conditions.
Neye ihtiyacın var
-
-
Keurig K40 not brewing/dispensing 12oz
-
Open the Keurig all the way to remove the K-cup Holder
-
The K-cup holder simply pulls straight up. There might be a bit of resistance from some spring clips. The flaky debris is actually coffee from reusable K-cup filters.
-
-
-
K-cup insert removed. Clean with hot water as needed.
-
On the bottom of the K-cup insert is a tapered needle that punctures the bottom of the K-cup. On the side of it is a small hole. Use a paper clip (or similar) and insert it in there to remove any scale, coffee grounds etc.
-
Next is to clean the top needle. It is trickier since it is somewhat hard to reach around the sides of the needle. There will be three holes around the needle. Open the Keurig all the way, and again use a paper clip (or similar).
-
-
-
-
Top part of the check valve on the bottom. there is a fine screen that acts as a filter. Remove that by removing the three Phillips screws with a long #2 Phillips screwdriver. Clean the screen under running water with a brush. Reassemble after proper cleaning.
-
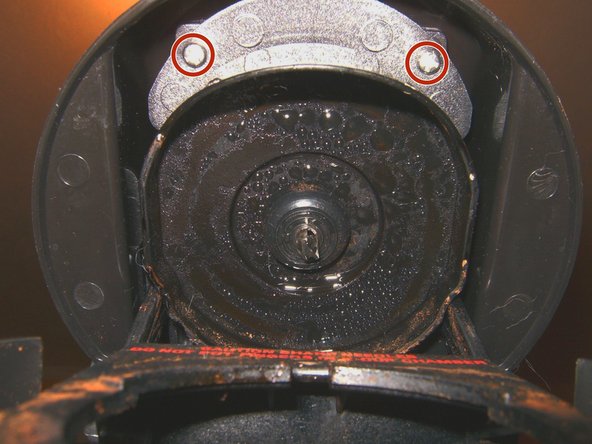
Next step is to remove the top cover to get to the water supply to the K-cup. Open the Keurig. remove two Phillips screws that hold it in place.
-
Lift the top cover up and forward to remove it.
-
-
-
Water supply from the boiler to the K-cup needle is via a water hose through a check valve.
-
Remove the two small screws that hold the water line to the inlet
-
Unhook the water line from the connector above the K-cup needle. it is a simple press fit.
-
Next remove the tie straps. (You don't have to do this step) Just remove the other end of hose from pump. You might have to use a flat head screwdriver to lift up on end of hose while pulling up
-
-
-
Test the check valve. Blowing air in it from the boiler side should cause it to open. Repeat that a couple of times to loosen any sediments etc. It will also help to run some hot water from the K-cup side into the check valve and shake it up. Once it is cleaned, replace the check valve and the tie straps. Reassemble the Keurig
-


To reassemble your device, follow these instructions in reverse order.
To reassemble your device, follow these instructions in reverse order.
İptal et: Bu kılavuzu tamamlamadım.
106 farklı kişi bu kılavuzu tamamladı.

Ekip

90 Yorum
Perfect - been looking all over for a solution besides trashing the unit.
Thank you for the step by step instructions!
awesome thank you kindley
Outstanding presentation. I've had my Keurig apart before. However, as I use well water and don't have the best filtration system, mine tends to clog frequently.
I will add however, that the case for, at least some Keurig coffee makers have clips holding the cover in place that can be rather difficult to release.
I should add, excellent photography!