Giriş
During sport, a strong stretch can damage the stitching on your jacket or T-shirt. Some seams may break under this heavy strain. Don't worry, they can be easily repaired with a sewing machine and you will be able to continue wearing your favorite outfit for more and more sports to come.
➡️Before you get started, please check the safety disclaimer at the bottom of the page.
Neye ihtiyacın var
-
-
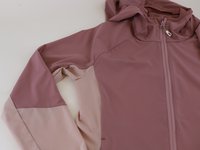
Locate the damaged area of your item.
-
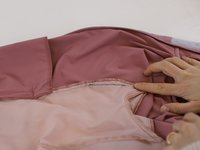
Check how it looks on the outside, and whether it is spreading further by gently pulling the seam.
-
Also check how the damage looks on the inside, and take note of the type of stitching, and fabric condition around the seam.
-
-
-
-
Prepare and clean the area around the damaged seam by removing broken thread and trimming any loose threads.
-
Prepare the damaged seam by placing the fabric edge to edge.
-
Place the item under the sewing machine, and make a short back-and-forth lockstitch using the reverse lever, to secure one end. Then proceed to make a single long stitch along the seam until the end of the damage. Secure at the end with another locking stitch. Inspect the repair, and if it requires another long stitch, repeat the process.
-
Tip: check the iFixit basic sewing skills page for more tips on sewing machine setup.
-
-
-
🛠️🏆👏 Congratulations! The repair is complete, and you're ready to go!
-


In need of another repair? Don't worry! Check out our other guides to find quick solutions for your favourite clothing, footwear and equipment!
----------------------------------------
🚨🛠️🩹 IMPORTANT SAFETY NOTICE:
The repair guides provided on this site are intended to help you repair products on your own. While we have put a lot of care into them, all repair work carries some risk:
- Safety Precautions: When repairing your product, take all necessary precautions to ensure your safety. Use appropriate tools and follow the instructions carefully.
- Product Condition: Once your product has been repaired, it may not meet original compliance guidelines anymore and could potentially have issues.
- Liability: We are not responsible for any damage or injury that may occur during the repair process or as a result of using a repaired product. You, as the repairer, assume all risks and responsibilities associated with the repair.
By using these repair guides, you fully acknowledge and accept the potential risks and responsibilities involved.

Ekip
