Ana içeriğe geç

Huawei Mate 10 Pro Shields Replacement

Salt Önkoşul
Bu kılavuz yalnızca diğer kılavuzlar için bir ön koşul olarak kullanılmak üzere tasarlanmıştır. Tek başına eksiktir.

Neye ihtiyacın var

  1. Huawei Mate 10 Pro Shields Replacement, Back Cover: adım 1, 1 resimden 1.
    • Switch off your phone.

    • Prepare an iOpener and apply it to the back of the phone for about two minutes to loosen the adhesive beneath the back cover.

  2. Huawei Mate 10 Pro Shields Replacement: adım 2, 3 resimden 1. Huawei Mate 10 Pro Shields Replacement: adım 2, 3 resimden 2. Huawei Mate 10 Pro Shields Replacement: adım 2, 3 resimden 3.
    Bu adımda kullanılan alet:
    Halberd Spudger
    $2.99
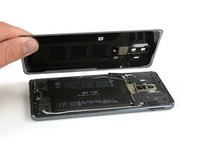
    • Lift up the back cover with a suction cup until you can insert the flat end of a halberd spudger.

    • Use the halberd spudger to cut the adhesive beneath the back cover on all sides of the phone.

    • Use opening picks to avoid the adhesive from sticking to the back cover again while cutting the adhesive on all sides.

  3. Huawei Mate 10 Pro Shields Replacement: adım 3, 2 resimden 1. Huawei Mate 10 Pro Shields Replacement: adım 3, 2 resimden 2.
    • Don't remove the back cover all the way, yet. The fingerprint sensor cable is still connected to motherboard.

    • Flip the back cover over to the side.

    • Remove the Phillips #00 screw which holds down the metal shield, sitting on top of the connection of the fingerprint sensor cable.

  4. Huawei Mate 10 Pro Shields Replacement: adım 4, 2 resimden 1. Huawei Mate 10 Pro Shields Replacement: adım 4, 2 resimden 2.
    Bu adımda kullanılan alet:
    Tweezers
    $4.99
    • Use a pair tweezers to remove the metal shield covering the connector of the fingerprint sensor.

    • Disconnect the fingerprint sensor cable with a spudger.

    • When reassembling your phone apply new adhesive where it is necessary.

  5. Huawei Mate 10 Pro Shields Replacement, Shields: adım 5, 3 resimden 1. Huawei Mate 10 Pro Shields Replacement, Shields: adım 5, 3 resimden 2. Huawei Mate 10 Pro Shields Replacement, Shields: adım 5, 3 resimden 3.
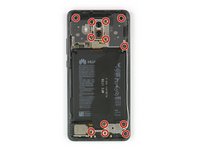
    • Remove the twelve Phillips #00 screws.

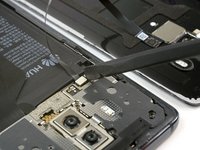
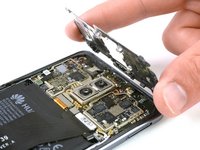
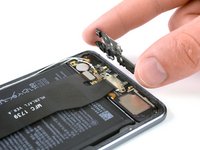
    • Carefully remove the shields on top of the motherboard and the charging board.

    • In case the shields do not pop out easily on their own after you removed the Phillips screws, you can use the pointed end of a spudger to pry them out.

Sonuç

To reassemble your device, follow these instructions in reverse order.

Dominik Schnabelrauch

Üyelik tarihi: 11/23/16

231.142 İtibar

682 adet Kılavuz yazıldı

Ekip

iFixit iFixit üyesi

Staff

120 Üyeler

19.664 adet Kılavuz yazıldı

0Kılavuz Yorumları

Yorum Ekle

İstatistikleri Görüntüle:

Son 24 Saat: 0

Son 7 gün: 1

Son 30 gün: 7

Her zaman: 35