Bu sürüm, hatalı düzenlemeler içerebilir. En son doğrulanmış bellek kopyası dönün.
Neye ihtiyacın var
-
-
Telefonunuzu kapatın.
-
İki adet Pentalobe P2 vidayı sökün.
-
SIM kart tepsisini çıkarın.
-
-
-
Telefonunuzun alt kısmından olmak üzere, ekran ve kasa arasına bir adet plastik açma aleti yerleştirin.
-
Ekranı, parçaları ile birlikte dikkatli bir şekilde kasadan dışarıya doğru kaldırın.
-
Alt tarafı kaldırdıktan sonra, her iki taraftaki kelepçeleri açmak için de açma aletini kullanın.
-
-
Bu adım çevrilmemiş. Çevrilmesine yardım edin
-
Remove the two Phillips #00 screws.
-
Use tweezers to remove both metal plates.
-
-
Bu adım çevrilmemiş. Çevrilmesine yardım edin
-
Use a spudger to disconnect the interconnect, the battery and the display flex cable.
-
-
-
Bu adım çevrilmemiş. Çevrilmesine yardım edin
-
Remove the four Phillips #00 screws.
-
Use Tweezers to remove the metal plate.
-
-
Bu adım çevrilmemiş. Çevrilmesine yardım edin
-
Use a spudger to disconnect the main flex cable.
-
Use tweezers to disconnect the antenna cable and pull it out of the clamp holding it down to the charging board.
-
-
Bu adım çevrilmemiş. Çevrilmesine yardım edin
-
Use a spudger to disconnect the headphone jack and the loudspeaker flex cables.
-
-
Bu adım çevrilmemiş. Çevrilmesine yardım edin
-
Use a spudger to pry out the charging board.
-
Remove the charging board.
-
-
Bu adım çevrilmemiş. Çevrilmesine yardım edin
-
Use a spudger to carefully pry out the loudspeaker. There is some adhesive underneath so it might be a little bit sticky. You can use an iOpener to loosen it.
-
Remove the loudspeaker.
-
-
Bu adım çevrilmemiş. Çevrilmesine yardım edin
-
Remove the antenna cable if you haven't already.
-
Use tweezers to remove the interconnect cable.
-
Use an iOpener to loosen the adhesive beneath the display. Especially take care of the upper and lower part of the display.
-
-
Bu adım çevrilmemiş. Çevrilmesine yardım edin
-
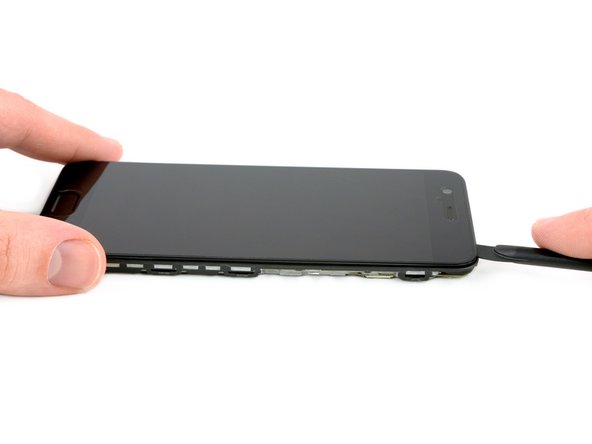
Insert the tip of an opening pick between the display and the midframe on the bottom of the phone, near the home button.
-
Slide the opening pick along the bottom edge, to cut the adhesive.
-
Slide the opening pick to the bottom right corner and leave it there.
-
Insert another opening pick under the screen on the bottom left corner.
-
-
Bu adım çevrilmemiş. Çevrilmesine yardım edin
-
Slide the opening pick under the screen around all edges of the phone.
-
-
Bu adım çevrilmemiş. Çevrilmesine yardım edin
-
Carefully pull the display assembly away from the frame.
-
Remove the display assembly.
-


İptal et: Bu kılavuzu tamamlamadım.
23 farklı kişi bu kılavuzu tamamladı.


4 Yorum
Any advice which adhesive to use? I’ve seen a russian replacement video, it looked like the guy was using some kind of silicone.
Little late but maybe this?
I used B-7000 glue. It enables you to release the screen when a second replacement is needed.
Assuming I purchase a screen off of ebay, and replace it using this method, will the touch id still work?