Bu çeviri, kaynak kılavuzdaki en son güncellemeleri yansıtmayabilir. Çeviriyi güncellemeye yardımcı olun veya kaynak kılavuzunu görüntüleyin.
Giriş
Bu kılavuzu, Huawei P10 Lite akıllı telefonunuzun çerçeveli ekran düzeneğini değiştirmek için kullanın.
Eğer ekranınız kırıksa, tamirinize başlamadan önce geniş bir bandı şeritler halinde keserek ekranın üzerine koyun. Bu hem gözlerinizi cam kırıklarından korur hem de temizliği kolaylaştırır.
Tekrar birleştirme işlemi esnasında, gerektiğinde yeni yapışkan kullanın.
Neye ihtiyacın var
-
-
Yapışkanı kesmek için, açma penasının ucunu arka kapak ve orta çerçeve arasına sokarak telefonun etrafında kaydırın.
-
-
-
Cımbız yardımıyla etiketi çıkarın.
-
İki adet Phillips #00 vidayı sökün.
-
Dört adet 2.5 mm'lik Phillips #00 vidayı sökün.
Schritt 3 und 4 kann man sich komplett sparen. Wozu auch. Kann gleich mit Schritt 5 weitergemacht werden, zuvor einfach das Flachbandkabel vom Fingerabdrucksensor an der Rückabdeckung abklemmen und fertig.
Translate what Bobby mcgee said:
Step 3 and 4 can be completely ignored. What for? You can continue with step 5, just disconnect the ribbon cable from the fingerprint sensor on the back cover and you're done.
However, the reason step 3 and 4 should not be skipped is Step 6 — Use an iOpener to loosen the adhesive beneath the battery. I.e., the adhesive cannot be easily removed without heat, however, that heat might damage the electric chips. Thus they’d better be removed first.
-
-
-
Anakart kalkanını ayırmak için cımbız kullanın.
-
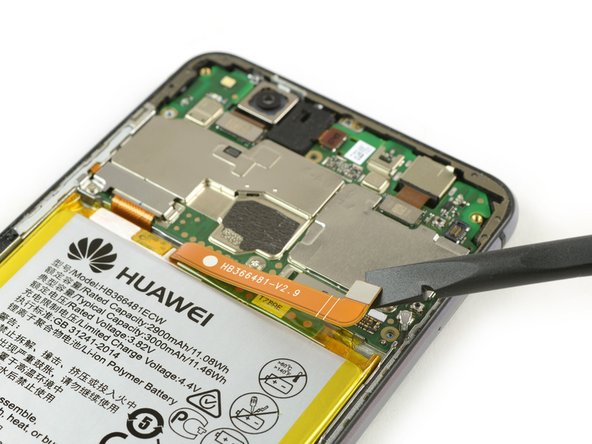
Parmak izi algılayıcısı fleks kablosunun bağlantısını kesmek için spudger'ın (plastik kanırtma aparatı) düz ucunu kullanın.
Welchen Klebstoff soll man verwenden?
Hallo Josef,
sollte bei deinem Ersatzteil kein Klebstoff oder Klebeband dabei gewesen sein, kannst du dünne Streifen Doppelseitiges Klebeband verwenden. Es gibt für das Huawei P10 Lite auch schon zugeschnittene Klebestreifen zu erwerben, hierbei gilt aber je nach Händler Rezessionen zu lesen, ob die Klebestreifen auch wirklich halten.
Hi darren,
pre-cut adhesive would be the best solution if you can source it. Otherwise a two-sided adhesive tape or carefully used E6000 adhesive glue will be your friend. -
-
-
Phillips #00 vidayı sökün.
-
Pil fleks kablosunu kaplayan metal kalkanı ayırın.
-
Pil fleks kablosunun bağlantısını kesmek için spudger'ın (plastik kanırtma aparatı) düz ucunu kullanın.
-
-
-
Pilin altındaki yapışkanı gevşetmek için iOpener kullanın.
-
Boşluk yaratmak için, pil ve ara çerçeve arasına bir adet spudger (plastik kanırtma aparatı) yerleştirin.
-
Pilin altındaki yapışkanı kesmek için araya soktuğunuz spudger'ı ya da bir adet açma penasını kullanın.
Ohne eine Erwärmung des Klebers ist die Entfernung des Akkus wirklich sehr hakelig und zeitintensiv!
Is it possible to soften the adhesive using isopropyl alcohol?
Hi Michele,
yes, the use of isopropyl alcohol is a common technique when removing a battery in a smartphone. Especially when the adhesive is very strong. Try to apply the alcohol to every corner of the battery and let it penetrate the adhesive for several minutes. Start the prying procedure with the spudger afterwards. In case the adhesive isn’t loose enough you can reapply isopropyl alcohol any time during the removal. Keep in mind, that there’s a gap in the midframe for the display flex cable. It can happen that the isopropyl alcohol runs trough that gap and loosens the adhesive of the display as well. When the display adhesive gets loose you’ll need replacement adhesive for the display. To avoid that, apply as less alcohol as possible at a time and take especially care during prying to avoid damage to the flex cables underneath the battery. The adhesive of the cables will get loose as well.
The battery was very hard to remove. Please note: it is glued everywhere around the ribbon cables at the bottom. The battery is not glued with little strips like the back cover. The spudger and the blue cutting triangles were not very strong and the plastic tip bent upon removal of the battery. I eventually got the battery out with a metallic spatula. Be careful not to rip the shining lining of the battery while cutting the adhesive. I don’t know how people get the battery out without bending it, also every YT video I watched had - slightly - bent batteries. The glue is so strong snd sticky I did not need to apply new adhesive strips.
If you are operating on aged ones:
The Old double sided tape doesn’t really much care about the heat from the iOpener.
Use a metal spudger (round edges) instead but use it with care. Slowly and evenly lift the battery and go around it in a circle. Stay close to the edges to not damage cables under the battery (seen in step 7). Start pushing closer towards the middle only when you can see the cables yet and are sure not to damage them.
If this still doesn’t bring you closer to lifting the battery safely:
Two Options:
1. Try to use some small drops of adhesive remover . Best to use not to much is use Q-Tips or Cotton Swabs to evenly apply the remover through a little crack under the battery.
2. Use unwaxed dental floss push it under the battery. Then gently move it upwards with a pulling-side-to-side motion. To accelerate the process you can also use ***adhesive remover***. The dental floss will soak it up (only works with unwaxed dental floss) and assure that it will only be where it’s needed.
-
-
-
-
Bir adet Phillips #00 vidayı sökün.
-
Ekran fleks kablo kolunu cımbız yardımıyla ayırın.
-
-
-
Cımbızla anten kablosunu yerinden çıkarın.
-
Anakart iyi bir şekilde tutabilecek hale gelene kadar kaldırmak için açma penası kullanın.
-
Anakartı ayırın.
The instructions did not say to remove the sim tray or the screw holding the motherboard down that is in the bottomcenter of the mother board. Unless these are removed first, the motherboard cannot be removed.
Thanks ronald for your input. The missing steps and actions have been added and edited.
-
-
-
Hoparlörü tutan sekiz adet Phillips #00 vidayı sökün.
-
-
-
Bağlantı kablosunun bağlantısını kesip çıkarmak için spudger'ın düz ucunu kullanın.
-
Anten kablosunun bağlantısını kesin çıkarmak için cımbız kullanın.
-
Şarj panosunu cımbızla çıkarın.
-


Cihazınızı tekrar birleştirmek için, bu tamilatları sondan başa doğru uygulayın.
Cihazınızı tekrar birleştirmek için, bu tamilatları sondan başa doğru uygulayın.
İptal et: Bu kılavuzu tamamlamadım.
12 farklı kişi bu kılavuzu tamamladı.
Bu çevirmenlere özel teşekkürler:
85%

Gözde dünyayı onarmamıza yardım ediyor! Katkıda bulunmak ister misiniz?
Çeviriye Başlayın ›


4 Yorum
Hello!
Thanks for the assembly guide! My phones display glass was broken, and I bought new display with frame (since the frame might have been bent), and this guide proved to be helpful. Though, I ought to mention that you did not show how the upper left metal cover for display port was removed (not that I needed it).
However, I think I slightly damaged the main cord between upper and lower motherboards, the orange one, when I was removing the battery. I can still recharge my phone and listen to music through loudspeaker, but I can not hear or be heard when I am having a phone call with someone. I can use hands-free with a microphone to get around the problem, but I wanted to ask that is it possible for the damaged cord to cause this problem, or could it be something else? I would imagine that I should at least hear the other person even if the cord is slightly damaged.
- Jesse
Hello Jesse
It could be, that cable sends data from the top to the bottom. The micro of the calls is the lower one, so the information could not reach the top if that part is damaged. Look at step 17, in that small plate is the microphone, it could be covered by dirt or not embedded in its hole. But the headset does not depend on that cable, could it have misplaced the headset? Look at step 13, if it is reversed, it will not work.
Oscar -
Hello all!
As we continue getting more and more boards with the same problem, I’d like to point out that you should be very careful when disconnecting the antenna cable. The soldering quality is probably not the best, and this may lead to the antenna cable coming out of the board along with the connector to which it is connected.. This is not so critical, but you will have to do some jewelry work to solder the detached connector.
Thank you for the good guide which helped us to save my son’s phone!
P.S.: I recommend buying the spare parts here - I had ordered the first display on ebay (this was before my brother recommended ifixit to me) and it was broken. The parts from ifixit came in perfect quality.
Mit dem Saugnapf die Rückseite anheben hilft ungemein…
Matthias Eberle - Yanıt
Had to use blue wedge tool to wedge open bottom plate from the rim part in order to then use the tip of the blue opening pick under the back plate to then cut the glue. It’s like placing a pie server or knife under the plate once there’s a gap between the rim and the back plate.
Jane - Yanıt
Be careful, there’s a cable to fingerprint sensor, very close to the edge (see pictures below)… It’s very easy to cut it through with the pick, as I just learned :)
dambig - Yanıt