Ana içeriğe geç

Bu sürüm, hatalı düzenlemeler içerebilir. En son doğrulanmış bellek kopyası dönün.

Neye ihtiyacın var

  1. Bu adım çevrilmemiş. Çevrilmesine yardım edin

    : adım 1, 1 resimden 1.
    • Heat an iOpener and apply it to the rear glass for two minutes.

    • A hair dryer, heat gun, or hot plate may also be used, but be careful not to overheat the P8 Lite—the display and internal battery are both susceptible to heat damage.

  2. Bu adım çevrilmemiş. Çevrilmesine yardım edin

    : adım 2, 2 resimden 1. : adım 2, 2 resimden 2.
    • Apply a suction cup to the rear glass, as close to the right edge as possible.

    • If the phone's rear glass is cracked, the suction handle may not stick. Try lifting it with strong tape, or superglue the suction handle in place and allow it to cure so you can proceed.

    • Pull up on the suction up with strong, steady force to create a gap.

    • Depending on the age of your device, this may be difficult. If you have trouble, apply more heat to further soften the adhesive and try again.

    • Insert the tip of an opening pick into the gap between the rear glass and frame.

  3. Bu adım çevrilmemiş. Çevrilmesine yardım edin

    : adım 3, 2 resimden 1. : adım 3, 2 resimden 2.
    • Slide the tip of the opening pick to the bottom right corner to cut the adhesive.

    • Leave it there to prevent the adhesive from resealing.

  4. Bu adım çevrilmemiş. Çevrilmesine yardım edin

    : adım 4, 2 resimden 1. : adım 4, 2 resimden 2.
    • Insert a second opening pick at the bottom right corner.

    • Slide the tip of the opening pick to the top right corner to slice the adhesive.

    • Leave the opening pick at its place to prevent the adhesive from resealing.

  5. Bu adım çevrilmemiş. Çevrilmesine yardım edin

    : adım 5, 2 resimden 1. : adım 5, 2 resimden 2.
    • Insert a third opening pick at the top right corner.

    • Slide it to the top left corner to cut the adhesive.

    • In case you're having trouble to cut the adhesive, reapply the iOpener for another minute to loosen it.

    • Leave the opening pick at its place to prevent the adhesive from resealing.

  6. Bu adım çevrilmemiş. Çevrilmesine yardım edin

    : adım 6, 2 resimden 1. : adım 6, 2 resimden 2.
    • Insert a fourth opening pick at the top left corner.

    • Do not insert the opening pick deeper than 1 cm (1/3rd of an inch) to avoid damage the fingerprint sensor cable.

    • Slide the tip of the opening pick to the bottom left corner to cut the adhesive.

    • Leave the opening pick in its place to prevent the adhesive from resealing.

  7. Bu adım çevrilmemiş. Çevrilmesine yardım edin

    : adım 7, 2 resimden 1. : adım 7, 2 resimden 2.
    • Insert a fifth opening pick at the bottom left corner.

    • Slide it to the bottom right corner to cut the remaining adhesive.

    • Try not to remove the rear glass yet! The fingerprint sensor is still connected to the motherboard.

  8. Bu adım çevrilmemiş. Çevrilmesine yardım edin

    : adım 8, 3 resimden 1. : adım 8, 3 resimden 2. : adım 8, 3 resimden 3.
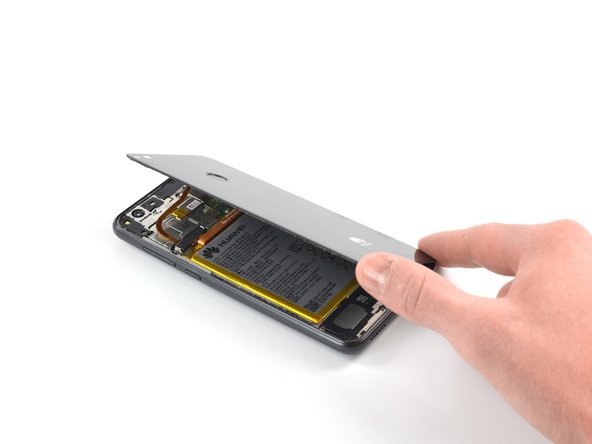
    • Open the P8 Lite by swinging the rear glass up from the left side, like the back cover of a book.

    • Place the rear glass on the top of the battery.

    • Avoid tensioning the display cable during this procedure.

  9. Bu adım çevrilmemiş. Çevrilmesine yardım edin

    : adım 9, 1 resimden 1.
    • Use a Phillips #00 screwdriver to remove the 2.9 mm screw.

  10. Bu adım çevrilmemiş. Çevrilmesine yardım edin

    : adım 10, 2 resimden 1. : adım 10, 2 resimden 2.
    • Use the tip of an opening pick to pry up and loosen the metal shield.

  11. Bu adım çevrilmemiş. Çevrilmesine yardım edin

    : adım 11, 1 resimden 1.
    • Use a pair of tweezers to remove the metal shield.

  12. Bu adım çevrilmemiş. Çevrilmesine yardım edin

    : adım 12, 2 resimden 1. : adım 12, 2 resimden 2.
    • Use a spudger to pry up and disconnect the fingerprint sensor cable.

  13. Bu adım çevrilmemiş. Çevrilmesine yardım edin

    : adım 13, 1 resimden 1.
    • Remove the rear glass.

    • After installing the rear glass, apply strong, steady pressure to your phone for several minutes to help the adhesive form a good bond—a stack of heavy books works well.

Bitiş Çizgisi

Adriana Zwink

Üyelik tarihi: 12/18/19

48.256 İtibar

167 adet Kılavuz yazıldı

Ekip

iFixit iFixit üyesi

Staff

135 Üyeler

16.817 adet Kılavuz yazıldı

0 Yorum

Yorum Ekle

İstatistikleri Görüntüle:

Son 24 Saat: 1

Son 7 gün: 5

Son 30 gün: 22

Her zaman: 651