Bu çeviri, kaynak kılavuzdaki en son güncellemeleri yansıtmayabilir. Çeviriyi güncellemeye yardımcı olun veya kaynak kılavuzunu görüntüleyin.
Giriş
Bu kılavuzu, Huawei P9 Lite'ınızın çerçevesi de dahil ekranını değiştirmek için kullanın.
Neye ihtiyacın var
-
-
Alt köşeden başlayarak, arka kapağın klipslerini açma penası yardımıyla çıkartın.
-
Saat yönünün tersine bir hareket izleyerek, plastik tırnakları teker teker dikkatli bir şekilde açın..
-
-
-
Açma penasını yana döndürerek, arka kapağı havaya ve yapışkandan uzağa doğru kaldırın.
Most of the adhesive is around the fingerprint cell and on the battery itself. You can slowly pull the back cover from its side but make sure not to break it. Push the mediator or a longer piece of plastic under the back cover to slowly destroy the adhesive.
Slowly, slowly wins the day. Nicolas is right and comes off a charm. The most nerve wracking part of this longish repair.
-
-
-
Arka kapak yapışkandan kurtulduktan sonra, kapağı elinizle rahatça tamamen açabilirsiniz.
Hi! Im so sad! At the begginig of the operation i ve broken the white seal/connector that in one side is connected to the board and the other side is "glued" to the battery. Can someone help me? how can i solve this?? There is no image displayed on the screen. but there is vibration, sound, notifications... can someone help me please???
What you broke is handling the NFC, and doesn’t have anything to do with the display. You probably damaged the ribbon right below the battery, since that’s what links the display to the motherboard.
Polaris -
Oups ! L’antenne NFC était solidement collée à l’intérieur de la coque et j’ai donc déchiré sa nappe en ouvrant la coque. Heureusement, je n’utilise pas les fonctions NFC et, à part cela, tout a l’air de fonctionner normalement.
-
-
-
Metal kalkan plakayı tutan, dokuz adet Phillips #00 vidayı sökün.
Qu’est ce qu’un “indicateur d’eau”?
Une petite pastille qui change de couleur au contact de l’eau. Les fabricants s’en servent pour nullifier la garantie : si ta pastille indique que de l’eau s’est infiltré, tu devra payer ta réparation.
Polaris -
Are all the screws the same size ?
yes they are
Adam M -
-
-
-
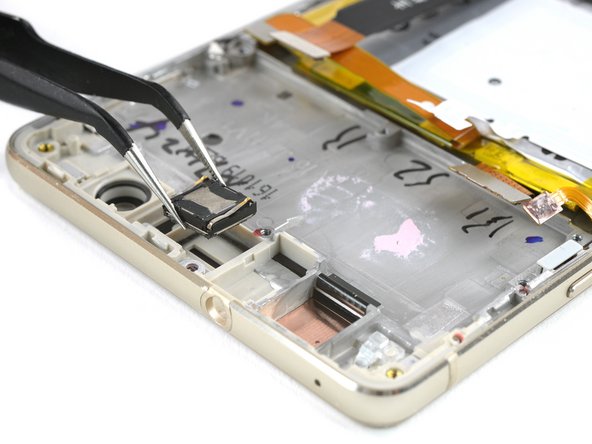
Parmak izi sensörünü anakarttan ayırmak için spudger (plastik kanırtma aparatı) kullanın.
-
NFC (Yakın Saha İletişimi) anten kablosunu metal plakadan soyun.
can we just remove NFC antenna and dont want to install int back?
Note there are two plastic tabs at the top of the shield plate. Unlock them with a mediator, the plate will come easily after that.
Buongiorno,
va sostituita l'intera piastra metallica contenente il sensore impronte e la fotocamera, oppure il sensore é estraibile dalla piastra?
Grazie
LUIGI
Yes, it is possible to remove just the fingerprint sensor from the motherboard shield. Remove the small metal plate on the inside of the shield covering the sensor and push the fingerprint sensor through from the other side.
-
-
-
-
Şimdi yardımcı kartı ayırın.
-
Titreşim motorunun kontağını dikkatli bir şekilde soyup çıkartın.
-
Ayrıca alt mikrofon yuvasını da ayırın.
Be extra careful when removing the vibrator motor ( I ripped the flex ). The flex is easy to detach but the motor is glued a bit deeper in the frame, and it’s tricky to extract. I naively thought if I applied a lever from the top side, where the flex reaches (following the ungluing of the flex cable) I could get it out, but I ripped the flex in doing so. you have to come and lift it up from the right side preferably. On the other hand if you ripped the flex, it’s no biggy. Just save the part and don’t put it back in the new frame, your phone will work but not vibrate. I always hated that thing anyway ! Otherwise you can buy a new part (non OEM) for a few euros on Amazon.
-
-
-
Pile zarar gelmemesi için, düz bir açıyla bir adet spudger (plastik kanırtma aleti) ya da herhangi bir kaldırma aleti kullanarak pili yapışkanından kurtarın.
Really good guide - mine seemed to have a lot more glue holding things down but eventually got it all apart, One additional thing - if you need to transplant the power and volume buttons from the old frame, they just sit in an opening on the side, but be aware that they may be glued into place.
I agree with the comment above. I removed the on/off and volume buttons with an old style razor blade to cut through the glue between the body and the back of the buttons. Also I would recommend buying a new battery as I totally ruined mine trying to un-stick it from the old frame.
Same from me: everything in instruction very accurate described except power/volume buttons replacement. Most of frames comming from Chine are without these buttons and transfer from old one is required ;)
Yup, a lot of glue as well and I had to bend my battery slightly. I didn’t pierce or rip it though, so I risked putting in back with the new piece. It works, but battery performance is affected. I would recommend buying a new battery and changing it at the same time. The adhesive is already in place on the new frame, so no need for double sided tape.
Also volume up down and power buttons were not on the new frame. I had to get them from the new frame and they were glued were strongly.
Before you consider taking them out, make sure to remember how the little gray plastic cover on top was put (that bit was not glued by the way, it’s the actual button underneath which is), since you may have a headache putting it back in place on the new frame. You will know you got it right when all three buttons “click” when all is done.
As for the ungluing, the only way I could get them out was by first ungluing the screen with iopener/suction handle/picks (although my screen was way too broken for that too work, in the end I had to push through the broken screen by a small hole in the old frame, where the battery was before).
Once you get the screen off the old frame, there’s a small black tape where the buttons are on the other side. Remove it first, and from there you can see the buttons and push them out. You have to cut out the glue first though. I used one tip of the tweezers since they were thinner and stronger than the plastic spudge and “sawed” between the buttons and the frame, that’s where the glue is. Be careful to saw between the button and the frame and not between the circuits and the buttons (orange layer and metal piece), or you will wreck it. Also be careful when you reach the middle between the two volume buttons (I think, just check from the inside) since that is where the circuits merge into the flex that connects to the motherboard.
-


Cihazınızı tekrar birleştirmek için, bu tamilatları sondan başa doğru uygulayın.
Cihazınızı tekrar birleştirmek için, bu tamilatları sondan başa doğru uygulayın.
İptal et: Bu kılavuzu tamamlamadım.
39 farklı kişi bu kılavuzu tamamladı.
Bu çevirmenlere özel teşekkürler:
90%

Gözde dünyayı onarmamıza yardım ediyor! Katkıda bulunmak ister misiniz?
Çeviriye Başlayın ›

Ekip

7 Yorum
I finished to replace the display yesterday and everything is perfect , thanks ifixit
i replaced the display but the touchscreen doesn’t work
You can try to reopen the phone and check if the flex cable is plugged in correctly or if any cable is ripped. If you can’t find any damage and all cables are plugged in correctly it’s possibly an issue with the replacement part.
Hi, could you show how to replace the power button flex cable for a P9 Lite 2017? I would be greatful.
my powerbutton connection is also missing…
Ho riparato il cellulare e realmente la guida è fatta molto bene, Grazie!
Great guide ! I added a few comments under the relevant steps for the following issues (they were my doing though, the guide is great) :
STEP 16 Be extra careful when removing the vibrator motor as it is rather easy to rip the flex.
STEP 17 I had to get the volume up/down and power buttons from the old frame and that proved tricky (see my comments under step 17). Mind you that is not the outer plastic button but the inner metal button and circuits. You will know it’s not there by pressing the buttons to see if they “click”.
*I STRONGLY RECOMMEND BUYING A NEW BATTERY TOGETHER WITH THE SCREEN* I was able to remove my battery without wrecking it but the slight deformation still affected battery performance in the end (a lot). I highly doubt it is possible to do this repair without harming the battery.
What could you use instead of an opening pick??
Alfredo - Yanıt
Like, could a guitar pick wor? Or anything else?
Alfredo - Yanıt
A guitar pick will also do.
Tobias Isakeit -
what can still be used besides guitar pick
Tarshia Thompson - Yanıt
I had a hard time to open the back cover by opening pick. Then I used little, really little knife at first, and I continue to opening back cover using opening pick.
Andy B - Yanıt
Heating up aroud the finger sensor to loosen the square adhesive tape ..
Hishamchohan - Yanıt
If you do not have any picks, You can also adapt an old credit or utility card by cutting it in to thirds. Then with some fine emery or sand paper, rub a sharp point on the one edge of the card. This will help you get access to the clips that hold the rear cover on. The one i did yesterday had quite a lot of adhesive around the edge & around the finger print sensor. Another tip with an old credit card is to cut it in to narrow strips to insert in to where you have separated the cover from the frame to stop it getting stuck to the adhesive again.
gazza667 - Yanıt