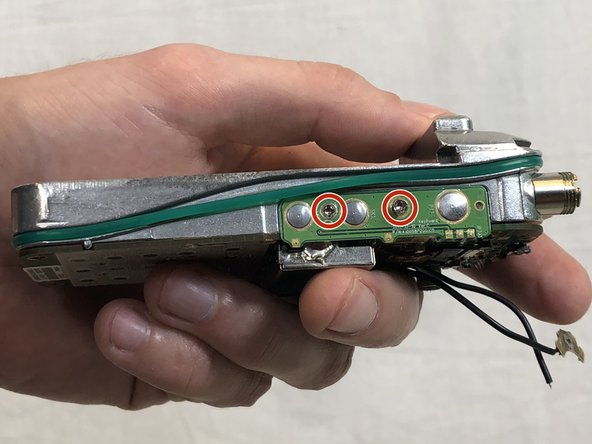
Ana içeriğe geç

Hytera TC-580 Speaker Replacement

Neye ihtiyacın var

  1. Hytera TC-580 Speaker Replacement, Battery: adım 1, 2 resimden 1. Hytera TC-580 Speaker Replacement, Battery: adım 1, 2 resimden 2.
    • Remove the two 10mm Phillips #0 from the belt clip.

  2. Hytera TC-580 Speaker Replacement: adım 2, 2 resimden 1. Hytera TC-580 Speaker Replacement: adım 2, 2 resimden 2.
    • Push in the release button and pull up on the battery to remove.

  3. Hytera TC-580 Speaker Replacement, Antenna: adım 3, 1 resimden 1.
    • Twist antenna counter-clockwise and set damaged antenna aside.

  4. Hytera TC-580 Speaker Replacement, Keypad: adım 4, 1 resimden 1.
    • Remove the volume knob by firmly lifting up on both sides of it.

  5. Hytera TC-580 Speaker Replacement: adım 5, 1 resimden 1.
    • Remove the orange o-ring around volume knob using tweezers.

  6. Hytera TC-580 Speaker Replacement: adım 6, 1 resimden 1.
    • Remove grey nut from base of volume knob by turning it counterclockwise with a set of tweezers.

  7. Hytera TC-580 Speaker Replacement: adım 7, 1 resimden 1.
    • Remove the brass washer from the base of the antenna slot by turning it counterclockwise with a set of tweezers.

  8. Hytera TC-580 Speaker Replacement: adım 8, 2 resimden 1. Hytera TC-580 Speaker Replacement: adım 8, 2 resimden 2.
    • Remove the two 15mm T8 Torx screws from the base of the battery cavity.

  9. Hytera TC-580 Speaker Replacement: adım 9, 1 resimden 1.
    • Using a plastic opening tool, pry in between the plastic case and metal circuit board to remove the board.

  10. Hytera TC-580 Speaker Replacement: adım 10, 1 resimden 1.
    • Peel off the keypad by hand.

  11. Hytera TC-580 Speaker Replacement, Speaker: adım 11, 3 resimden 1. Hytera TC-580 Speaker Replacement, Speaker: adım 11, 3 resimden 2. Hytera TC-580 Speaker Replacement, Speaker: adım 11, 3 resimden 3.
    • Remove eleven 4mm Phillips #00 screws.

  12. Hytera TC-580 Speaker Replacement: adım 12, 1 resimden 1.
    • Apply a soldering iron to the solder joints to remove the two wires connecting the speaker to the circuit board.

Sonuç

To reassemble your device, follow these instructions in reverse order.

Mohammed Chehab

Üyelik tarihi: 02/14/18

88 İtibar

1 Kılavuz yazıldı

Ekip

USF Tampa, Team S3-G4, Nance Spring 2018 USF Tampa, Team S3-G4, Nance Spring 2018 üyesi

USFT-NANCE-S18S3G4

3 Üyeler

5 adet Kılavuz yazıldı

0 Yorum

Yorum Ekle

İstatistikleri Görüntüle:

Son 24 Saat: 0

Son 7 gün: 2

Son 30 gün: 4

Her zaman: 492