Giriş
This is the important second step to opening up the PS4 Dual Shock 4 controller, which I have not been able to find anywhere on the internet (hence this guide).
You must unlatch 4 clips holding the case together, or else the top and bottom casings of the controller will not separate. Forcing it open will break the clips, and the controller will not hold together as securely when reassembled.
The photos show the assembled controller and the top casing alone to help you locate the clips, which are almost impossible to see before disassembly.
Neye ihtiyacın var
-
-
After you have unscrewed the four Phillips head screws on the back of the controller (see other guides), you will need to unlatch a total of 4 clips holding the casing together before you can open the controller
-
The clips are nearly impossible to see from outside the controller before disassembling, so the pictures show the assembled and disassembled casing to help you find them
-
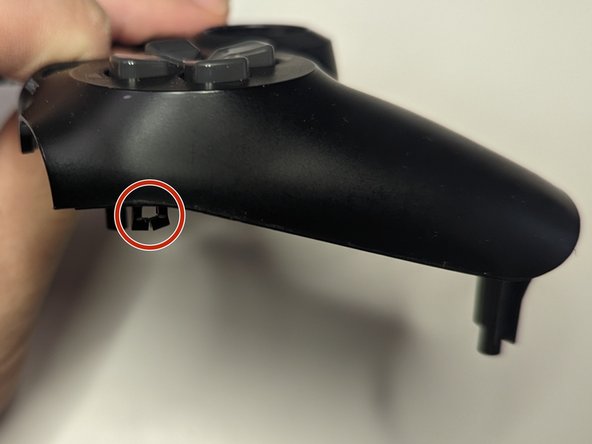
Start with the two clips located on either side of the ext/headphone port; note that the photo shows the casing after the clips have been unlatched, so your gap will not look that large yet
-
To unlatch each clip, insert a spudger, thin flathead screw driver, or other thin object that can fit into the gap between the top and bottom casings at the locations indicated with arrows
-
Push your tool towards the interior of the controller while gently twisting or levering it to further open the gap and separate the top and bottom casing
-
-
-
-
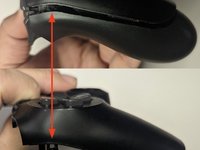
There are two more clips to unlatch, one on each side of the controller near the shoulder buttons; once again, this photo shows how your controller will look after the clips are unlatched, so your gap will be much smaller
-
Insert your tool at the location indicated on the right (buttons) side of the controller and repeat the previous step for unlatching this clip
-
-
-
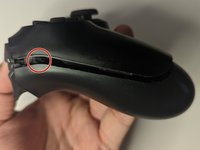
Repeat the previous step on the left (d-pad) side of the controller
-
(Note that my clip here is broken because I tried to force the casing open.)
-


The controller should now open easily. Take care not to damage the ribbon cable still connecting the top and bottom cases. You can now proceed to the next step in your guide.
İptal et: Bu kılavuzu tamamlamadım.
32 farklı kişi bu kılavuzu tamamladı.
5Kılavuz Yorumları
Thank you so much for this! Mine was not coming apart easily at all and nothing else I looked at had this info and I was worried I would be stuck figuring it out the hard way. But you saved me on that, thank you a ton!
This save me from breaking clips, thanks!
Very helpful guide, thank you!