Ana içeriğe geç

Bu kılavuzda güncel değişiklikler var. En son onaylanmamış sürüme geçin.

India Mark III Head Flange Replacement

Salt Önkoşul
Bu kılavuz yalnızca diğer kılavuzlar için bir ön koşul olarak kullanılmak üzere tasarlanmıştır. Tek başına eksiktir.

Neye ihtiyacın var

  1. India Mark III Head Flange Replacement, Access Door: adım 1, 2 resimden 1. India Mark III Head Flange Replacement, Access Door: adım 1, 2 resimden 2.
    • Before performing any repairs, perform a water test on the pump by raising and lowering the handle a full 40 strokes. A properly performing pump will yield greater than 10 liters.

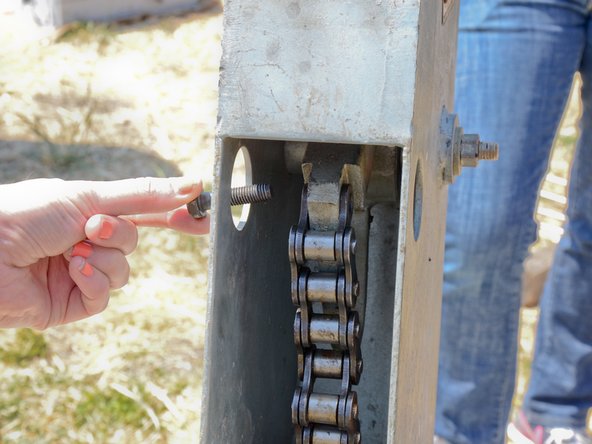
    • Remove the hex head bolt from the top of the access door on the pump head.

    • On reassembly, this bolt should be hand-tight.

  2. India Mark III Head Flange Replacement: adım 2, 3 resimden 1. India Mark III Head Flange Replacement: adım 2, 3 resimden 2. India Mark III Head Flange Replacement: adım 2, 3 resimden 3.
    • Pull the access door straight up off the pump head.

    • Store the access door in a sanitary place to prevent contamination.

  3. India Mark III Head Flange Replacement: adım 3, 2 resimden 1. India Mark III Head Flange Replacement: adım 3, 2 resimden 2.
    • The access door has a tongue that fits into the base of the pump head.

    • The access door makes a convenient tray to hold nuts and bolts during the disassembly.

  4. India Mark III Head Flange Replacement, Chain: adım 4, 3 resimden 1. India Mark III Head Flange Replacement, Chain: adım 4, 3 resimden 2. India Mark III Head Flange Replacement, Chain: adım 4, 3 resimden 3.
    • Place the spacer collar around the pump rod below the raised chain, with the beveled side down, and the flat side facing up.

  5. India Mark III Head Flange Replacement: adım 5, 3 resimden 1. India Mark III Head Flange Replacement: adım 5, 3 resimden 2. India Mark III Head Flange Replacement: adım 5, 3 resimden 3.
    • The following procedure requires two people. If you attempt to do this alone, you risk injuring yourself and damaging the pump.

    • Lift the pump handle until the base of the chain comes to rest on the spacer collar, and the chain is slack. Hold the handle in this position while the chain is being detached.

  6. India Mark III Head Flange Replacement: adım 6, 3 resimden 1. India Mark III Head Flange Replacement: adım 6, 3 resimden 2. India Mark III Head Flange Replacement: adım 6, 3 resimden 3.
    • Using the two access holes, place an angled socket wrench on the bolt and nut attaching the chain to the pump handle.

  7. India Mark III Head Flange Replacement: adım 7, 3 resimden 1. India Mark III Head Flange Replacement: adım 7, 3 resimden 2. India Mark III Head Flange Replacement: adım 7, 3 resimden 3.
    • Hold the wrench on the bolt stationary.

    • Loosen the nut.

  8. India Mark III Head Flange Replacement: adım 8, 3 resimden 1. India Mark III Head Flange Replacement: adım 8, 3 resimden 2. India Mark III Head Flange Replacement: adım 8, 3 resimden 3.
    • Remove the nut from the chain bolt.

  9. India Mark III Head Flange Replacement: adım 9, 2 resimden 1. India Mark III Head Flange Replacement: adım 9, 2 resimden 2.
    • Remove the washer from the chain bolt.

  10. India Mark III Head Flange Replacement: adım 10, 2 resimden 1. India Mark III Head Flange Replacement: adım 10, 2 resimden 2.
    • Remove the chain bolt.

  11. India Mark III Head Flange Replacement: adım 11, 3 resimden 1. India Mark III Head Flange Replacement: adım 11, 3 resimden 2. India Mark III Head Flange Replacement: adım 11, 3 resimden 3.
    • Pull the top of the chain straight off of the pump handle.

  12. India Mark III Head Flange Replacement, Head: adım 12, 3 resimden 1. India Mark III Head Flange Replacement, Head: adım 12, 3 resimden 2. India Mark III Head Flange Replacement, Head: adım 12, 3 resimden 3.
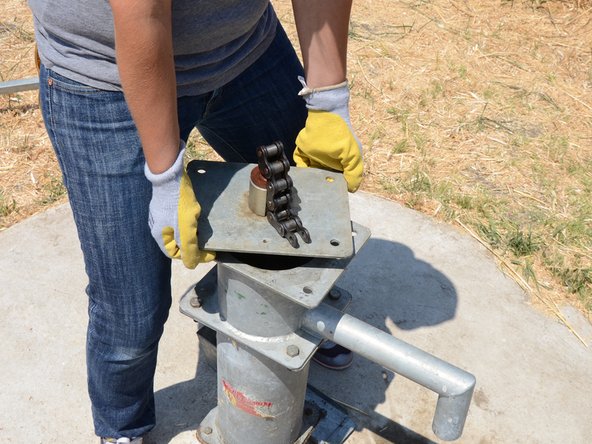
    • Remove the two bolts from the handle side of the pump head.

    • Use one wrench on the bolt and another on the nut beneath. Hold the bolt stationary and loosen the nut.

  13. India Mark III Head Flange Replacement: adım 13, 3 resimden 1. India Mark III Head Flange Replacement: adım 13, 3 resimden 2. India Mark III Head Flange Replacement: adım 13, 3 resimden 3.
    • Remove the two bolts and nuts from the handle side.

  14. India Mark III Head Flange Replacement: adım 14, 2 resimden 1. India Mark III Head Flange Replacement: adım 14, 2 resimden 2.
    • After removing the two handle side bolts, have your partner support the weight of the handle.

    • Remove the two remaining bolts in the same fashion.

  15. India Mark III Head Flange Replacement: adım 15, 3 resimden 1. India Mark III Head Flange Replacement: adım 15, 3 resimden 2. India Mark III Head Flange Replacement: adım 15, 3 resimden 3.
    • Lift and remove the pump head from the pump.

    • Store the pump head in a sanitary place, preferably above ground, to prevent contamination.

  16. India Mark III Head Flange Replacement, Chain: adım 16, 2 resimden 1. India Mark III Head Flange Replacement, Chain: adım 16, 2 resimden 2.
    • Slightly twist the head flange, until the corners overhang the top of the tank far enough to grab.

  17. India Mark III Head Flange Replacement: adım 17, 3 resimden 1. India Mark III Head Flange Replacement: adım 17, 3 resimden 2. India Mark III Head Flange Replacement: adım 17, 3 resimden 3.
    • Lift the head flange up about one foot above the tank.

  18. India Mark III Head Flange Replacement: adım 18, 3 resimden 1. India Mark III Head Flange Replacement: adım 18, 3 resimden 2. India Mark III Head Flange Replacement: adım 18, 3 resimden 3.
    • Slide the rod clamp around the pump rod, and support it on the tank base.

    • Make sure the pegs in the base of the rod clamp fit into the appropriate holes in the top of the tank.

  19. India Mark III Head Flange Replacement: adım 19, 2 resimden 1. India Mark III Head Flange Replacement: adım 19, 2 resimden 2.
    • Tighten the rod clamp against the pump rod.

    • Be sure the pump rod is centered within the jaws of the clamp and held securely.

  20. India Mark III Head Flange Replacement: adım 20, 2 resimden 1. India Mark III Head Flange Replacement: adım 20, 2 resimden 2.
    • Lower the head flange.

  21. India Mark III Head Flange Replacement: adım 21, 3 resimden 1. India Mark III Head Flange Replacement: adım 21, 3 resimden 2. India Mark III Head Flange Replacement: adım 21, 3 resimden 3.
    • Unscrew the chain from the top of the pump rod.

    • Remove the chain.

    • Check the chain for signs of wear or damage.

    • Set the chain in a sanitary place, such as the access door that was previously removed.

  22. India Mark III Head Flange Replacement, Head Flange: adım 22, 3 resimden 1. India Mark III Head Flange Replacement, Head Flange: adım 22, 3 resimden 2. India Mark III Head Flange Replacement, Head Flange: adım 22, 3 resimden 3.
    • Remove the chain support from around the pump rod.

  23. India Mark III Head Flange Replacement: adım 23, 1 resimden 1.
    • Remove the jam nut from the top of the pump rod.

  24. India Mark III Head Flange Replacement: adım 24, 3 resimden 1. India Mark III Head Flange Replacement: adım 24, 3 resimden 2. India Mark III Head Flange Replacement: adım 24, 3 resimden 3.
    • Remove the head flange.

  25. India Mark III Head Flange Replacement: adım 25, 1 resimden 1.
    • Screw the jam nut back onto the top of the pump rod.

Sonuç

To reassemble your device, follow these instructions in reverse order.

Andrew Optimus Goldheart

Üyelik tarihi: 10/17/09

502.789 İtibar

407 adet Kılavuz yazıldı

Ekip

iFixit iFixit üyesi

Staff

135 Üyeler

16.767 adet Kılavuz yazıldı

0 Yorum

Yorum Ekle

İstatistikleri Görüntüle:

Son 24 Saat: 0

Son 7 gün: 0

Son 30 gün: 0

Her zaman: 41