Ana içeriğe geç

Insignia Flex 10.1 NS-P10A6100 Camera Replacement

Neye ihtiyacın var

  1. Insignia Flex 10.1 NS-P10A6100 Camera Replacement, Back Case: adım 1, 1 resimden 1.
    • Make sure your tablet is turned off and not connected to a power source to prevent personal injury.

    • The volume rocker and power button located on the top edge by the camera are not connected pieces and will become free from the device once the front panel is removed from the back case. They are easily put back in place when reassembling the tablet.

    • Position the tablet with the top edge by the camera facing down.

    • Insert the plastic opening tool between the front panel and back case at the upper left hand corner of the tablet.

  2. Insignia Flex 10.1 NS-P10A6100 Camera Replacement: adım 2, 2 resimden 1. Insignia Flex 10.1 NS-P10A6100 Camera Replacement: adım 2, 2 resimden 2.
    • Slide the plastic opening tool along the edge of the tablet between the front panel and back case.

    • Repeat this process for the two shorter edges of the tablet leaving the top edge by the camera still snapped in place.

  3. Insignia Flex 10.1 NS-P10A6100 Camera Replacement: adım 3, 1 resimden 1.
    • Using an unfolding motion along the top edge of the tablet, carefully separate the front panel from the back case.

  4. Insignia Flex 10.1 NS-P10A6100 Camera Replacement, Camera: adım 4, 2 resimden 1. Insignia Flex 10.1 NS-P10A6100 Camera Replacement, Camera: adım 4, 2 resimden 2.
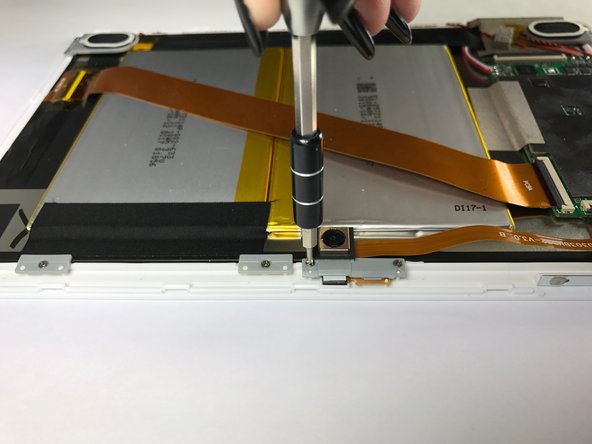
    • Using the Phillips #000 screw driver, unscrew the two 4 mm screws securing the camera to the front panel in a counterclockwise direction.

    • The two screws are very small, so be careful not to lose them after unscrewing them.

  5. Insignia Flex 10.1 NS-P10A6100 Camera Replacement: adım 5, 1 resimden 1.
    • Using the plastic opening tool, lift up the black retaining flap that secures the camera ZIF (zero insertion force) ribbon connector to the motherboard.

  6. Insignia Flex 10.1 NS-P10A6100 Camera Replacement: adım 6, 1 resimden 1.
    • Pull the camera ZIF (zero insertion force) ribbon connector out from underneath the black retaining flap.

    • Remove the camera.

Sonuç

The camera is now free from the device and can be replaced. To reassemble your device, follow these instructions in reverse order.

Cody Koelemay

Üyelik tarihi: 10/30/16

365 İtibar

1 Kılavuz yazıldı

Ekip

Baylor, Team 5-8, Williams Fall 2016 Baylor, Team 5-8, Williams Fall 2016 üyesi

BU-WILLIAMS-F16S5G8

3 Üyeler

12 adet Kılavuz yazıldı

Bir Yorum

Cannot take selfies. Tha camera points forward all the time

fife2usa - Yanıt

Yorum Ekle

İstatistikleri Görüntüle:

Son 24 Saat: 0

Son 7 gün: 1

Son 30 gün: 1

Her zaman: 281