Giriş
There are many benefits to adding a second hard drive to your iMac such as improved speeds, greater storage space, and less heartache when installing new software. Use this guide to install one using our optical bay hard drive enclosure.
Neye ihtiyacın var
-
-
Loosen the single Phillips screw in the center of the access door.
-
Remove the access door from your iMac.
-
-
-
Stick two suction cups to opposing corners of the glass panel.
My GPS unit's car mount suction cup worked nicely here - couldn't find any at the store and didn't want to wait for mail order!
Two cups would make it easier but one is fine if you place it in the center and are careful to pull the panel straight out.
Why use suction cups when some finger nails will do the job nicely, though a plastic spudger might work too. Start at a top corner. Prize the glass away from the case and leave finger nails in. Move the other hand along the top edge and then with finger spread peel the screen cover away. Be careful not to twist plastic I suppose, but I've had no difficulties.
3M Command Strip hooks in opposite corners is another fabulous option when suction cups are not available!
Suction cups usually available at Home Depot or Lowes, in the flooring section. (They're used to handle large ceramic & stone floor tiles.)
-
-
-
Gently pull the glass panel straight up off the iMac.
In order to avoid unnecessary smudges and what not I covered the LCD itself with some plastic wrap while doing the hard drive upgrade. When I reinstalled it all I needed to do was blow off a few dust particles.
While you are at it, it is worth cleaning out dust within the case to help with cooling - particularly around the fans and vents.
For the screen I used a lens cleaner from my camera bag. These have very fine fibers and won't leave detritus.
Note that the front glass panel is quite light. When reassembling I found it impossible to get the LCD free of dust with the computer lying on its back. I had success with standing the computer up, tilting the LCD down as far as it goes, holding the glass panel upright in front of the computer (about 1 foot away), lightly spraying both the LCD and the back side of the glass panel with compressed air, and then attaching the glass panel (with the computer upright). It took me 5 tries before it was completely clean of dust once the front glass was on.
Tuandomino ini sudah di akui oleh para member member setia di dunia situs poker online Indonesia. Yang pertama situs ini sudah diakui dan mendapatkan sertifikat resmi oleh pusat server situs poker online.
Get out of here with your spam.
-
-
-
Remove the following 12 screws securing the front bezel to the rear case:
-
Eight 13 mm T8 Torx.
-
Four 25 mm T8 Torx.
Note for the less experienced.. the case is plastic and the metal coarse thread screws will easily cut a new thread in the hole if you don't line up the screw in the original thread. Do this a few times and the hole will be stripped and the screw no longer tightens.
TIP:- place the screw in the hole and rotate BACKWARDS/counter clockwise (for RH threads) until you hear/feel it click/drop into the original thread then tighten the screw down. rotate it a couple times to get the feel of things. If there is any significant resistance you probably don't have the original thread.
This trick also works on the fine metal thread screws and can help avoid cross threading them.
HIH
This step is not really explained here with pictures. But you can check this same step in another guide to help you : iMac Intel 20" EMC 2266 Front Bezel Replacement
I think you're missing this step: With the iMac lying on its back screen facing up, grasp the aluminum sides of the bezel and carefully pull it straight up. Then disconnect the microphone cable. Took me a while to figure it out.
I found it helpful to use a few lids from spaghetti sauce jars to hold the different screws. I used a sharpie to mark the inside of the lid w/ location taken from or the step number from directions. Then I placed a small magnet under the lid to hold the screws inside the lid in case I accidentally jostle something on the table. Worked great! You can also use a magnetic knife bar to line up the lids in sequential for the project.
I cut a hardwood block and drew the outline of the the iMac shape with the base as key. I then drew another two lines at 1/2” and 1” all around from the outline. This done I drilled holes for each screw (12 Outer securing the front bezel to the rear case , and 8 Inner screws securing the display panel to the rear case ). That way I don’t lose any or get them mixed up.
I think the title of this chapter could be (in french) désinstallation but not Installation with is the contrary. Idem for the other chapters.
-
-
-
Place your hands at the top corners of the bezel (to the side) and lift the bezel 2-3cm from the body by working from the top. After this you can also disengage the bottom of the bezel (the memory modules will prevent the bottom of the bezel to detach first). When reassembling, start with the bottom of the bezel.
-
To fully detach the bezel: disconnect the microphone cable connector, removing tape as necessary.
-
To keep it attached, leave the microphone cable attached to the logic board, and place the bezel 'above' the chassis, with the microphone cable forming a hinge.
I avoided this step by just flipping the housing over and having it lay flat on the table. The tape on mine was on really tight, and I risking ripping the wires out of the connector if I messed with it (I didn't have some really small scissors which might have helped removing it). I would suggest either securing the body of the iMac and the housing to the table you're working on, or somehow securing the housing to the body, so that it doesn't move around accidentally, since it's only hanging on by a very thin wire at that point.
^^^ This! This tutorial should be amended for this step. Much, much easier and less damage-prone.
(There really oughta be a step addressing the removal of the bezel as well.)
cklarson -
Make sure you do not pull this apart by the wires. Have a firm grasp on the plastic parts. Do not force back together. It only goes back together one way. Also, it is crucial when placing the aluminum bezel back in place that this wire is out of the way. It often gets in the way and is easily damaged.
CAUTION - To disconnect the cable, you'll need to support the bezel while you carefully extract slack microphone cable which is tightly tucked within the iMac. (I didn't have this guide's 'notes on' and missed robgendreau's warning - then inadvertently shifted the bezel and busted my microphone cable in this step.)
Don't forget to pull the microphone cord out before you put the panel back on. Otherwise you will have to go back and remove screws to find that microphone cord
As robgendreau says, avoid this whole step by opening the bezel and laying it upside down above the iMac, still connected by the mic cord, just carefully. Then replace the battery, suck/blow out your dust, and carefully rotate the front bezel back over the iMac from where you removed it. No cord manipulation or damage at all!
When reassembling the bezel, you should actually gently pull the microphone connector (and cables) through the ~1 inch long slot in the bezel next to the iSight camera, when lowering the top part of the bezel onto the chassis . Then further lower the bezel onto the chassis of the iMac, while making sure there’s no room / play between the bottom of the bezel and the bottom of the body (where the memory slots reside). . This way you’ll avoid damaging the microphone cable. Finally gently push the microphone wires and connector through that sale long slot in the bezel to conceal them inside the bezel.
Tuandomino merupakan Situs Poker Online dan qiu qiu online yang terbaik di indonesia dengan halaman mobile friendly , serta sangat ringan untuk dapat kalian akses melalui pc atau pun gadget.
How about no?
The tutorial video is great, but they were fortunate to have such a long microphone cable to work with. The iMac I just upgraded had a cable on the system side (not the one on the bezel) that is barely long enough to provide enough play to be able to grasp the connectors when re-attaching them.
Disconnecting the microphone cable is done automatically, when you breathe on it. Or look at it. Or reattach the bezel and get it screwed down.
However, it should be noted that this connector is a LUXURY compared to the first-gen ("polycarbonate") Intel iMacs. Those come configured with the auto-slice microphone cable: the cable simply shears off during disassembly of the case.
-
-
-
be sure to tuck the microphone cable and connector into the void next to the camera board.
-
Gently guide the microphone connector and cables through the ±1in long slot at the right of the iSight camera. Once the bezel is properly assembled, gently push the microphone connector and cable into the bezel through that slot.
-
-
-
Pull the LCD temperature sensor connector straight up out of its socket on the logic board.
-
If necessary, de-route the LCD temperature sensor cable from behind the logic board.
This was the most confusing step, because the video shows MJ just tilting the monitor open, and I had a ribbon cable hooked up to it. Finally figured out that the ribbon cable was connected to the LCD temp sensor cable, and it was neatly tucked under the adjacent fan. Had to pull it pretty hard to get it out from under the fan, and then could tilt the LCD. Instructions are not completely clear about this, only that you may have to reroute the cable around the motherboard.
I agree, there is no sign of how to remove the bezel (it took me several minutes to understand it was even the bezel that came off here) in these steps (in all the guides for this model, in fact). On step 4 says remove the LCD screws, and suddenly step 6 shows innards and fans etc - !! - What about showing the bezel being removed here - super confusing and not up to usual ifixit high standards.
If you rush through the reassembly, it's very easy to miss reconnecting the LCD Temp Display cable. I just did it and one of the fans came on full-speed and stayed there through a new macOS install. Did a Google search and found mention of this symptom. At first I was thinking I switched one or more of the inverter cables but this guide shows that this is not a problem. Once I reviewed this step, the problem was obvious as was the solution. Thanks again, iFixit, for saving my nappy behind.
I can speak from experience, this cable’s a pain. It came out of where I tucked it and snuck behind one of the bottom screws, which pierced it during reassembly, afterward it would not boot properly. It’ll boot without the cable plugged in, but the fan runs near max. I’m glad it can at least be used while I wait for the replacement cable to ship. What a weird (lazy) design choice from Apple.
In case the iMac hasn’t been opened for years (typical situation), then you may want to first carefully and prudently remove the piled up dust with a vacuum cleaner and a soft brush. Definitely not with a can of compressed air, as then you’ll spill the debris everywhere (and on the display). Otherwise you won’t be able to get hold of the right cable, connector or screw. In addition, it will help increase the air flow hence reduce heat (and allow the fans to operate at a lower speed).
hi could some one help me with this cable replacing as it has been damaged i mean i would like to know if i could repair the wire or simply replace it and also what type of wire i would need and how could i find one please i m new thanks
kazi
-
-
-
Remove the two 5.3 mm T6 Torx screws securing the data display cable to the logic board.
Removing these screws was the most difficult part of the whole job. They were tight and felt as if the heads were about to chew up. I had to press really hard and jerk the screwdriver counter clockwise to loosen them. Despite others' warnings, I managed to drop a screw when reinserting.
The only tool I needed to buy was the T6 Star Bit - the first auto store I went to had it. These screws are tiny so you have to be careful not to drop them!
Yes, this step is very difficult. I finally used a magnet to magnetize the torx driver, and that helped immensely...however, that was AFTER I lost the right one inside the computer. You really only need one screw to reattach the monitor connector, however.
Argh! I dropped my right screw into the bowels of the iMac. I can't find it anywhere and am loath to leave it rattling around as well as to tear down the machine any further.
Well, I followed the instructions for right-speaker removal and optical drive fan removal and still couldn't find the right screw. I couldn't hear it rattle either so figured it was wedged somewhere. Using an inspection mirror and flashlight, I finally found it. It had fallen down and wedged between the PCB and the plastic housing (below the ports). I was able to slide it toward the right until it came to the void left by the right speaker where it fell out into my hand.
It's true, these were super tight. I only had a T5 which worked on the first screw, but the second wouldn't budge. Ended up filing the tip off the T5 bit - presto! - instant T6.
Note that just below where you are working is the PRAM battery. If you have never replaced this, now is a good time so you won't have to open the machine up again in the near future. The battery is a CR2032.
Taking all the warnings into account about losing these tiny screws, during removal and replacement I held onto the screws tightly with a very fine needle nose tweezer. Fortunately I managed not to lose them either out or in. I highly recommend using a small gripper during this step.
These screws are Torx 7 - at least that was what
I used on them and got a prefect tight fit ... .
torx 6 didn't do it, needed torx 7
If you do manage to lose one of these screws, will the cable still be held in properly if you reinstall it with only one?
-
-
-
Remove the eight 12 mm T8 Torx screws securing the display panel to the rear case.
-
Lift the display panel from its left edge and rotate it toward the right edge of the iMac.
I was able to disconnect the two connectors to the front easily. With those off, I just rotated the LCD out of the way to expose the hard drive. Again, make sure it's stabilized if you do this so that when you yank on something else you don't send it flying.
I did a HD replacement on my 24 inch iMac. It's basically the same, but it does not have disconnectable invertercables. Instead, there's just one cable that's can't be disconnected. It sits too tight to rotate the display to the degree that you can lean it against something, so the only way to get the job done was to call in an extra set of hands to hold the display while I took out the hard drive.
On the 2134 model, I found that the LCD must be lifted from the RIGHT (not the left as per the 2133 guide) - the connector wires are covered in nylon housing and it's way easier just having someone hold the LCD vertical whilst you replace the HDD, unless you have small fingers and feel like disconnecting completely ...
-
-
-
-
With the display panel still lifted, disconnect the four inverter cables.
-
If you are replacing a hard drive and have an extra set of hands, it is possible to reach in and remove the drive without disconnecting anything but the LCD temp and display connector in the previous step with the LCD in its propped position.
This was the only step different for my 2134 - it is just one cable that connects to the monitor - disconnect the monitor end rather than the motherboard side.
For 24" iMacs, a single power cable is attached on the left side of the screen. To remove the cable, lift the screen from the right side and rotate it to the left. Remove the black plastic protector on the back of the screen and disconnect the cable.
So does it matter which ones are connected to which?
That is, at each end there are two connectors (one pink/black the other light blue/dark blue on the "male" side). The "female side appear identical. Does it matter if the pink/black "male" one is connected to the wrong "female" one?
Mark, did you ever get an answer about the connectors?
Mike -
Agreed this is an unspecified issue and i'm surprised it's not covered? Did everyone else just guess?
Yes, mark each female end in a way that distinguishes itself from the other. I put “P” on the harnesses with the pink wires and “B” on the harnesses with the blue wires.
steven -
So let’s say hypothetically I didn’t label them as I failed to notice that they were identical before disconnection. What should I do to resolve this issue?
Managed to avoid this step just lifting the lcd panel and holding it with my... head ;)
Yes, I agree. If you just prop the panel up on the left (carefully!) with your head, or as I used a box, or get a friend to hold it up, this step can be bypassed. It is a tight squeeze inside to work with getting the HD in and out but its totally do-able. If using an SSD, which of course you should, you can just tape it down inside, as they weigh almost nothing.
I'm trying to find some information on replacing the power supply temperature sensor cable. Mine broke during removal of a bad power supply.
Re: Scorps comment above - I got the “beeping” too. Does anyone know how to resolve it, i.e. identify which goes with which? Other than trying every combination?
My screen is just Grey? anyone else have this happen?
I tagged the inverter cables with different color sharpies so as to get them connected back the way they were.
Step 9…. before I took those tiny screws out for the data display cable on the logic board, I put the tip of the torx tool on a magnet (magnets on the front cover worked fine) for a few minutes. this magnetizes the screws so you are less likely to drop them when you go to put them back in.
I replaced the internal hard drive. worked fine. putting everything back together, the CD drive wont insert or eject discs when I tighten the screws on the right side that holds the display in place, or when I put the cover back on. CDs work fine if I leave the screws loose and/or leave the cover off. cant figure out why, i never touched the CD drive at all…
anyone else have this issue after opening the unit up, and how did u fix it?
This happened to me and I found that a cable that had been wrapped around the side of the DVD drive had slid over top of it while I had it open. When I closed it all up, the pressure of the cable against the surface of the DVD drive was enough to impact it. I reopened the machine and pushed the cable back around the side of the DVD drive and it worked fine.
I went with the option of not detaching the screen. I have horror stories around inverters, mostly on notebooks, but still, don’t approach/touch if you don’t have to.
Ask your wife/somebody to hold the screen while you go through the steps below, without detaching the cables in step 11. It is a couple minute to step 18 and having the drive out.
-
-
-
If necessary, remove the pieces of tape securing the hard drive/optical drive thermal sensor cables to your iMac.
-
-
-
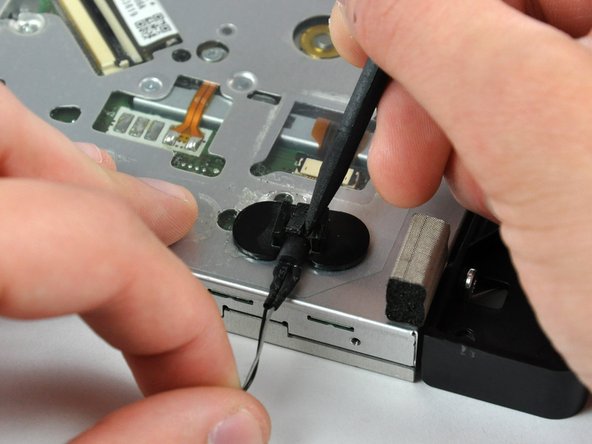
If necessary, remove the piece of foam tape covering the optical drive thermal sensor.
-
To remove the optical drive thermal sensor, use the tip of a spudger to lift the center finger of the thermal sensor bracket while applying slight tension to the thermal sensor cable.
-
-
-
Slightly rotate the optical drive bracket away from the optical drive.
-
Pull the optical drive bracket away from the open end of the optical drive, minding any tabs that may get caught.
If installing an optical drive that is not identical to the OEM AD-5630A model, two plastic alignment nubs must be removed from the black plastic optical drive bracket. If these nubs are not removed they will interfere with the insert and eject mechanism. If installing the AD-5630A optical drive, these nubs do not need to be removed.
-
-
-
Remove the three 3.0 mm Phillips screws from the optical bay enclosure.
Hello, is the sata & power cabla from the mac can directly feet inside the SSD?
plug in the back of the ssd
I'm trying to find out as well. I read elsewhere you need something like this without the bracket: http://www.amazon.com/gp/product/B0056OB...
However I have NOT confirmed this.
If I understand you correctly; the enclosure allows you to use the existing iMac optical cable. Also the enclosure allows for a safe fitting of the optical drive. In my newer machine I had to double side tape the SSD to the back of the iMac and buy a special cable. Note: this was not an optical drive replacement scenario or I would have done exactly as this tutorial suggests.
I bought another caddy, not the one from the description. i had to extract the plastic adaptor from the optical drive and put in on the new caddy 12,7mm
-
-
-
Starting from the left edge, gently pull open the optical bay enclosure.
-
Continue to pull open the two halves of the enclosure until they separate.
This is the 12.7mm caddy.. but, the caddy 9.5 mm fit fine as well? or it doesn't fit on imac mid 2010
My caddy (ordered 5/2019) had two additional screws that needed to be removed from the sides for it to open.
-
-
-
Lift the black plastic faceplate out of the optical bay enclosure.
-
Reassemble the optical bay enclosure without the faceplate, reusing the original three 3.0 mm Phillips screws to keep it intact.
Just curious, why is it necessary to remove this black plastic faceplate from the enclosure? It doesn't appear to serve any function in or out of the enclosure.
Maybe because it would interfere with the bracket you have to put back on in step 21?
So I'm confused about the Optical Drive Bracket, the one that originally held the DVD-CD drive. I had an awful time remounting the kit into that bracket as the screws didn't line up correctly. I finally got everything to fit, less one of the four holding screws. Did anyone else experience this problem? I would have expected a much better alignment for this assembly considering the quality of the iFixIt site.
For the record, the upgrade went fine with a SanDisk Extreme II 480GB SSD, but that one step was next to impossible, and not covered in any detail by the instructions.
Yep, I had exactly the same problem. The alignment was way off.
olafgoy -
My kit also did not line up correctly. I had to put all four screws in at an angle cross-threaded to mount the unit.
Kevo -
Same here. managed to get two screws in at a decent angle on one side and couldn't get the others in. Felt solid enough once I'd screwed the original ODD casing back onto the iMac.
I had the same alignment problem, too. I ended up removing the rubber grommets from the plastic enclosure, widening the holes with a small file, then replacing the grommets. All four screws went in, but not in perfect alignment. Should be ok, though.
I bought a different enclosure than the one recommended ($18 instead of $39) and it came with new screws because the old screws were too big to fit in the holes for the new enclosure.
Hi. Which enclosure did you buy? link please.
Alex -
Where did you get the alternative enclosure from?
I completed this guide last night on my iMac and it all worked great until I got to step 26 and none of the holes on the 12.7 mm PATA Optical Bay SATA Hard Drive Enclosure lined up with the black plastic faceplate. Just like what is being commented on by previous fixers, I could only get 2 screws on one side of the enclosure in, but they were crooked and unable to screw in all the way. It was crude, but it worked.
The rest of this guide works flawlessly. This is a great site!
-
-
-
Remove the plastic positioner from the optical bay hard drive enclosure by pressing in on one of the clips on either side and lifting it up and out of the enclosure.
What’s the switch for on the inside of the caddy? What position should it be in? Mine came switched to the right (towards SATA connector that disk inserts into).
-
-
-
Make sure that the hard drive connectors are facing down before placing it into the enclosure.
-
Gently place the hard drive into the enclosure's hard drive slot.
-
While firmly holding the enclosure in place with one hand, use your other hand to press the hard drive into the enclosure connectors.
-
-
-
Once the hard drive is snug, reinsert the plastic positioner while holding the hard drive against the bottom of the enclosure.
-
Reconnect any cables you have removed from the original optical drive onto the optical bay enclosure.
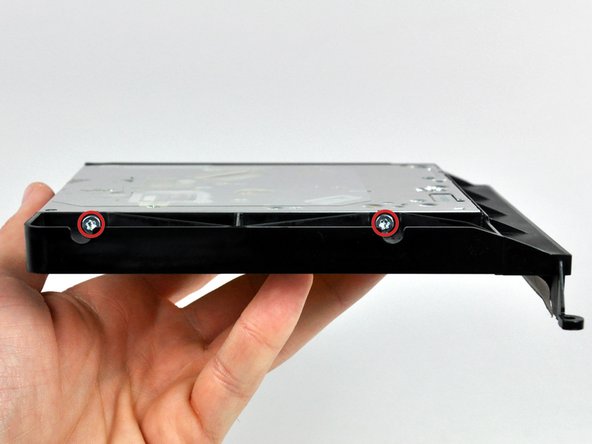
Why no mention of attaching the new hard drive to the Optical Drive Enclosure using the enclosed phillips screws?
Once you have securely inserted the new hard drive into the Optical Drive Enclosure and replaced the plastic positioner you should attach the drive to the enclosure using two of the provided phillips screws. Two holes on the underside of the enclosure should align with two attachment holes on the underside of the drive.
I suspect that the plastic positioner will secure the drive well enough (for this style of adapter). As I mentioned in earlier comment, this should mean you can replace / upgrade the SATA drive later without needing to remove the adapter, skipping many steps.
Do you need a sata cable to connect the new drive to the board or does it connect via the optical drive cable that we disconnected earlier?
It does connect to the optical drive cable but if you don't use the optical bay enclosure you'll need a 13 pins to 22 pins sata adaptor (and some tape!)
The sata cable for the optical drive has 6 + 7 pins while ssd and hhd have 15 + 7 pins
Can someone please explain why you need to remove the black plastic faceplate from the optical bay enclosure. It is designed to receive the standard SSD. What is gained from removing a part of it?
Thank you! This guy has made upgrading the mid 2010 iMac I inherited from my mom MUCH easier and saved me a lot of time, trial, and error.
I'm a little confused. Do I need the enclosure from ifixit or am I removing the optical drive and installing an ssd in the preexisting op drive enclosure? If using the already existing enclosure what type of ssd do I need as for Sata connectors?
-


To reassemble your device, follow these instructions in reverse order.
To reassemble your device, follow these instructions in reverse order.
İptal et: Bu kılavuzu tamamlamadım.
63 farklı kişi bu kılavuzu tamamladı.


10 Yorum
my iMac2008early dvdrom is PATA!!!!!!
plz fix you page!!!
I'd sound a caution before replacing the optical drive with anything else if it's on PATA. It'll be slow... Better using an external enclosure and FW800.
I have an iMac early 2008. Do you recommended to replace the optical super drive super with an SSD?
Cool. It worked nicely. I replaced the superdrive with an SSD. As expected, due to the slow PATA connection, speed increase is not as dramatic as one would expect with a SATA.
I've removed a faulty DVD drive, with temp sensor cable, pending replacement with an HDD/SDD... now the fan is running at full speed. I guess because it can't detect the drive. Should I disconnect the fan? Great guide by the way... !
ciao, come hai risolto?
I discovered the hard way that the optical drive was IDE. So now require a different caddy to proceed any further. Fortunately noticed this as I disconnected the optical drive. So back together again until the new caddy arrives…
There seems to be some confusion about whether this is worth doing. I have a mid-2007 iMac7,1 (20” 2.0) and I already swapped in a 1TB SSHD into the main drive, but still quite slow so was thinking of adding a small (120GB) SSD as the boot drive in the DVD bay. But this is the second comment about the PATA interface being slow. Is this the same as IDE? Can’t imagine the mid-2007 has a faster DVD than the early 2008? Help appreciated. Andy
Hi there,
Just wanted to state a few things for anyone who’s about to follow this guide. The optical drive for the 2133 iMac is a PATA (IDE) optical drive which has two disadvantages:
1. The HDD caddy you may have order may be SATA instead of PATA, meaning it has a different connector and won’t fit. Ordering a PATA drive shouldn’t be expensive, I ordered mine from China and it worked great.
2. Any SSD you put in the optical drive bay will be massively slowed down by the limitation of IDE/PATA speeds. Speed-wise, it’s much better to put a 2.5” regular hard drive in the optical drive and put an SSD in a 2.5” to 3.5” bracket in the original hard drive’s spot. The original HDD is connected through a SATA cable, and therefore has a faster connection to the motherboard.
isn't it actually pc2-5300s ?
grze - Yanıt
It is for the 2133, the 2210 uses 6400
maccentric - Yanıt
There are comments elsewhere in this step by step re. the bezel removal. That step does NOT show how to remove it. Well, take the 5:39 secs to watch the above video. It clearly shows how the aluminum framed bezel easily comes off once you've seen it done. To whoever decided to preface these instructions with that video, thank you.
ECJohansen - Yanıt