Ana içeriğe geç

Jura Impressa S Model Thermoblock Replacement

Neye ihtiyacın var

  1. Jura Impressa S Model Thermoblock Replacement, How to open a Jura Impressa S model cover: adım 1, 2 resimden 1. Jura Impressa S Model Thermoblock Replacement, How to open a Jura Impressa S model cover: adım 1, 2 resimden 2.
    • Always remove the power cord from the wall outlet.

    • Lift out the coffee tray

    • Remove the lid sealing the coffee bean container

    • Remove all of the coffee beans you can possibly remove.

    • Pull the adjuster of the coffee bean grinder straight up

    • Remove the four T15 Torx screws

  2. Jura Impressa S Model Thermoblock Replacement: adım 2, 2 resimden 1. Jura Impressa S Model Thermoblock Replacement: adım 2, 2 resimden 2.
    • Remove the cup heat plate.

    • It can be opened like a book.

    • Below the cup heat plate there are three more T15 Torx screws. Remove them.

  3. Jura Impressa S Model Thermoblock Replacement: adım 3, 1 resimden 1.
    • The top cover is now free. Lift ´er up and set ´er aside.

  4. Jura Impressa S Model Thermoblock Replacement, Jura Impressa S model front cover: adım 4, 2 resimden 1. Jura Impressa S Model Thermoblock Replacement, Jura Impressa S model front cover: adım 4, 2 resimden 2.
    • Remove the knob for the steam valve by simply pulling it off.

    • The front cover is secured with a Torx T15 screw. Remove it.

  5. Jura Impressa S Model Thermoblock Replacement: adım 5, 1 resimden 1.
    • Now the front cover can be opened like a door for a few inches. The hinge is on the left.

  6. Jura Impressa S Model Thermoblock Replacement: adım 6, 1 resimden 1.
    • Various hoses hinder the further opening of the front cover. You need to remove the steam valve keypad from the cover.

    • Use a spudger to lift the two notches at the top of the front cover a bit to release the keypad at the top.

    • Lift the keypad upwards and pull it to the back. The steam pipe will slide out from its connection.

    • All hoses can remain connected.

  7. Jura Impressa S Model Thermoblock Replacement: adım 7, 1 resimden 1.
    • Remove the silicone hose leading from the steam valve to the coffee spout. If it is secured with a cable tie which must be removed first.

    • The front cover is now free and can be opened.

  8. Jura Impressa S Model Thermoblock Replacement, Jura Impressa S model backpanel: adım 8, 3 resimden 1. Jura Impressa S Model Thermoblock Replacement, Jura Impressa S model backpanel: adım 8, 3 resimden 2. Jura Impressa S Model Thermoblock Replacement, Jura Impressa S model backpanel: adım 8, 3 resimden 3.
    Bu adımda kullanılan alet:
    iFixit Precision 4 mm Screwdriver Bit
    $2.99
    Satın Al
    • The backpanel is secured with two proprietary screws with oval head. They seem to be rivets, but in fact are screws. The only purpose is, to keep us out of our own devices. You can remove them using an oval drive bit. (Part of some IFixit tool collections or available at a Jura provider or iFixit). In a pitch try needle nose pliers. Here a DIY guide.

    • Remove the two oval head screws on the lower edge of the backpanel.

    • Lift the panel up.

  9. Jura Impressa S Model Thermoblock Replacement, Right side panel: adım 9, 3 resimden 1. Jura Impressa S Model Thermoblock Replacement, Right side panel: adım 9, 3 resimden 2. Jura Impressa S Model Thermoblock Replacement, Right side panel: adım 9, 3 resimden 3.
    • Remove the two Torx T15 screws at the bottom of the side panel.

    • Remove the Torx T15 screw on the front bottom right.

    • Remove the Torx T15 on the right underside of the front access door. Flip the door open a few inches.

  10. Jura Impressa S Model Thermoblock Replacement: adım 10, 1 resimden 1.
    • A metal plate rests loosely on the top of the side panel and holds the rotation sensor in place. Note the position of the plate. Simply lift the plate upwards.

    • When reassembling, make sure that the sheet metal is put back in exactly the same way.

    • First lift the side panel away a little at the bottom, then lift it out at the top.

  11. Jura Impressa S Model Thermoblock Replacement, Thermoblock: adım 11, 1 resimden 1.
    • The two heaters - the thermoblock for the hot water and the steam boiler - are screwed into a cage. This cage can be pulled out to the rear like a drawer.

    • Depending on the model, various hoses and cables lead into the cage. These must first be disconnected.

    • The cage is locked in place with metal tabs at the bottom left and right.

  12. Jura Impressa S Model Thermoblock Replacement: adım 12, 1 resimden 1.
    • Insert a flat-blade screwdriver into the opening under the right side panel and press it in about 5 mm.

    • This will release the latch on the left side of the cage and you can pull the cage out a few millimeters on the left side.

  13. Jura Impressa S Model Thermoblock Replacement: adım 13, 3 resimden 1. Jura Impressa S Model Thermoblock Replacement: adım 13, 3 resimden 2. Jura Impressa S Model Thermoblock Replacement: adım 13, 3 resimden 3.
    • Picture 1 shows the retaining lug (marked red) into which the metal tongue (Fig. 2) engages.

    • Insert a flathead screwdriver exactly opposite the left notch on the metal cage until the metal tongue detaches from the notch.

    • Pull the cage out about 1 cm.

    • Unfortunately, there are models where the cage cannot be moved. It is still held in place by a large screw at the bottom center. This screw is located on the side of the brew group and is only accessible from the inside.

  14. Jura Impressa S Model Thermoblock Replacement: adım 14, 2 resimden 1. Jura Impressa S Model Thermoblock Replacement: adım 14, 2 resimden 2.
    • Now you need to disconnect all the connections.

    • Disconnect the two green-yellow grounding wires at the flat connector

  15. Jura Impressa S Model Thermoblock Replacement: adım 15, 2 resimden 1. Jura Impressa S Model Thermoblock Replacement: adım 15, 2 resimden 2.
    • Disconnect the two sensor cables. To do this, you must press down a latch on the side of the connector.

  16. Jura Impressa S Model Thermoblock Replacement: adım 16, 1 resimden 1.
    • Two cables lead to a flat connector on the pump. Disconnect both cables.

    • Disconnect the flat plug on the heater.

  17. Jura Impressa S Model Thermoblock Replacement: adım 17, 1 resimden 1.
    • Disconnect the cables from the water boiler.

    • If the two green-red wires are interfering, you can disconnect them at the connector on the motherboard.

    • Depending on the model, other connections may be present.

  18. Jura Impressa S Model Thermoblock Replacement: adım 18, 1 resimden 1.
    • Pull out the clips on the two hoses of the water boiler.

    • Detach the two hoses, this can be a bit difficult.

    • There is an O-ring seal at the end of the hose. It may be stuck in the boiler. Remove it and replace it with a new one during reassembly.

  19. Jura Impressa S Model Thermoblock Replacement: adım 19, 1 resimden 1.
    • Pull out the clamp at the bottom of the black angle piece.

    • Pull out the hose, this may be a little difficult.

    • There is an O-ring seal at the end of the hose. It may be stuck in the contra-angle connector. Remove it and replace it with a new one during reassembly.

    • For reassembly, it is more convenient if you first remove the black right-angle piece. Press a small catch to the side, then you can pull off the black angle piece to the rear. Be sure to use new gaskets.

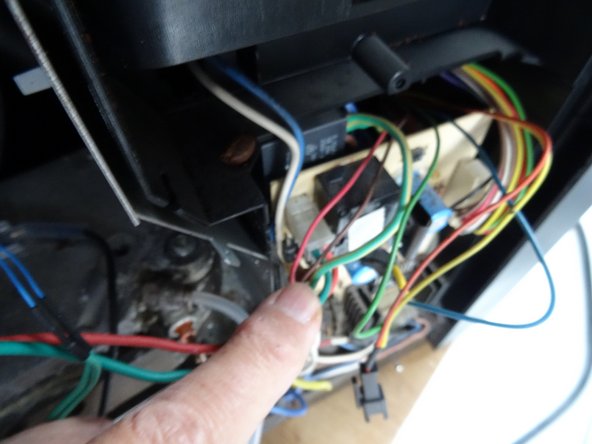
    • Check that all connections to the cage are really loose, depending on the model they may be different.

  20. Jura Impressa S Model Thermoblock Replacement: adım 20, 2 resimden 1. Jura Impressa S Model Thermoblock Replacement: adım 20, 2 resimden 2.
    • The pressure hoses to the boiler are connected with Legris connectors. The hoses can be very tight. If you can't loosen them, you'll have to cut them off right at the Legris connector. This is not a problem if you replace the thermoblock anyway.

    • First press the tube in firmly so that the seal loosens a little. Move the hose and the outer small ring at the end back and forth a little.

    • To get the hose out of the Legris connector, you need to push the small ring at the end firmly in with pliers and pull the hose out at the same time.

    • Thus, the hose is reconnected to the Legris connector:

    • First shorten it about 4 mm so that the connection point seals well.

    • Insert it into the connector and pull it back again briefly, then it should be tight.

  21. Jura Impressa S Model Thermoblock Replacement: adım 21, 1 resimden 1.
    • Carefully pull out the cage with the heaters.

  22. Jura Impressa S Model Thermoblock Replacement: adım 22, 3 resimden 1. Jura Impressa S Model Thermoblock Replacement: adım 22, 3 resimden 2. Jura Impressa S Model Thermoblock Replacement: adım 22, 3 resimden 3.
    • The heaters are screwed tightly to the sides. Unscrew the three screws.

    • Lift out the two heaters. They are still connected to each other.

    • Loosen the Torx T20 screw on the thermal fuse of the thermoblock.

    • Take off the thermal fuse.

    • The two remaining heaters should be separate.

  23. Jura Impressa S Model Thermoblock Replacement: adım 23, 3 resimden 1. Jura Impressa S Model Thermoblock Replacement: adım 23, 3 resimden 2. Jura Impressa S Model Thermoblock Replacement: adım 23, 3 resimden 3.
    • Here is the heavily calcified thermoblock from all sides. It was replaced with a new one.

    • If the screws can be loosened, you can also try if it can be resealed.

Sonuç

Work through the steps in reverse order to reassemble your device.

Bir başkası bu kılavuzu tamamladı.

Bu çevirmenlere özel teşekkürler:

de en

100%

Bu çevirmenler dünyayı onarmamıza yardım ediyor! Katkıda bulunmak ister misiniz?
Çeviriye Başlayın ›

VauWeh

Üyelik tarihi: 10/19/15

202.869 İtibar

246 adet Kılavuz yazıldı

Ekip

Repair is War on Entropy Repair is War on Entropy üyesi

Community

25 Üyeler

1.111 adet Kılavuz yazıldı

0 Yorum

Yorum Ekle

İstatistikleri Görüntüle:

Son 24 Saat: 5

Son 7 gün: 23

Son 30 gün: 85

Her zaman: 1,732