Bu sürüm, hatalı düzenlemeler içerebilir. En son doğrulanmış bellek kopyası dönün.
Neye ihtiyacın var
-
Bu adım çevrilmemiş. Çevrilmesine yardım edin
-
Using a spudger or plastic opening tool, gently pry the bezel from the screen. It is easier to start in the corners and work your way around the bezel.
-
-
Bu adım çevrilmemiş. Çevrilmesine yardım edin
-
Remove the eleven 3.0 mm Phillips screws surrounding the midframe.
-
-
Bu adım çevrilmemiş. Çevrilmesine yardım edin
-
Turn over the midframe to locate the battery.
-
Remove the three Phillips 3.0 mm screws securing the battery to the midframe.
-
-
Bu adım çevrilmemiş. Çevrilmesine yardım edin
-
Gently lift the battery from the bottom, and slide it out of the midframe.
-
-
-
Bu adım çevrilmemiş. Çevrilmesine yardım edin
-
Use a spudger to lift up the white locking cable tensioner and slide the flex cable out.
-
Proceed counterclockwise to the next cable and repeat. Small flex cable on the bottom won't need cable tensioner lifted, just carefully pull out.
-
-
Bu adım çevrilmemiş. Çevrilmesine yardım edin
-
Remove the white flex cable by gently lifting the yellow plastic connector.
-
-
Bu adım çevrilmemiş. Çevrilmesine yardım edin
-
Remove the yellow anti-static tape from the display ribbon cable connector.
-
Use a spudger to lift up and disconnect the cable tensioner.
-
-
Bu adım çevrilmemiş. Çevrilmesine yardım edin
-
Three silver screws with silver washers
-
Two silver screws with no washers
-
One black screw with a golden washer
-
One black screw with a square washer
-
-
Bu adım çevrilmemiş. Çevrilmesine yardım edin
-
Use a pair of tweezers to remove the white strip of tape that covers the LED lights.
-
-
Bu adım çevrilmemiş. Çevrilmesine yardım edin
-
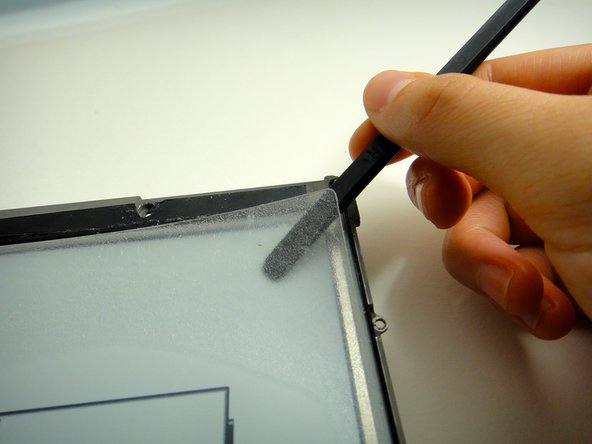
Use a spudger to gently remove the plastic screen from the display.
-
-
Bu adım çevrilmemiş. Çevrilmesine yardım edin
-
Once the outer screen is removed from the Kindle, gently use your fingers to pull off the LED lights.
-
İptal et: Bu kılavuzu tamamlamadım.
5 farklı kişi bu kılavuzu tamamladı.
13 Yorum
Hello to you! Your guide helped me to understand what happened with my kindle. I've got a scratch on the screen but it seems not very deep; the scratch is on a plastic screen, mentioned on the 12-th step. Is it possible to replace this screen with the same one or simple screen protector can do? Thank you.
Can the LEDs simply be removed using this method? I think they are giving me a headache, even on the lowest setting...
Best way is to jailbreak the kindle and use KO reader. In that you can switch off the lights completely. This is a software hack but then you do not need to open the paperweight at all


