Neye ihtiyacın var
-
Bu adım çevrilmemiş. Çevrilmesine yardım edin
-
With camera turned off remove battery and memory cards.
-
-
Bu adım çevrilmemiş. Çevrilmesine yardım edin
-
Remove: 2 screws from right side.
-
2 screws from base.
-
2 screws from left side.
-
-
Bu adım çevrilmemiş. Çevrilmesine yardım edin
-
With battery cover open and camera lens pointing down, gently prise the rear case free.
-
-
Bu adım çevrilmemiş. Çevrilmesine yardım edin
-
Lift LCD clear of metal housing,
-
Then, lift tab on connector.
-
Slide out ribbon cable.
-
-
Bu adım çevrilmemiş. Çevrilmesine yardım edin
-
Remove the 3 screws from LCD metal housing plate
-
And lift off metal housing plate.
-
-
-
Bu adım çevrilmemiş. Çevrilmesine yardım edin
-
Use fingernails or small flathead screw driver to push black tabs on view finder cable connector away from board connector.
-
Slide screwdriver beneath length of flex and gently lift upwards to remove flex from connector.
-
Lift flap on lens flex and gently slide flex out.
-
Use finger nails to gently prise small white connector from LCD (bottom right of board) free.
-
-
Bu adım çevrilmemiş. Çevrilmesine yardım edin
-
Remove bottom flex first.
-
Then use fingernails to gently pull out wire connector from lens.
-
And slide tabs on connectors from lens/shutter and lens screen horizontally away from board and then slide flex cables free.
-
-
Bu adım çevrilmemiş. Çevrilmesine yardım edin
-
Slide "off" button to favorites.
-
Turn camera upside down and lift front housing over tripod screw.
-
Gently prise front housing free of main camera body.
-
Clear plastic seal and thin rubber seal on camera lens may drop out as housing is freed.
-
-
Bu adım çevrilmemiş. Çevrilmesine yardım edin
-
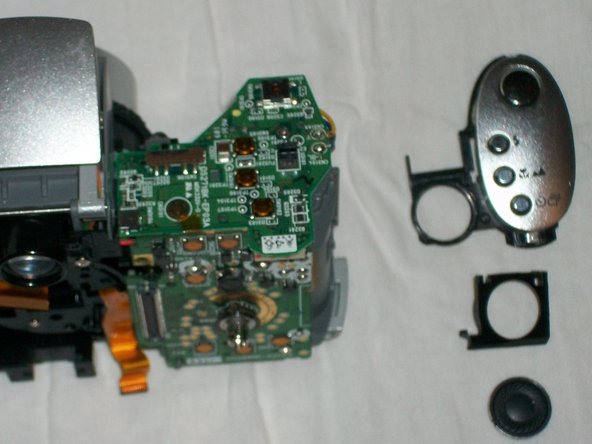
Use fingernail or small flathead screwdriver to lift plastic tab free from uppermost board.
-
Remove button console and speaker/speaker housing from top of camera.
-
-
Bu adım çevrilmemiş. Çevrilmesine yardım edin
-
Remove 2 screws from either side of view finder.
-
Remove view finder
-
-
Bu adım çevrilmemiş. Çevrilmesine yardım edin
-
take care that cover and seal from screen don't fall off
-
-
Bu adım çevrilmemiş. Çevrilmesine yardım edin
-
Turn camera over so that lens is facing you.
-
Remove 3 screws holding barrel of lens to main frame of camera.
-
Pull lens barrel towards you, take care as flexes still attached at rear of lens.
-
-
Bu adım çevrilmemiş. Çevrilmesine yardım edin
-
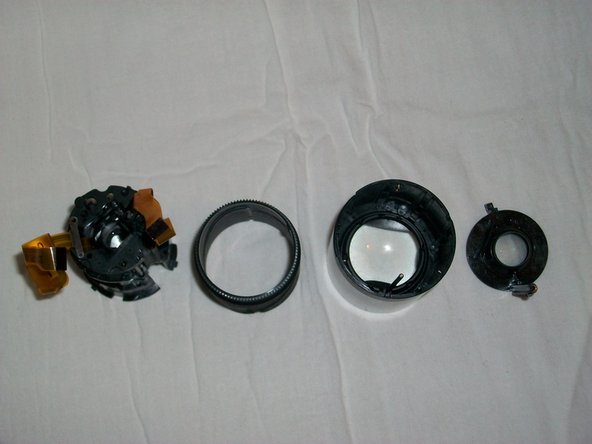
Turn lens over so that rear of lens is facing up.
-
Lift flex on right of rear lens barrel to reveal screw, then remove 3 screws on rear of lens.
-
Remove 1 screw from left side of lens barrel (holding focus flex) optional step.
-
Slide flex through openings on rear lens housing to remove housing.
-
-
Bu adım çevrilmemiş. Çevrilmesine yardım edin
-
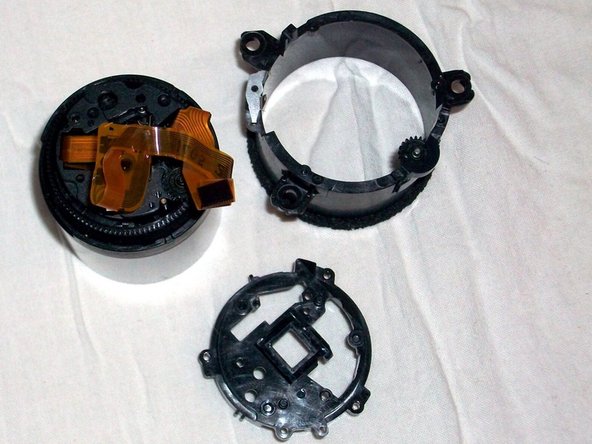
Hold inner black lens barrel and turn anti-clockwise until inner barrel lifts out.
-
Lift inner barrel up and free from lens motor and flex assembly.
-
Holding on to pin on inside of outermost lens barrel, turn lens barrel upside down and grasp inner lens as it falls free.
-


Ekip

2 Yorum
jackmorin, I'm just curious; why did you feel it was necessary, to make that your comment of choice, knowing exactly what pollytintop meant; rather than, thank you for the time you put into posting this very helpful information. I would like to say, thank you pollytintop, this was very helpful & I appreciate this detailed information.
I would like to thank the author for putting this info together. I was able to find a video screen for the back of this cam2017era very reasonably on Ebay, and with the help of these instructions, replace the broken screen that had plagued this camera for years. It was with a gre/24/at sense of satisfaction that I can now use the camera with its full features. Thanks again!
Bill West - 4/24/2017