Ana içeriğe geç

Kurio 7 Back Panel Replacement

Neye ihtiyacın var

  1. Kurio 7 Back Panel Replacement, Back Panel: adım 1, 3 resimden 1. Kurio 7 Back Panel Replacement, Back Panel: adım 1, 3 resimden 2. Kurio 7 Back Panel Replacement, Back Panel: adım 1, 3 resimden 3.
    • Begin by removing the rubber cover from the Kurio 7.

  2. Kurio 7 Back Panel Replacement: adım 2, 2 resimden 1. Kurio 7 Back Panel Replacement: adım 2, 2 resimden 2.
    • Remove the four 30 mm Phillips #00 screws from the outer case.

  3. Kurio 7 Back Panel Replacement: adım 3, 2 resimden 1. Kurio 7 Back Panel Replacement: adım 3, 2 resimden 2.
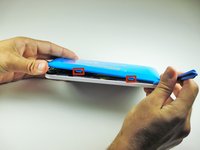
    • Insert the plastic opening tool in the gap between the front cover and the back cover of the device.

    • Slide the plastic opening tool around the edge of the device. Gently pry apart the tabs that hold the front cover and the back cover together.

    • Be careful not to break off the tabs that hold the front cover and the back cover together.

  4. Kurio 7 Back Panel Replacement: adım 4, 2 resimden 1. Kurio 7 Back Panel Replacement: adım 4, 2 resimden 2.
    • Once all of the tabs are removed, the back cover should come off easily.

    • Gently remove the back cover. There are wires inside that may get caught on the cover while removing it. These wires are soldered to their components and are difficult to reattach.

Sonuç

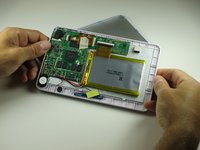
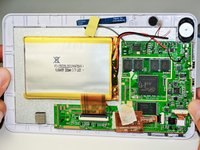
Replace with a new back panel. To reassemble your device, follow these instructions in reverse order.

2 farklı kişi bu kılavuzu tamamladı.

Eric Rice

Üyelik tarihi: 04/14/14

913 İtibar

3 adet Kılavuz yazıldı

Ekip

Cal Poly, Team 12-36, Maness Spring 2014 Cal Poly, Team 12-36, Maness Spring 2014 üyesi

CPSU-MANESS-S14S12G36

4 Üyeler

14 adet Kılavuz yazıldı

0 Yorum

Yorum Ekle

İstatistikleri Görüntüle:

Son 24 Saat: 0

Son 7 gün: 1

Son 30 gün: 5

Her zaman: 2,557