Bu sürüm, hatalı düzenlemeler içerebilir. En son doğrulanmış bellek kopyası dönün.
Neye ihtiyacın var
-
Bu adım çevrilmemiş. Çevrilmesine yardım edin
-
Remove the 2 screw covers next to the rear speaker with a Push Pin.
-
-
Bu adım çevrilmemiş. Çevrilmesine yardım edin
-
Remove the 4 cover screws with a Philips #00 screwdriver.
-
-
Bu adım çevrilmemiş. Çevrilmesine yardım edin
-
Continue sliding the iPod opening tool around the seam of the casing to separate the front and back casings.
-
-
Bu adım çevrilmemiş. Çevrilmesine yardım edin
-
Remove the 2 screws from the back of the phone with a Phillips #00 Screwdriver.
-
-
Bu adım çevrilmemiş. Çevrilmesine yardım edin
-
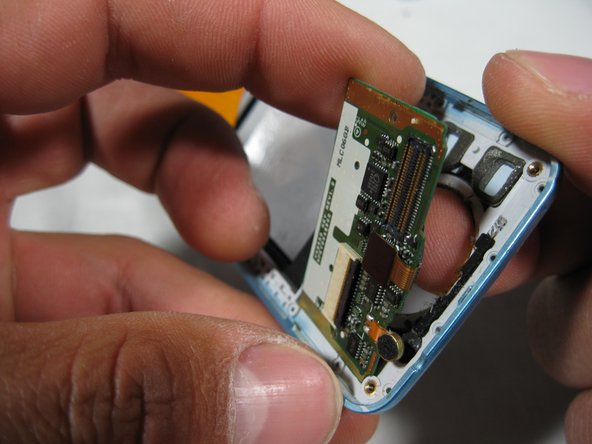
Carefully lift up on the motherboard to see the ribbon cables underneath.
-
Use the spudger to carefully disconnect the ribbon cable from the motherboard.
-
-
-
Bu adım çevrilmemiş. Çevrilmesine yardım edin
-
Remove the motherboard from the front casing by lifting straight up.
-
-
Bu adım çevrilmemiş. Çevrilmesine yardım edin
-
Lay the phone with the screen facedown.
-
The 6 slider screws are visible.
-
-
Bu adım çevrilmemiş. Çevrilmesine yardım edin
-
Peel back but don't remove the blue tape to access the 2 center screws.
-
Remove the 6 slider screws with the Phillips #00 screwdriver.
-
-
Bu adım çevrilmemiş. Çevrilmesine yardım edin
-
Remove the 2 screw covers next to the speaker with a push pin next to the camera.
-
-
Bu adım çevrilmemiş. Çevrilmesine yardım edin
-
Use the ipod opening tool to pry the screen casing and the slider mechanism apart from each other.
-
-
Bu adım çevrilmemiş. Çevrilmesine yardım edin
-
With the spudger, lift up under the connector to unplug it from the circuit board.
-
-
Bu adım çevrilmemiş. Çevrilmesine yardım edin
-
Lift the top edge of the screen using a pin to pry under the corner.
-
-
Bu adım çevrilmemiş. Çevrilmesine yardım edin
-
Grasp the ribbon cable near the connector and carefully slide it out of the white connector.
-
-
Bu adım çevrilmemiş. Çevrilmesine yardım edin
-
Carefully lift the circuit board away from the screen casing using Ipod Opening Tool.
-
Peel the circuit board away from the adhesive backing with your finger.
-
-
Bu adım çevrilmemiş. Çevrilmesine yardım edin
-
Remove the scroll wheel from the casing with your hands.
-


İptal et: Bu kılavuzu tamamlamadım.
Bir başkası bu kılavuzu tamamladı.
Ekip

Cal Poly, Team 34-55, Forte Spring 2010 Cal Poly, Team 34-55, Forte Spring 2010 üyesi
CPSU-FORTE-S10S34G55
5 Üyeler
20 adet Kılavuz yazıldı